
Customisable Basemesh v2.1 Documentation
The Customisable Basemesh System lets you design characters the same way you would in a video game character creator.
The characters comes fully rigged using Blender’s Rigify system, so you can pose, animate, and render immediately.
Using the included addon, you can adjust body proportions, facial features, and overall silhouette, as well as control height and head scale. You can also customise skin, eyes, eyebrows, overlays, and clothing.

If you want fast results, you can use the built-in presets or randomise individual sections of the character. This makes it easy to explore ideas, lock in proportions you like, and refine specific areas.
The addon also supports multiple characters in the same scene, the addon knows which character you’re working on and will change the proportions, features and materials for the models independently.
IMPORTANT
This is for intermediate Blender users, you’ll need to know how to navigate Blender and also know how Blender’s rigging tools work.
This is simply a Blender file that contains the customisable female basemesh and rig. To use the sliders/controls, there is an included addon that you can install.
Summary
There is a lot to cover so below you’ll find links that will bring you to each section
New in Version 2.1
Male Characters
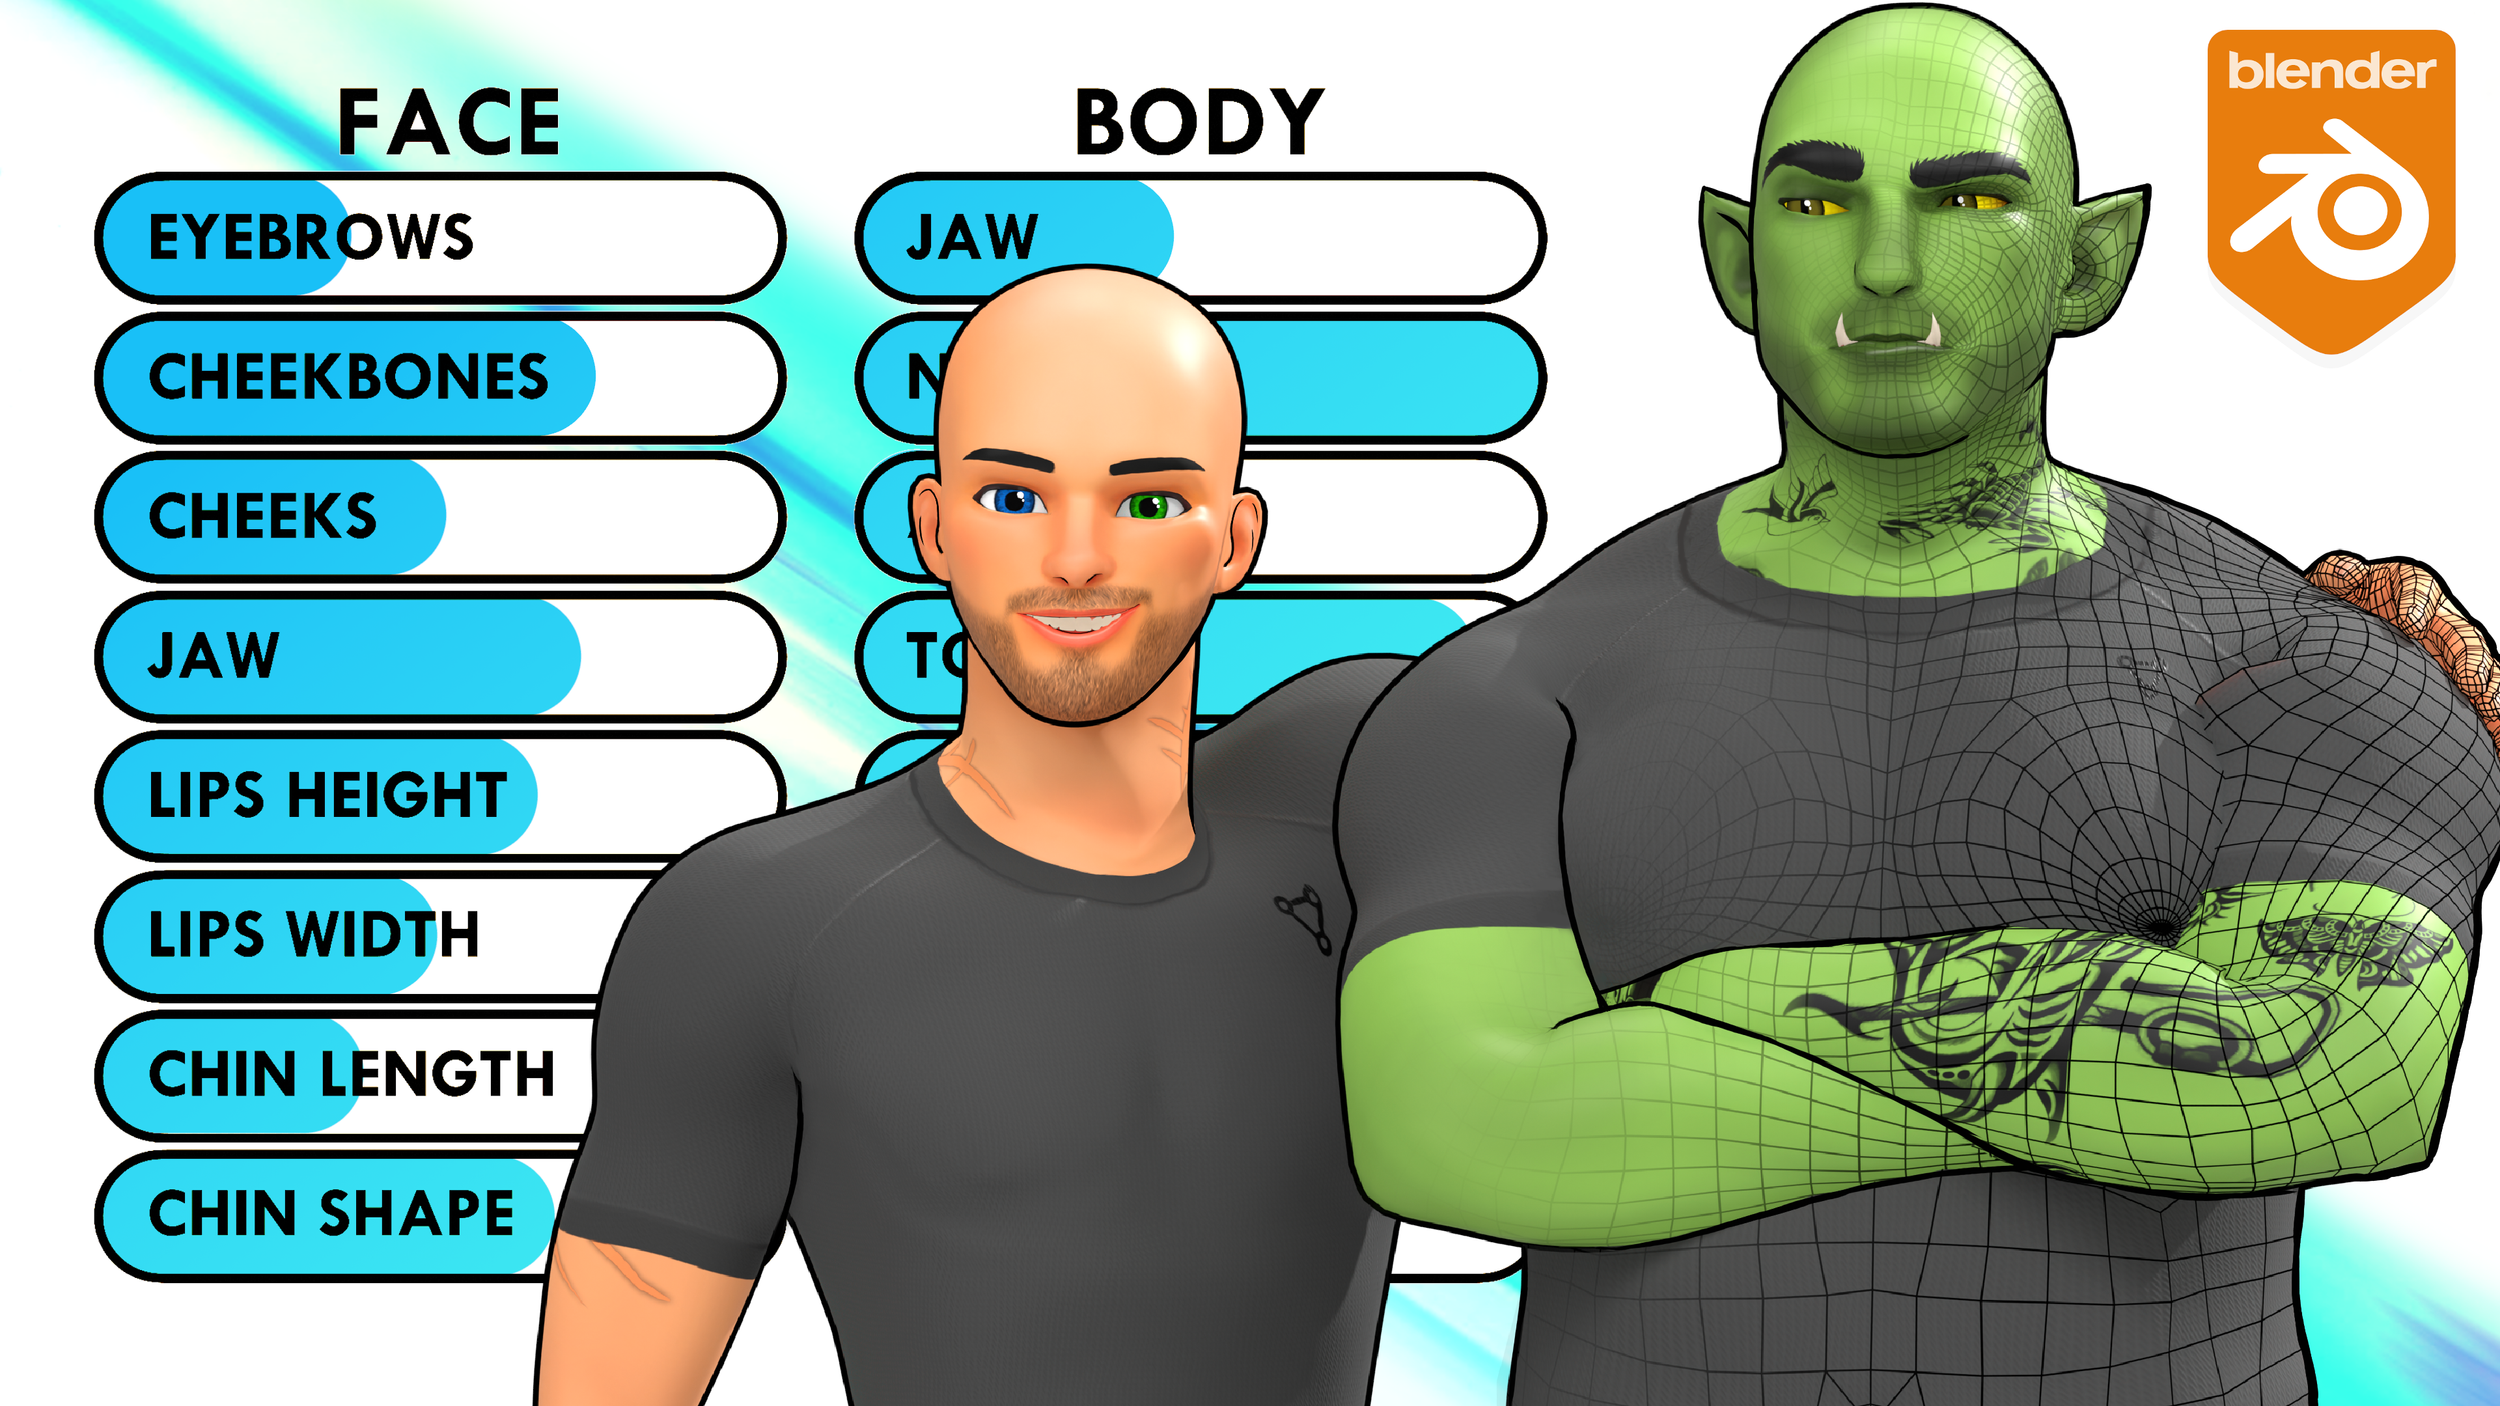
The Customisable Male Basemesh allows you to use the same presets, textures and addon controls to create male characters.
Male + Female Compatibility
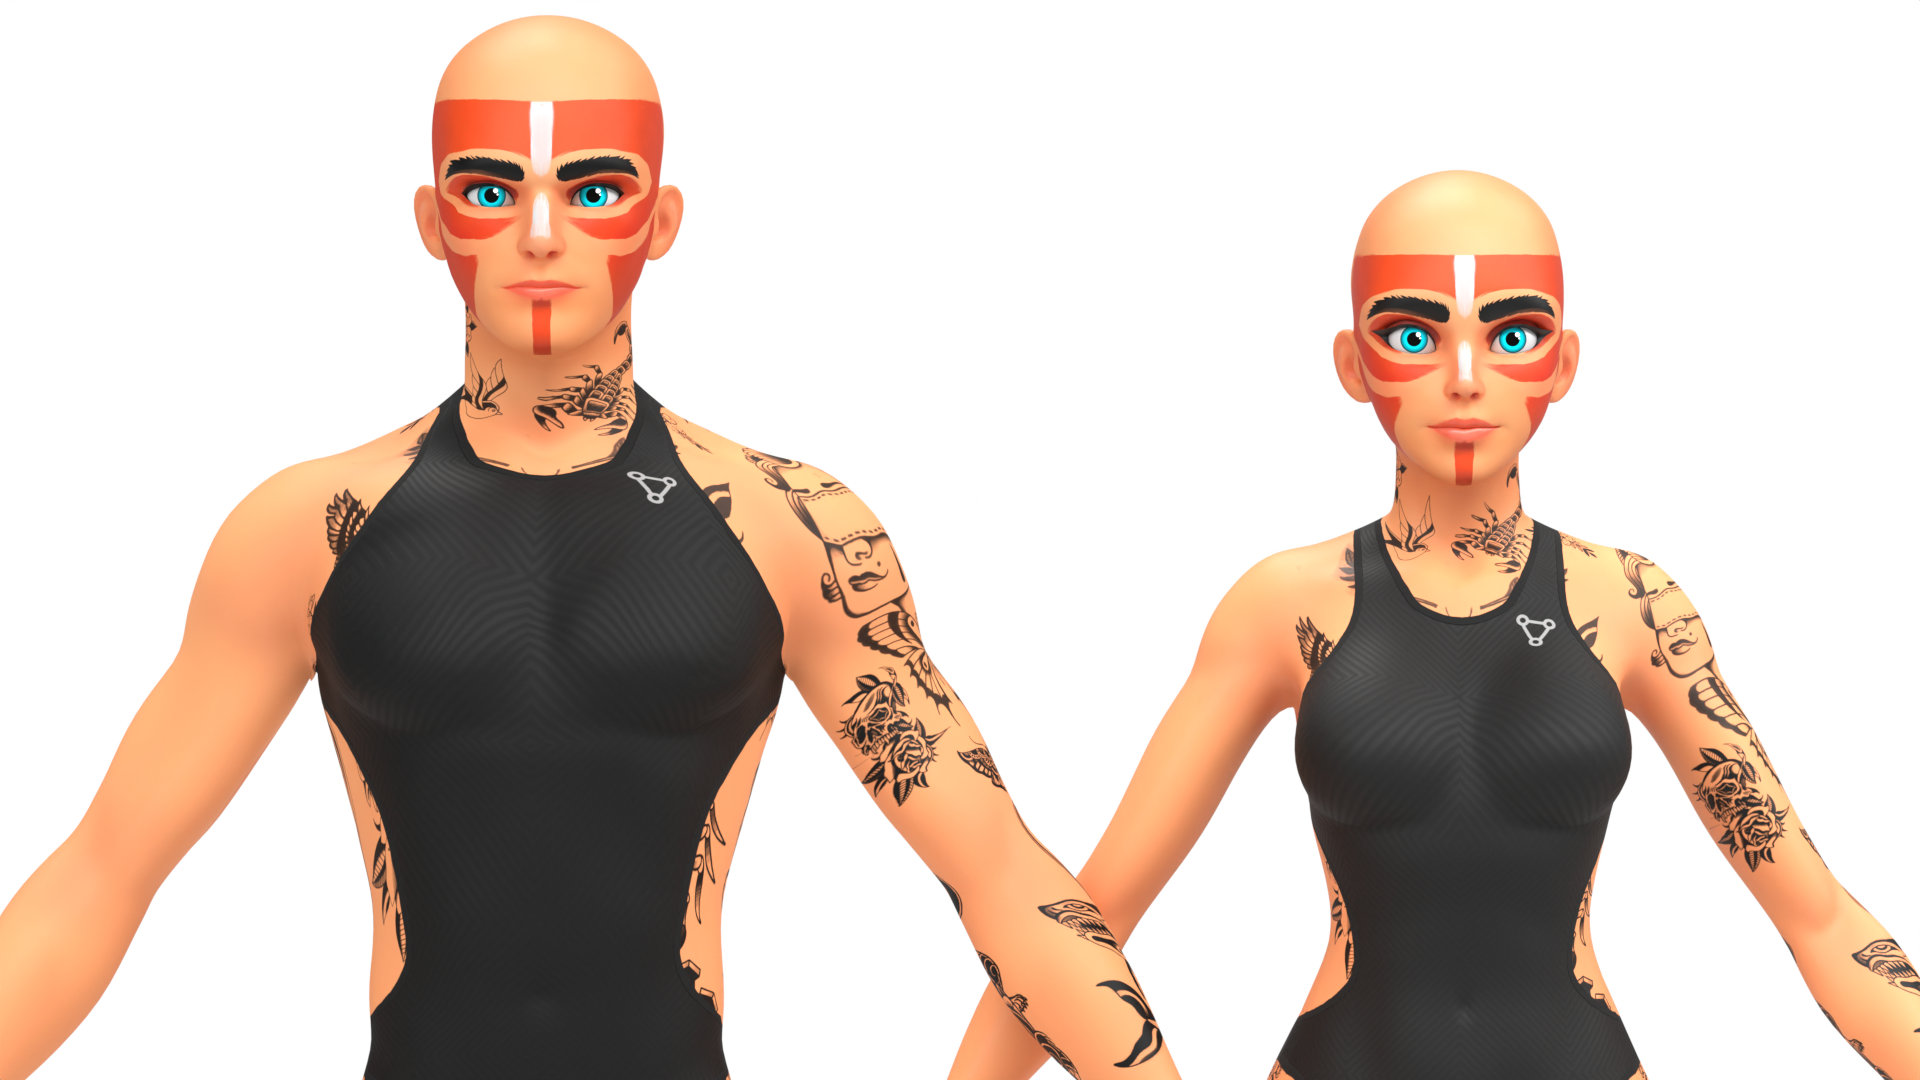
The Male Basemesh is a heavily modified version of the Female Basemesh, so all of the materials, presets and settings will work for BOTH versions.
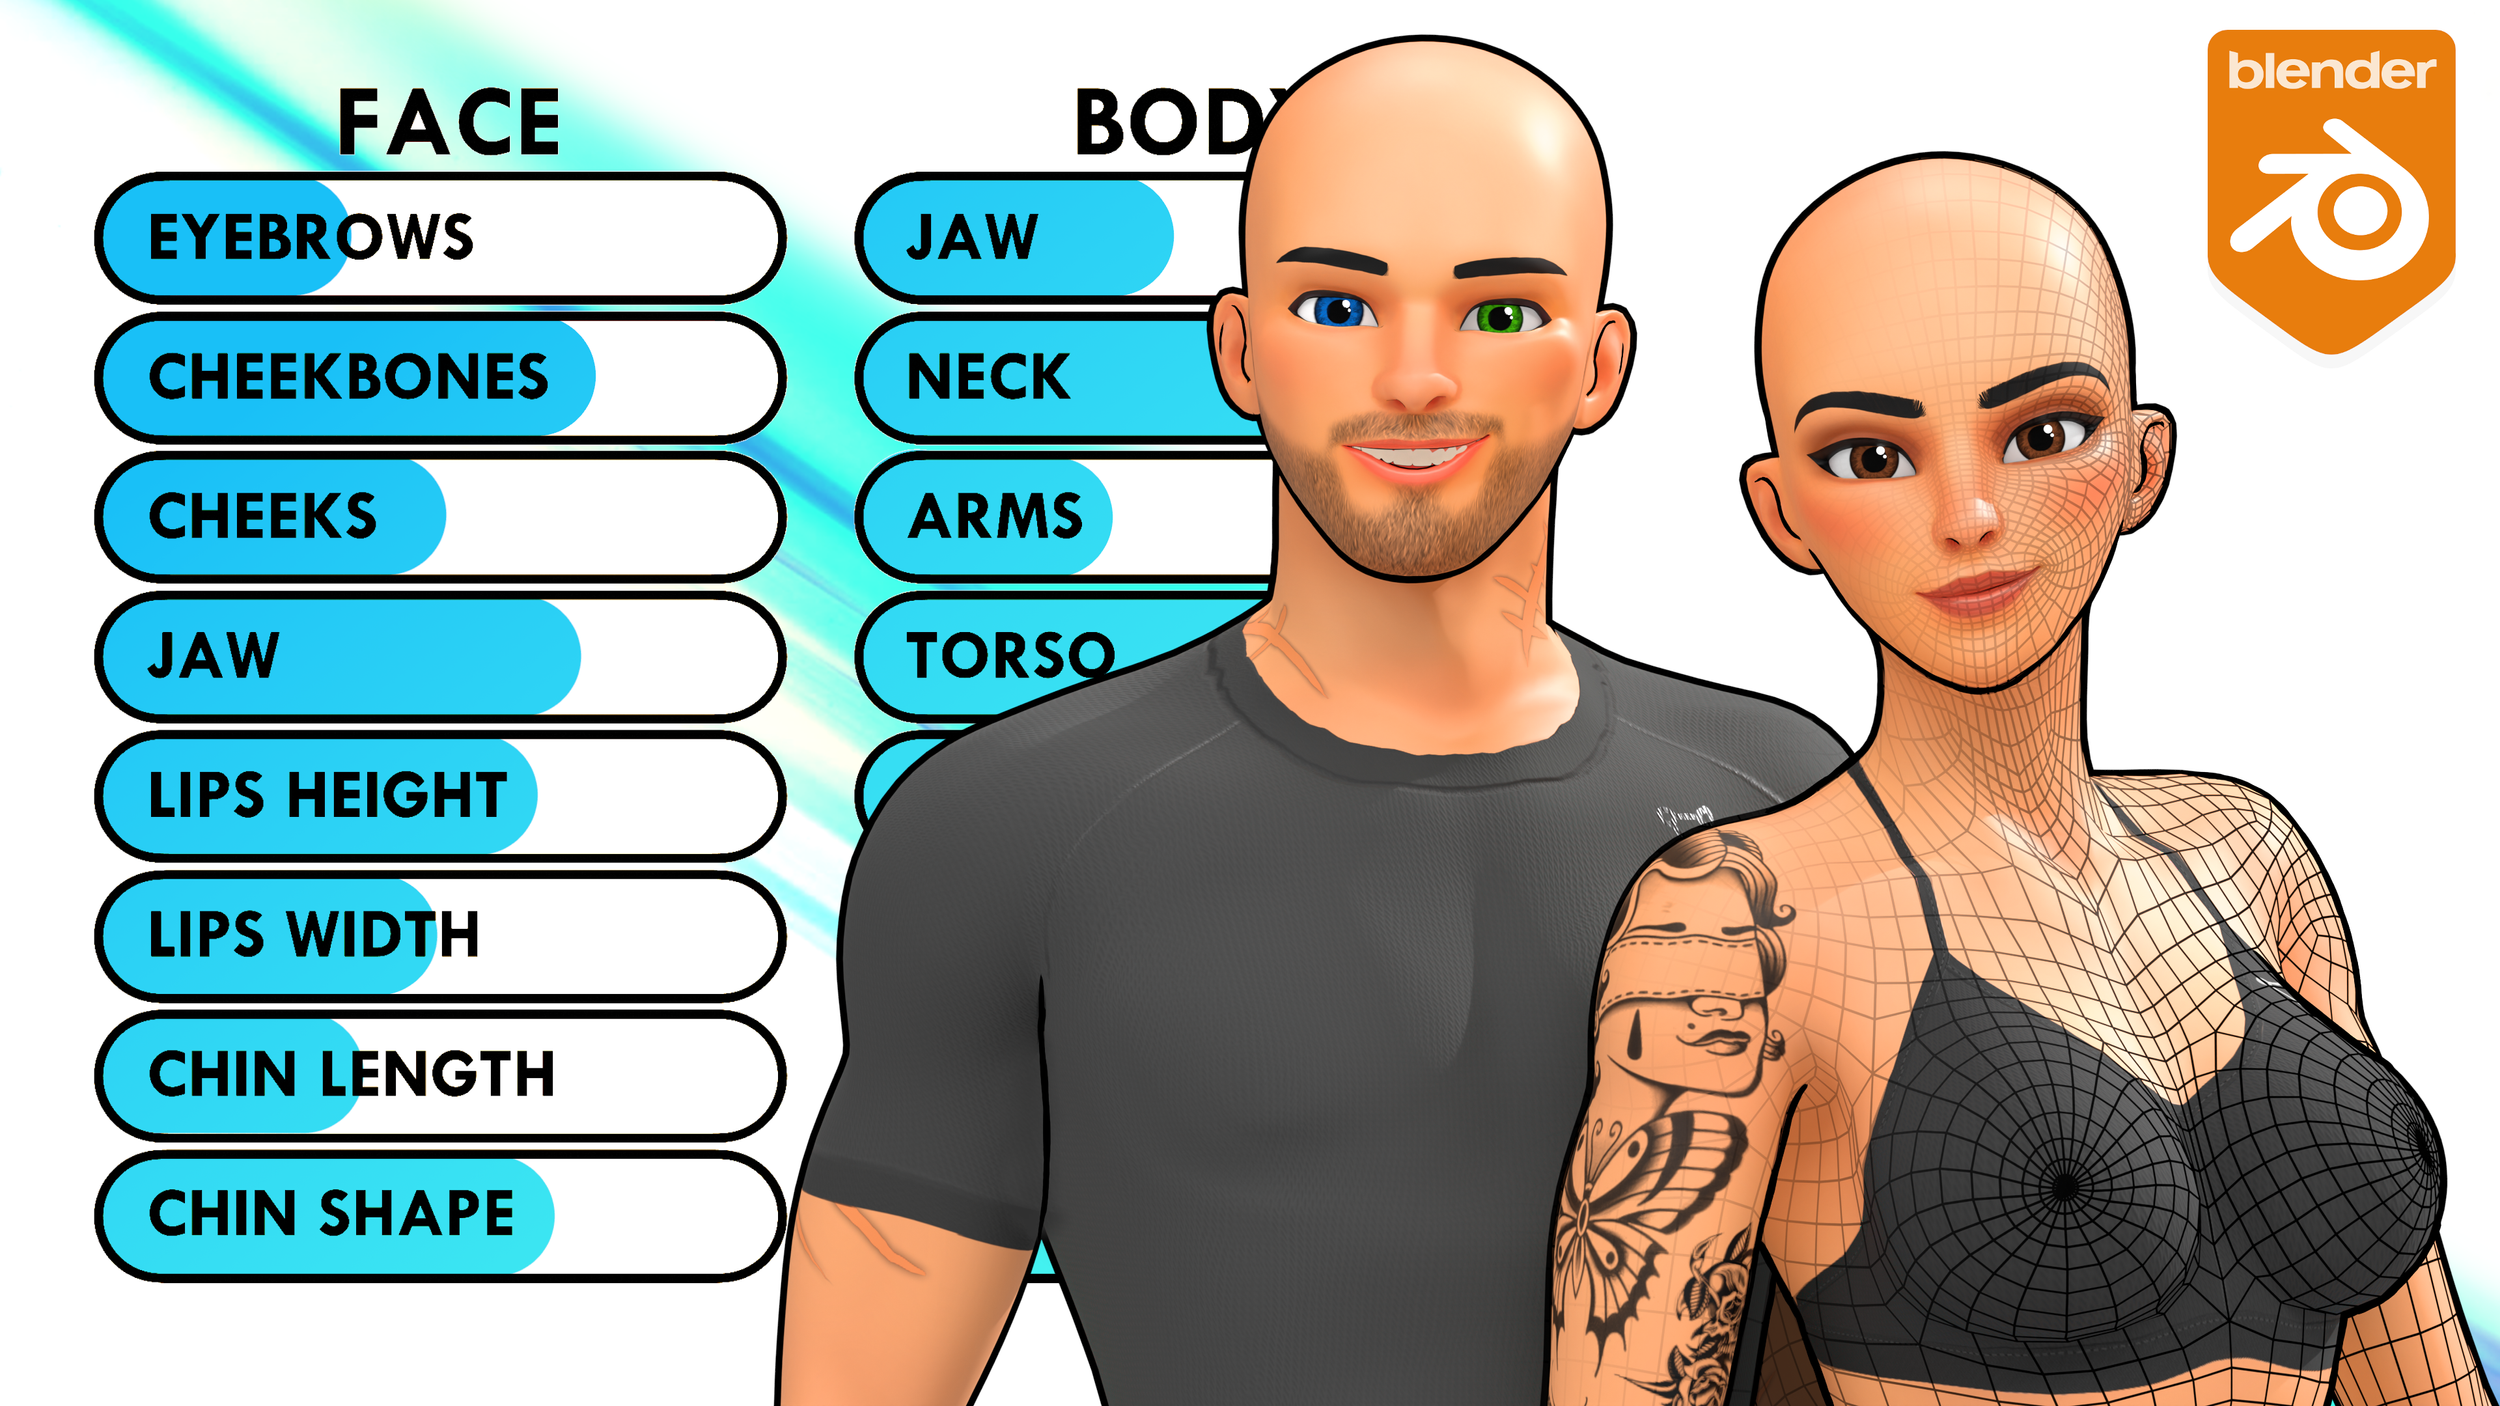
60+ Face Controls
I’ve added 15 new face controls, for a total of over 60, and these will allow you to create an even wider range of characters.
NO UV Unwrapping
The model is already fully UV Unwrapped, so you can use some of the pre-made skin textures or make your own custom ones.
Presets
The Presets system has been rebuilt to allow you to save your own presets. You can also give your presets custom names and images
More customisation options

I’ve added a bunch of new customisation options, so as well as being able to change the proportions, you can also change the character’s height, give the character vampire teeth, fangs or a forked tongue.
New and Improved Addon
v2.1 of the Addon has been improved quite a bit. All of the menus should now be easier to use and they should give you more control over what you want your character to look like
Improved textures

All of the textures have been improved and are higher resolution. The textures have been divided up into a Face texture and Body texture to allow for higher resolution texture maps.
Clothes Textures

There are 7 clothing options to choose from (and nude) which can help when designing different characters because sometimes different clothes can spark an idea.
Custom Eyes

You can customise each aspect of the eyes, you can change the colour of the Sclera, Iris and Pupil separately and enable/disable the different parts to create unique eye designs. You can also change the size of the Iris/Pupil and make the eyes different colours.
Skin Textures

You can now change the colour of the character’s skin very easily. There are 4 main skins, Caucasian, Black and then realistic versions of both. You can also choose Coloured skin to choose whatever colour you would like.
Overlay Textures
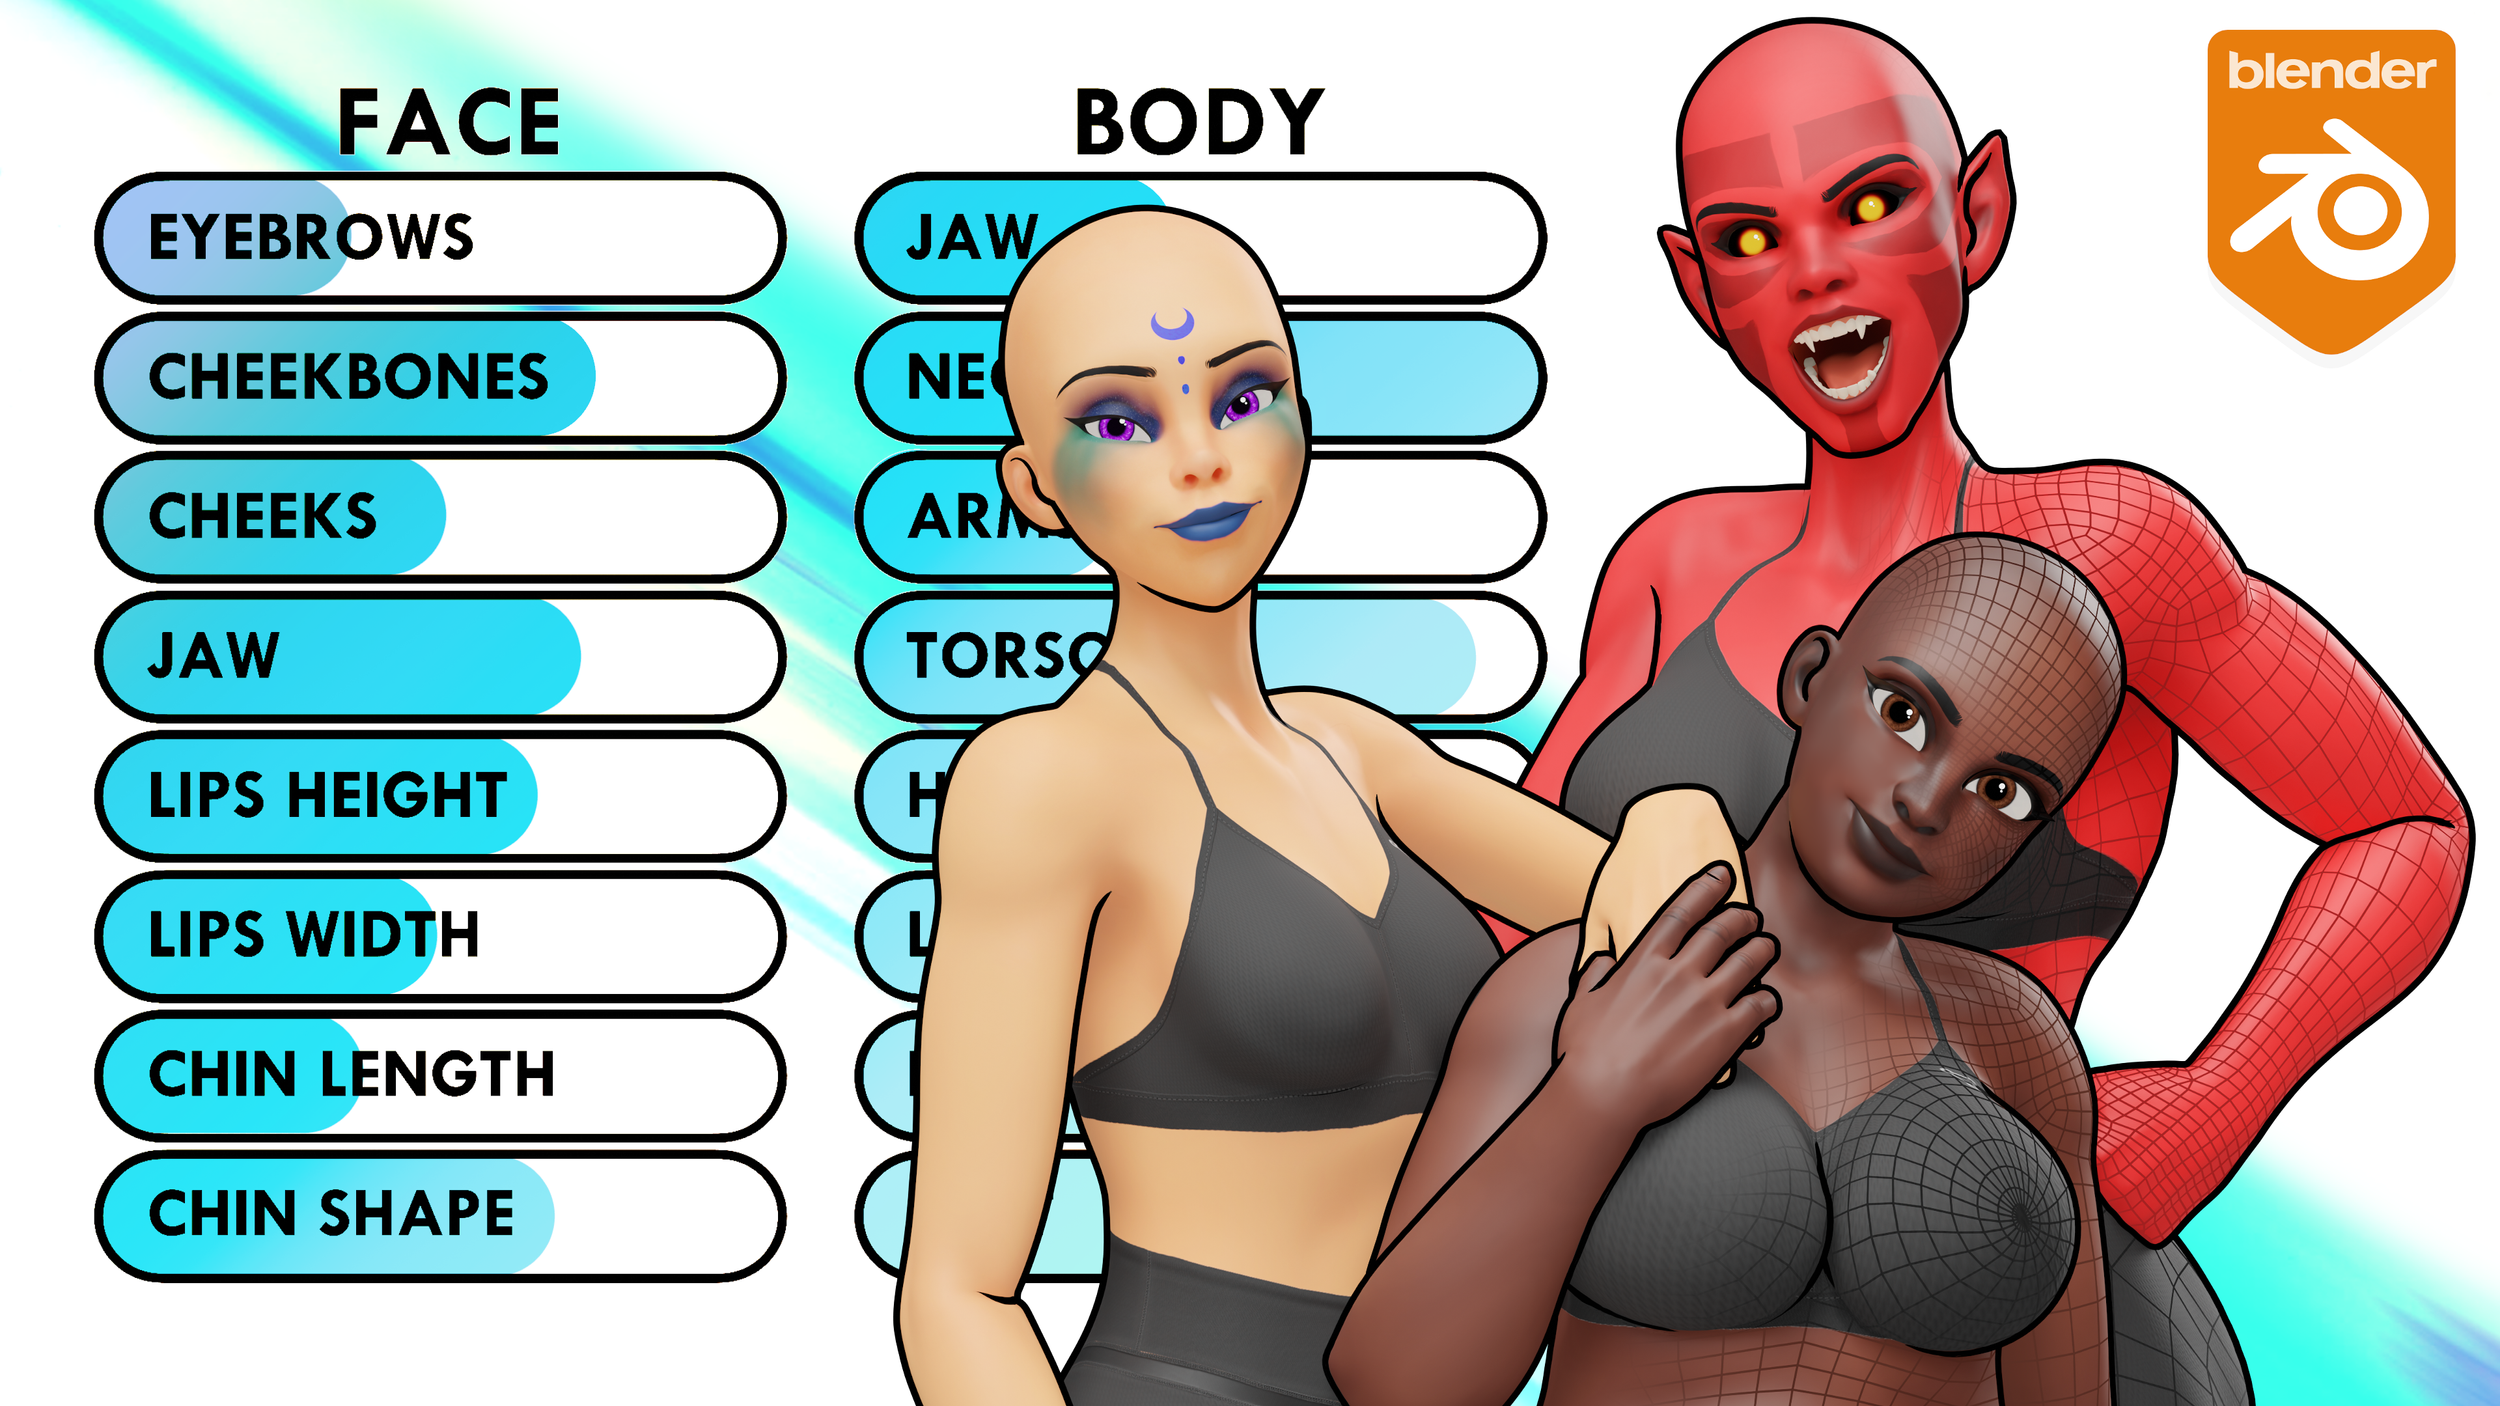
There are also over 25 Overlay options to choose from. These range from simple freckles, to scars, tattoos and Facial Hair
Version Compatibility
V2.1 of the Customisable Basemesh was made for the current version of Blender 5.1, so that’s the version that will be the most compatible, but it has been tested with all of these different versions of Blender, so have a look at the list below or the infographic to see what versions of Blender it will work in.
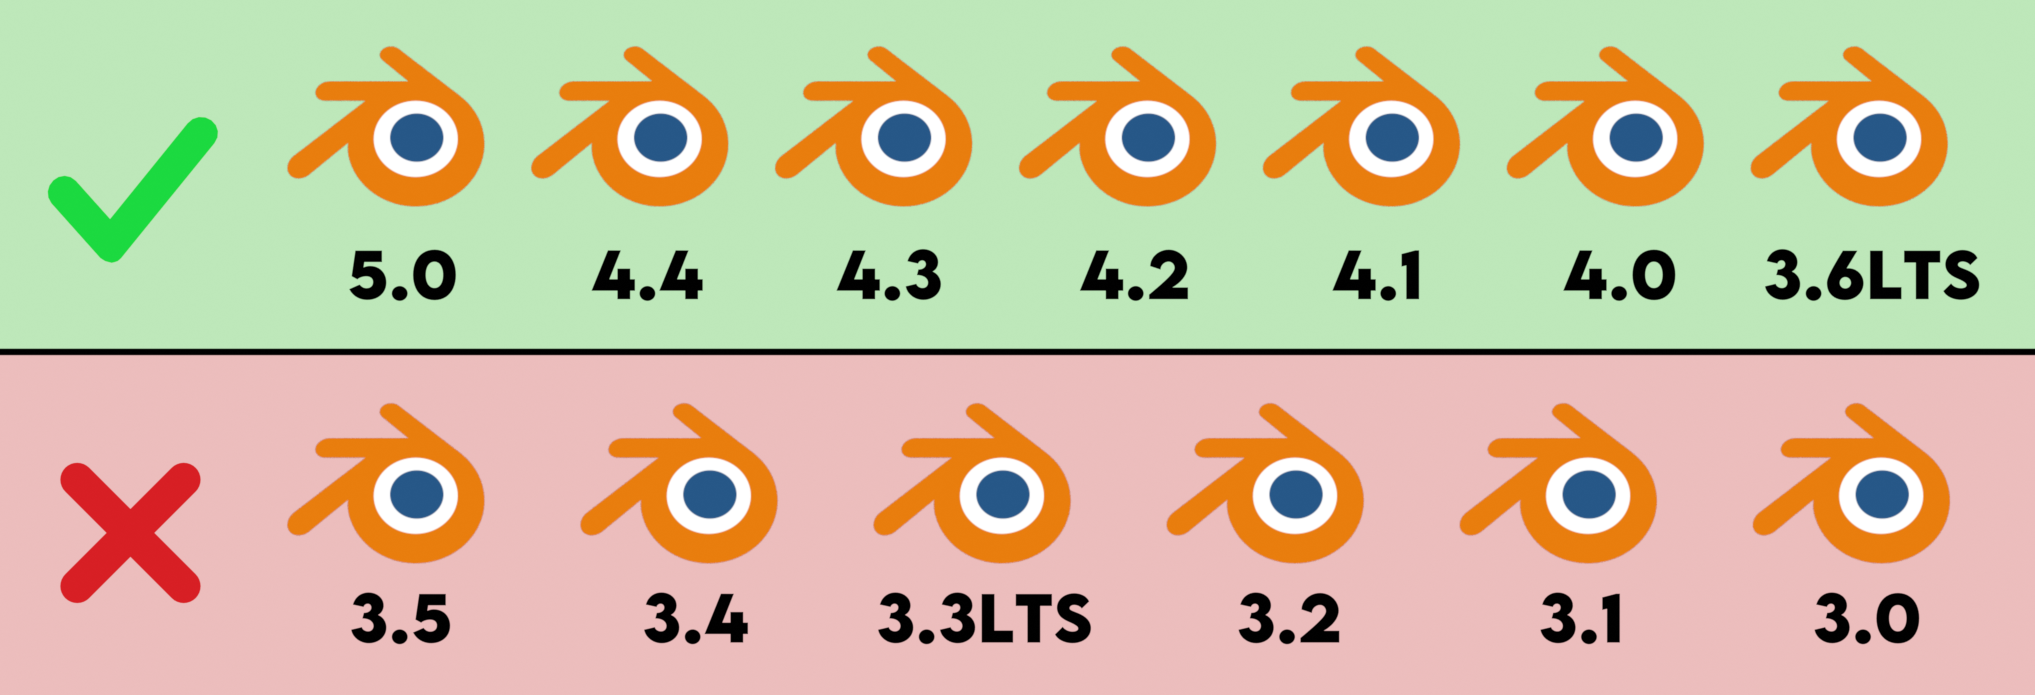
Compatible
Blender 5.0
Blender 4.4
Blender 4.3
Blender 4.2
Blender 4.1*
Blender 4.0*
Blender 3.6LTS *
*Replace Principled BSDF, Change Eye Shine Blend Mode to Alpha Blend
Incompatible (will crash on startup)
Blender 3.5
Blender 3.4
Blender 3.3LTS
Blender 3.2
Blender 3.1
Blender 3.0
Getting Started
When you first open the Blender file, you may see a script warning. This happens because Rigify is a built-in Blender addon that runs Python scripts to set up the rig, and Blender is simply warning you that a script is being executed.
For now, you can click Allow Execution. Since this warning will appear every time you open the file, you can also choose Permanently Allow Execution to avoid seeing it again.
Just be aware that Python scripts can be used maliciously, so always make sure you only open Blender files from trusted sources.
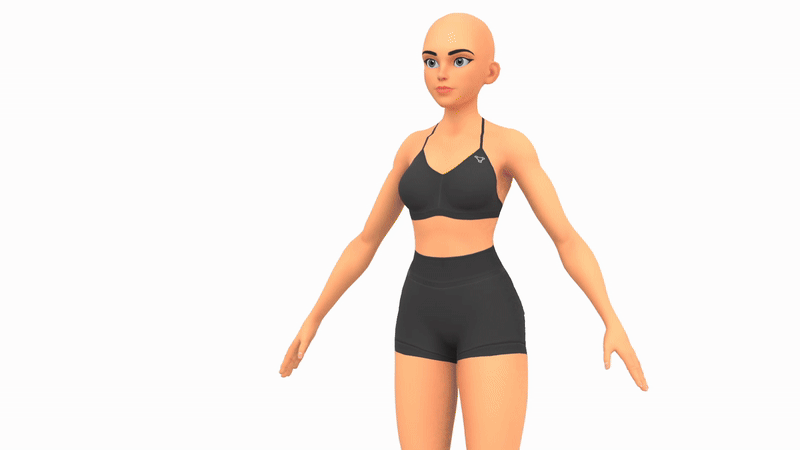
Once the file opens, you’ll see the basemesh in the scene. Switch to Material View, and it may take a moment for the materials to load, as Blender needs to initialise all of the textures. After this, you’re free to start interacting with the character.

Posing/Animating
If you want to pose or animate the character, select the rig and switch to Pose Mode. Rigify uses Inverse Kinematics (IK) by default, so you can pose the character by moving or rotating the hips, chest, shoulders, hands, or feet. The rig will automatically calculate natural bends for the elbows and knees.
One of the main benefits of Rigify is that it gives you easy access to Bone Layers while using the Rig. So in the properties panel, you can see the Rigify menu and all of the Layers. You can enable all of these and your rig will become quite messy because you’re seeing every single control, however, you can just choose the ones you want to work on and that’s all you’ll see. It’s very convenient for making more advanced poses/animations as you can get into really fine details but when you’re finished, you can hide those details and make the bigger motions.
To learn more about rigging, check out the Rigging section.
Installing the Addon
To customise the basemesh, you’ll need to install the included addon. Go to Edit > Preferences, open the Addons section, click the small arrow in the top right corner, and choose Install from Disk. Locate the file named
customisable_basemesh_addon.zip and click Install from Disk.
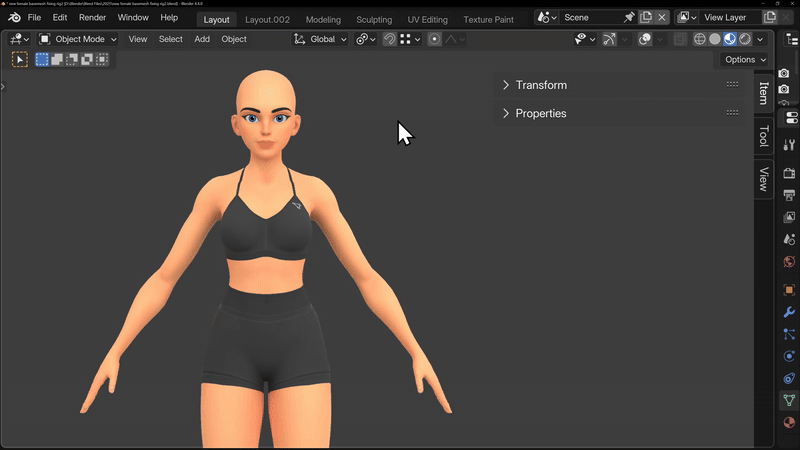
Once installed, the addon will appear on the right hand side of the viewport under Customisable Basemesh. You can start experimenting with the settings right away, but the following sections will explain each option in detail.
Addon Menu
The add-on only works on the currently selected mesh, which allows you to work on multiple characters independently, so make sure to select a mesh before changing settings.
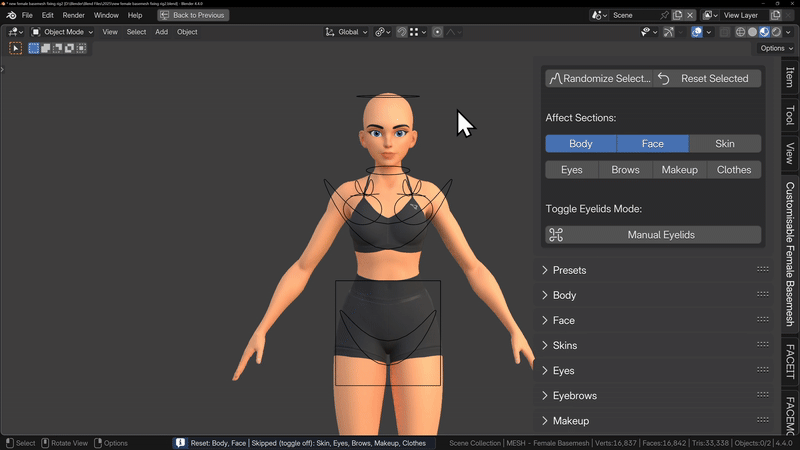
Main Menu
The Main Menu is your central hub for quickly experimenting with and shaping your character. It allows you to randomise or reset selected parts of the model.
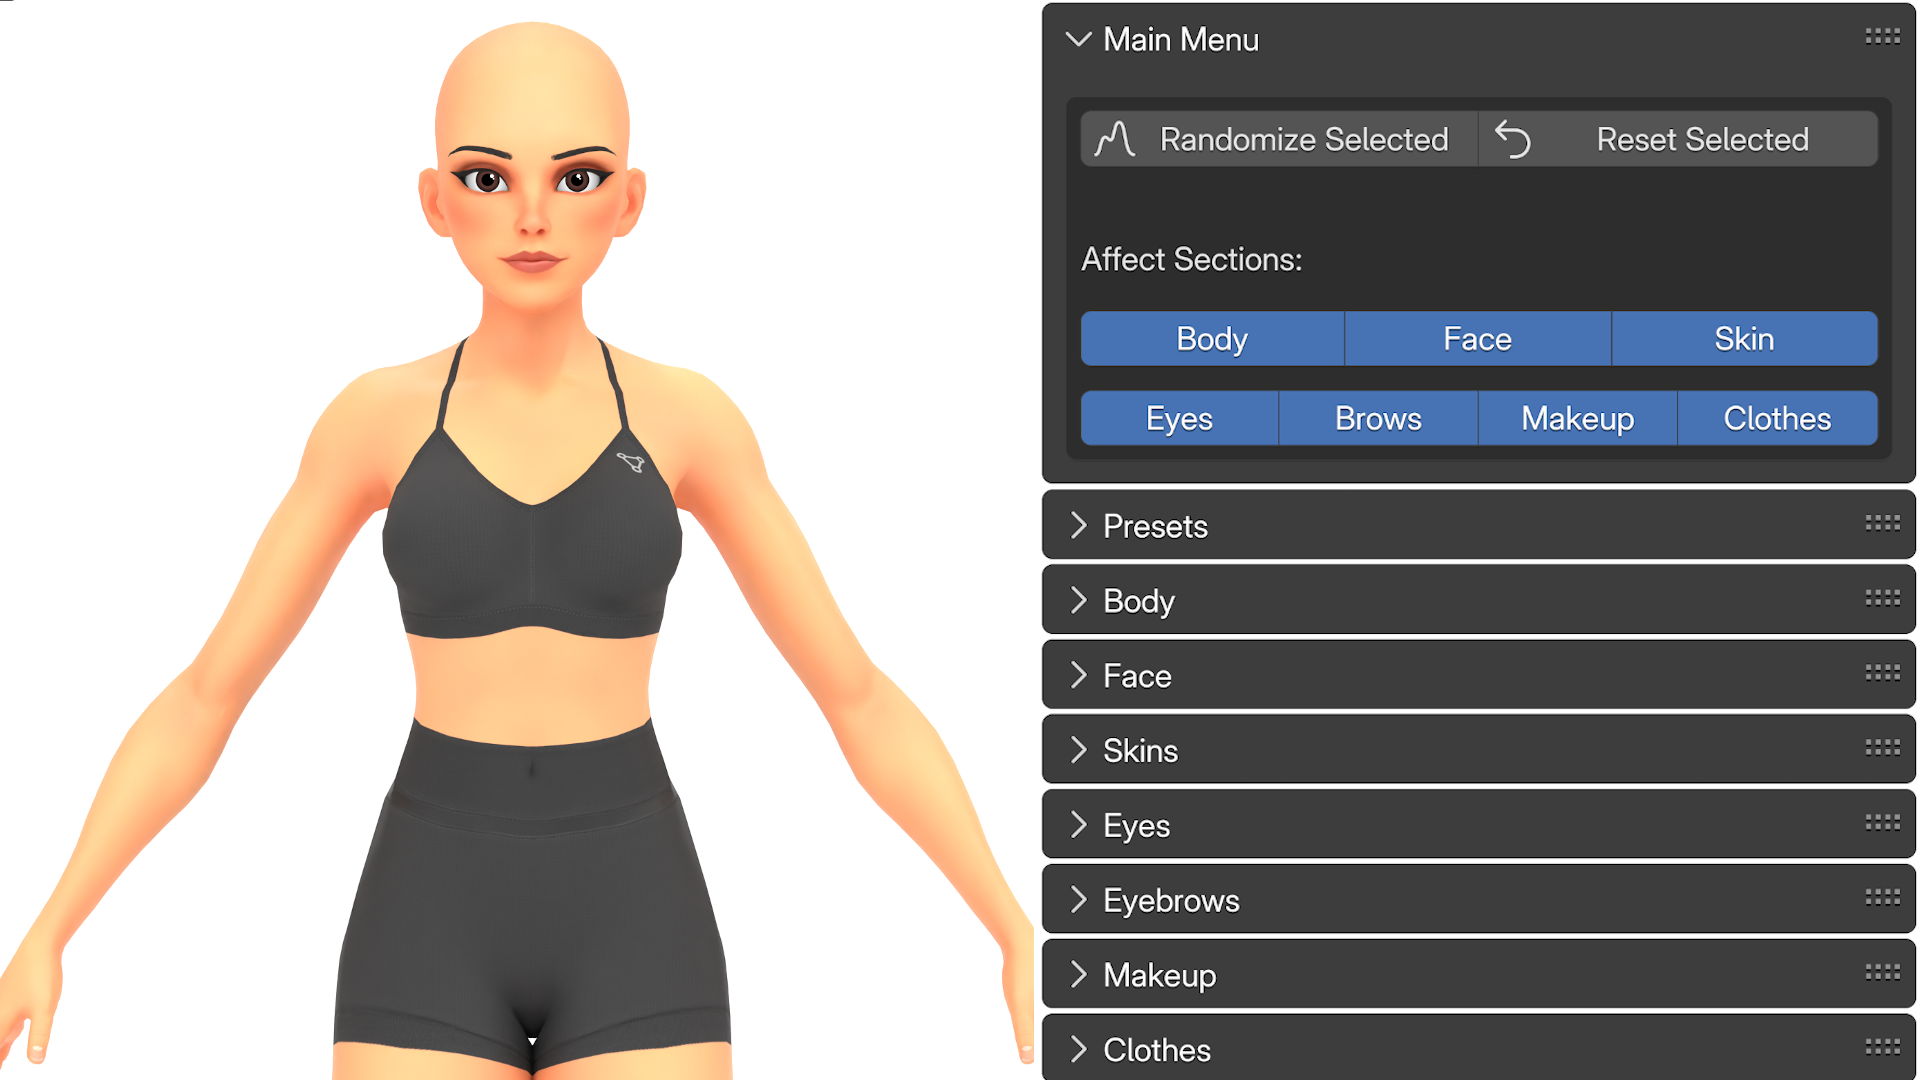
This is very useful for quick prototyping. You can choose exactly which sections are affected, such as the face or body, so randomising or resetting only applies to those sections. If you want to reset everything and go back to default, you can select all of the sections and press Reset.
For example, you might randomise both the face and body to generate new designs, then lock in a body shape you like and continue randomising the face. The Main Menu lets you iterate quickly without diving into individual sliders, making it a quick way to play around with character designs.
You can also choose which Eyelid mode you’d like to be in from this menu. By default, the addon controls the eyelids to create wide eyed or squinted eyes, but you can toggle this back to Manual mode and this will allow you pose the eyes normally.
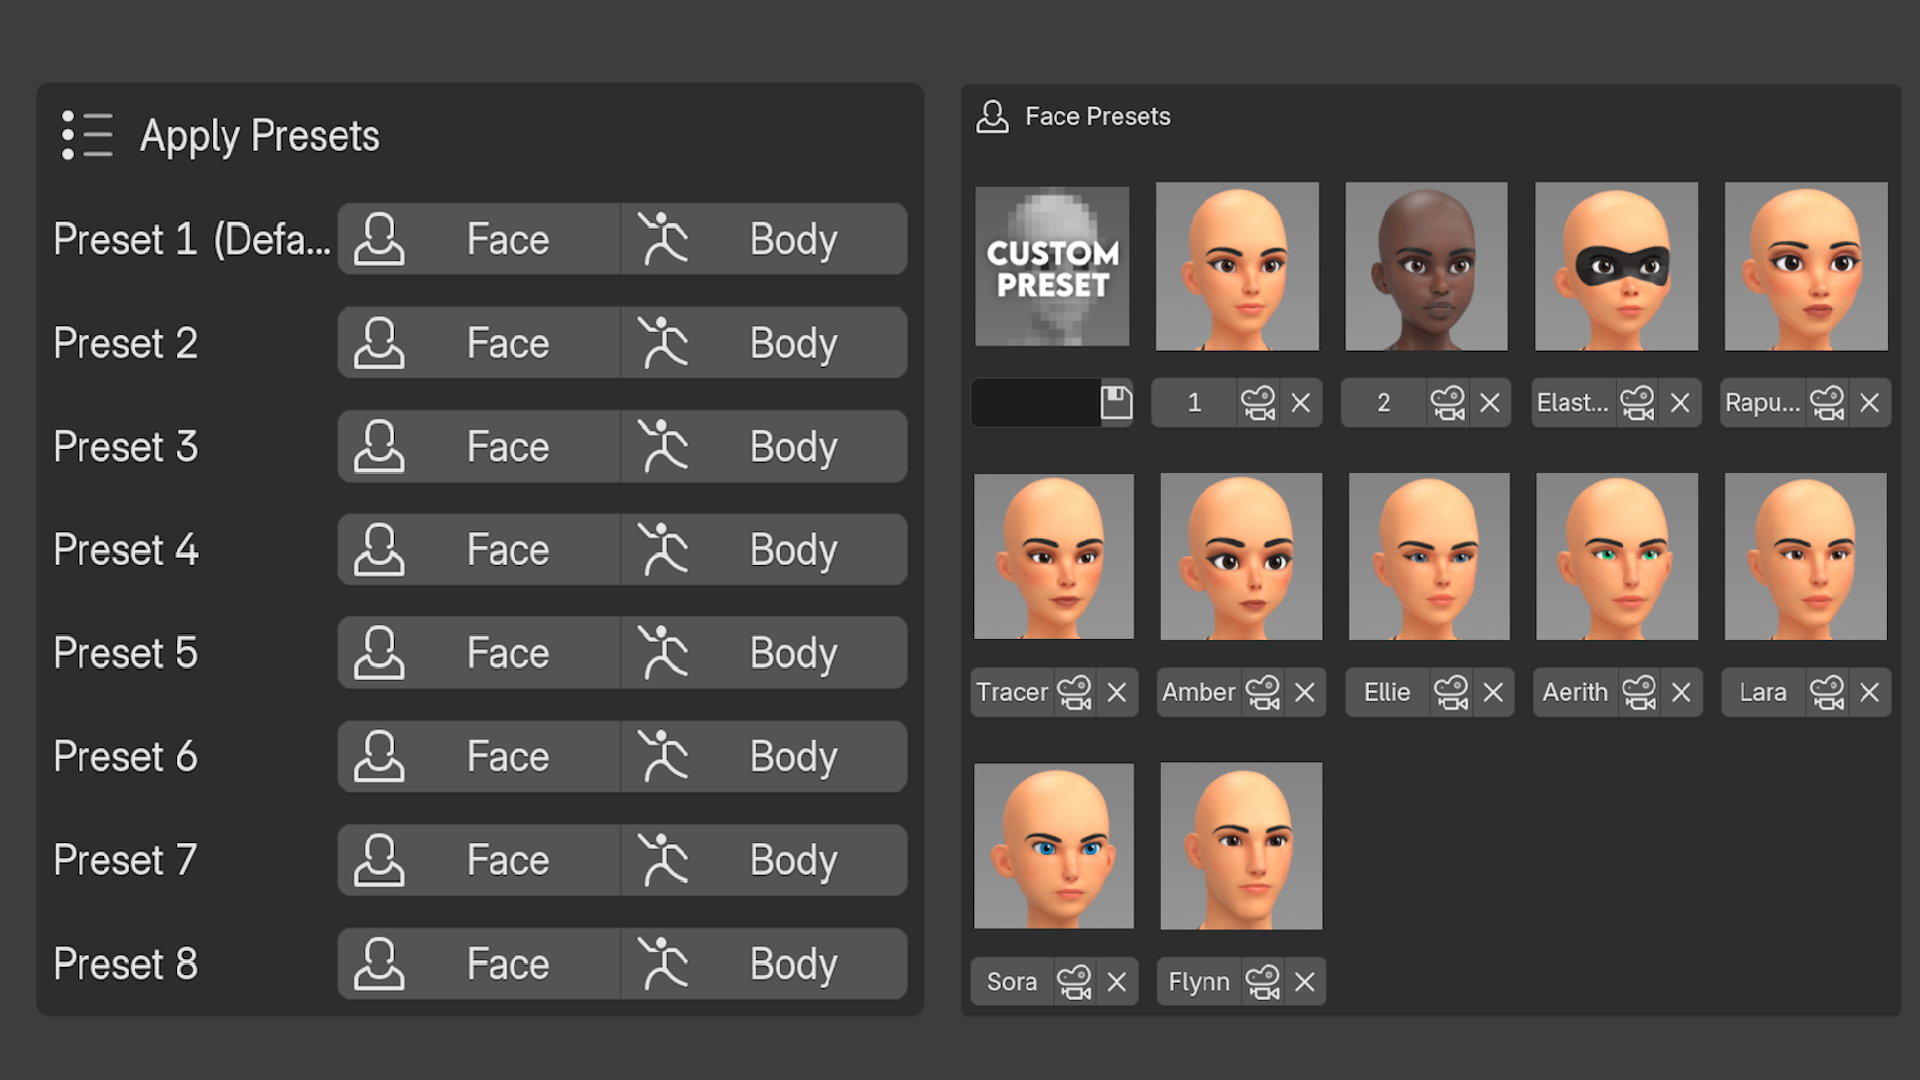
Presets
The Presets Menu lets you create a character instantly, without adjusting any sliders or settings. Simply click one of the preset buttons and it will affect your character’s face OR body.
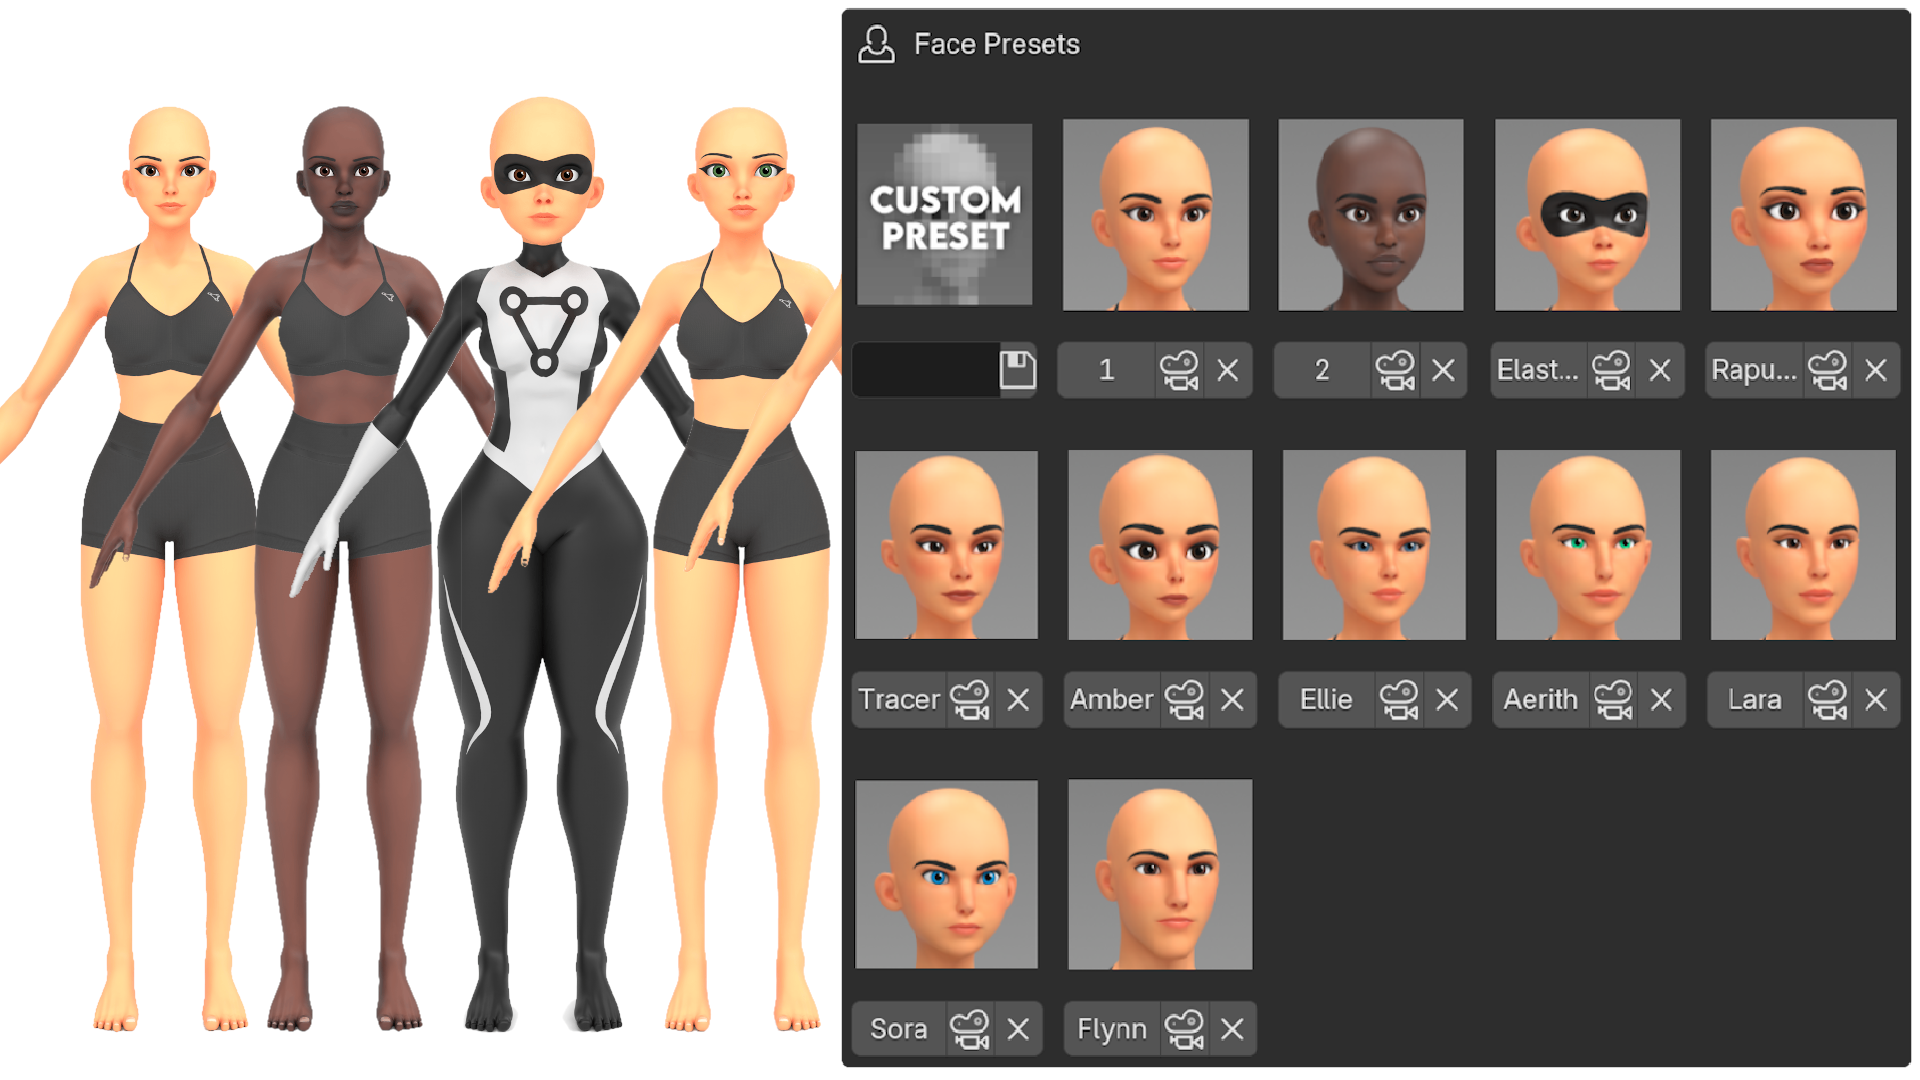
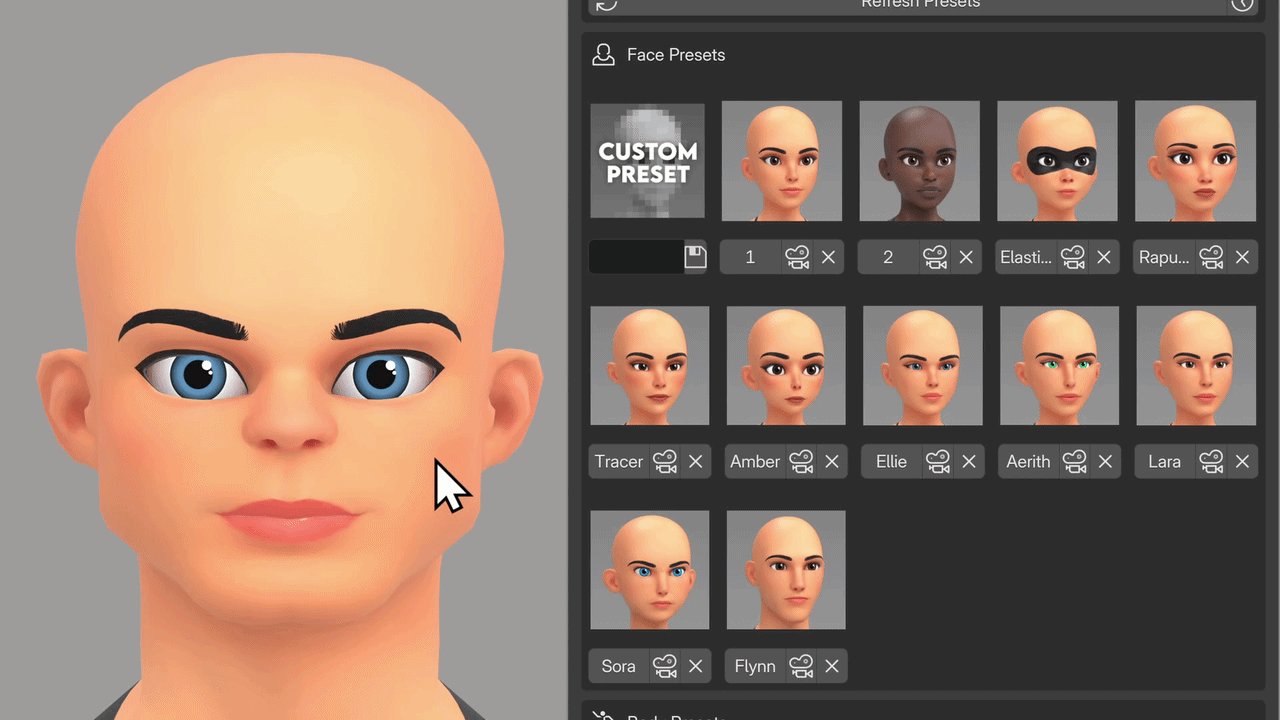
Presets only affect the character’s Body and Face, so you’re free to customise the skin, eyes, clothing, and other details afterwards.
You can choose to apply only the Face or Body for any of the presets, this allows you to mix and match different faces with different bodies.
You can Save your Custom Presets. The first element in the Grid is the Custom Preset section. You can give your Preset a name if you like and then press Save. If you don’t give it a name, it will just give it a number.
Saving a Preset will Render an image from one of the Preset cameras in the scene.You can see these in the Outliner, we have Body Preset Camera and Face Preset Camera. And these will always follow your character’s body and face. If you want to use the Custom Presets, just make sure not to delete these Cameras.
If for whatever reason your image didn’t render how you’d like or maybe you want to change the lighting or skin colour, you can Re-Render ANY of the icons.
Simply just change your model, you can change the lighting or materials and then you can click the Camera icon on any of the Presets and it will Re-Render that icon for you.
If you want to just have your own presets, you can actually Delete all of the presets by clicking the X button beside them, now you can have your own library of custom Faces and Body types.
If you ever want to Restore the Default settings you can click the Restore Default Presets button and this will replace all of the current presets with the original ones, so just be careful that you don’t lose any presets you want to keep.
Body Settings
The Body Menu allows you to adjust the overall weight, proportions, and scale of the basemesh. Here, you can change the character’s height as well as the size and shape of individual body parts.
At the top of the menu, you can Randomise the body proportions to generate completely new variations, or Reset everything back to the default values at any time.
Each slider can be locked, which excludes it from randomisation. This is useful when you want to experiment with proportions while keeping certain features consistent and preventing things from getting too extreme.
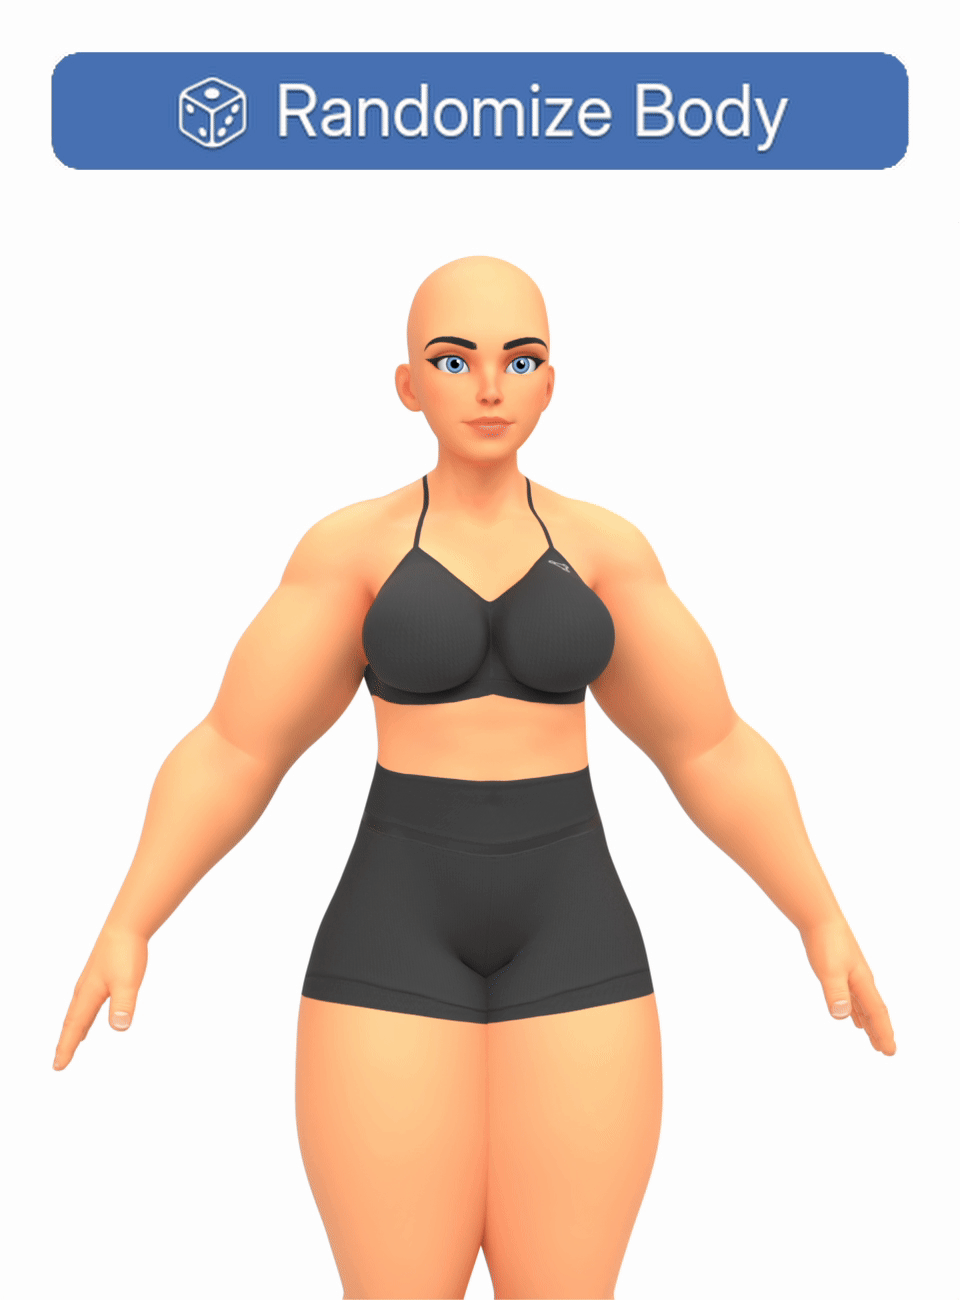
To adjust a value, click and drag the slider left or right. To reset an individual slider, hover over it and press Backspace. You can also adjust multiple sliders at once by clicking and dragging vertically to select several sliders, then dragging left or right. This is especially useful for changing the overall weight of a character without breaking the existing proportions.

The addon also supports working on multiple characters at the same time. You can duplicate a character’s rig and mesh using Shift + D, and the Body sliders will automatically update whichever character/rig is currently selected.
Below is a list of all of the body settings and what they do:
Height
The height slider allows you to change the height of your character. The heights can range from 3’11” to 5’11”.

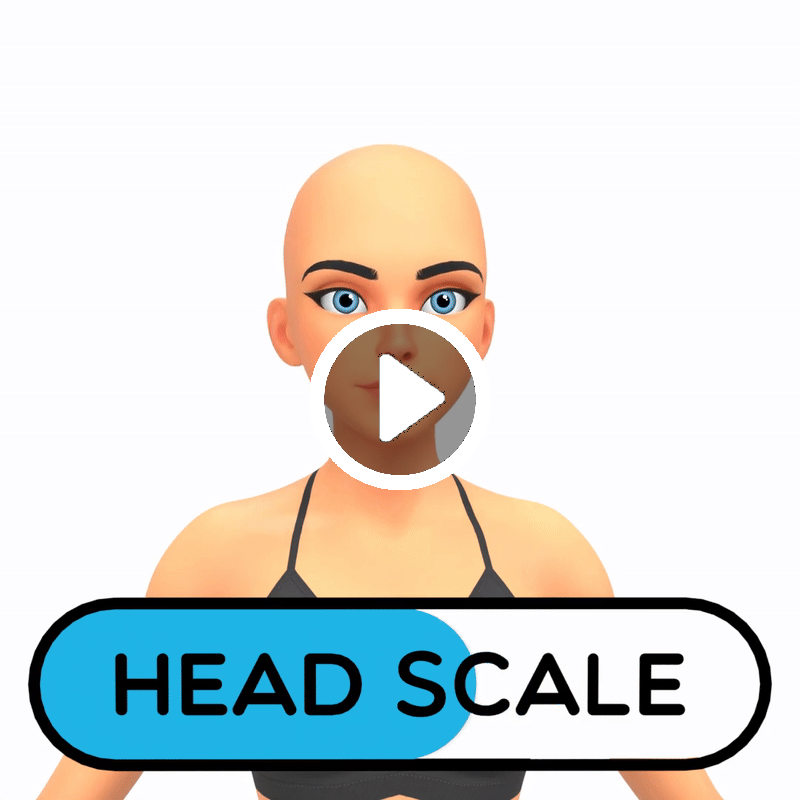
Head Scale
The Head Scale slider changes the size of the head. A smaller head can make the character look more realistic, and a bigger head can be more stylized.
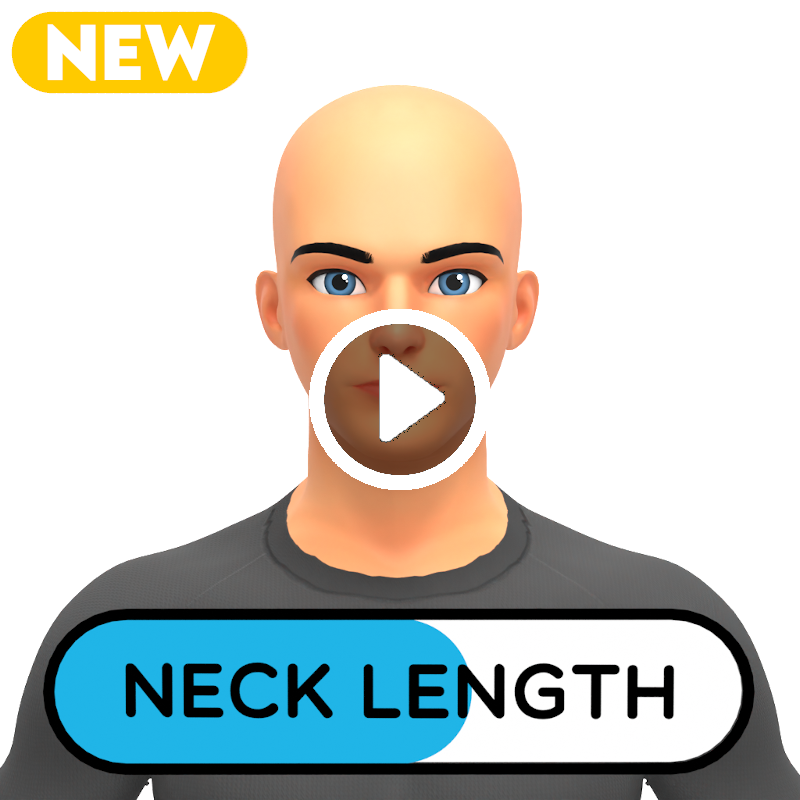
Neck Length
Neck Length allows you to create characters with long or short necks.
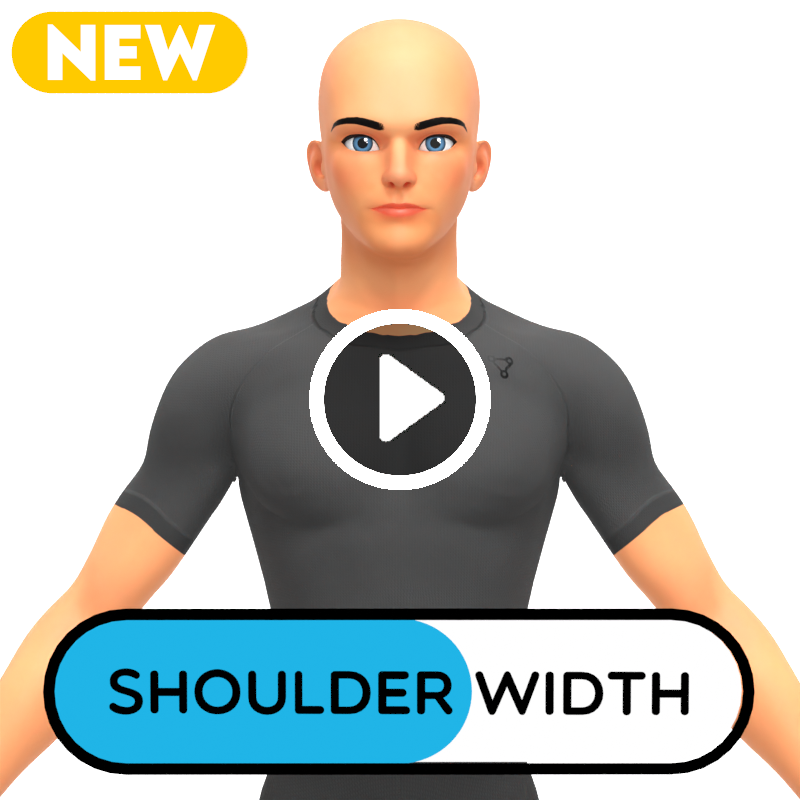
Shoulder Width
Shoulder Width allows you to change the width of the shoulders. This is useful for creating very strong Superhero style characters.
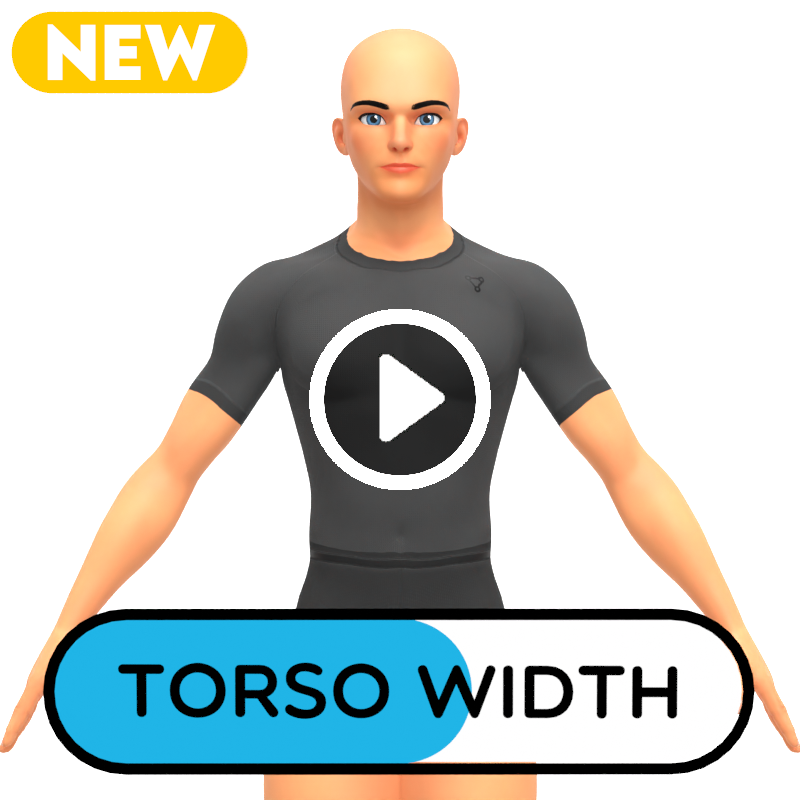
Torso Width
Torso Width allows you to change the width of the Torso to create some wider characters.
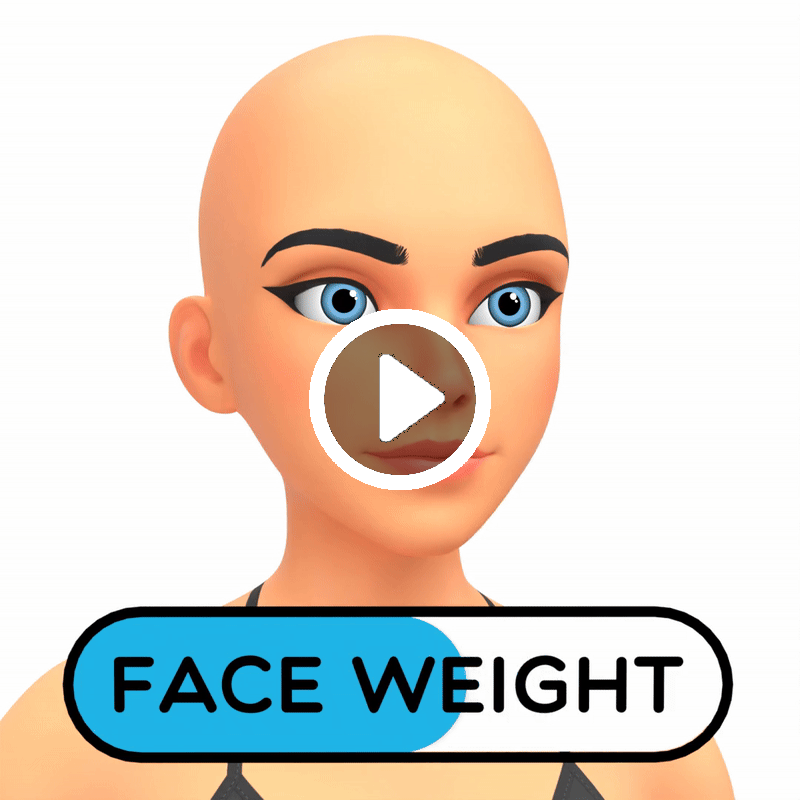
Face Weight
Face Weight changed how sunken or full the cheeks look. This is a quick way to make heavier or skinnier characters.
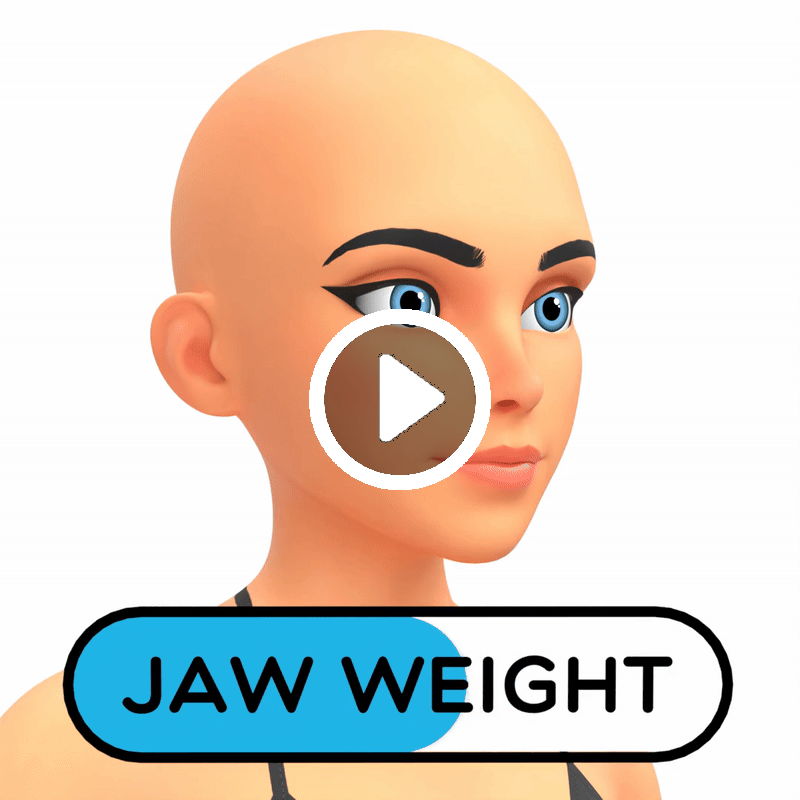
Jaw Weight
Jaw Weight allows you to change the weight of the jaw.
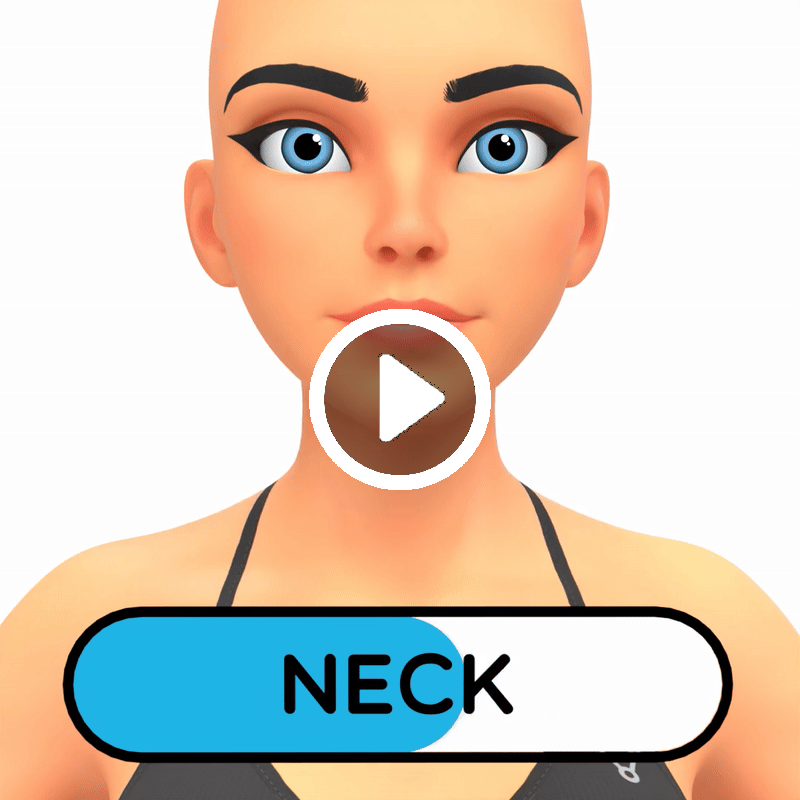
Neck
The Neck slider allows you to change the thickness of the neck
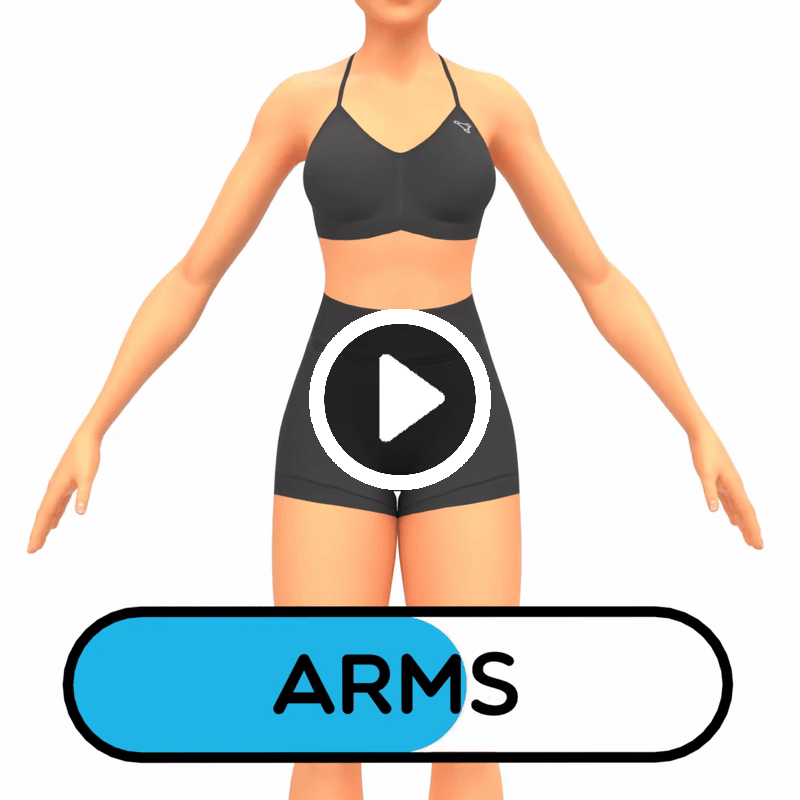
Arms
The Arms slider changes the size of the arms. Use this in combintation with the muscles slider to create defined arms.
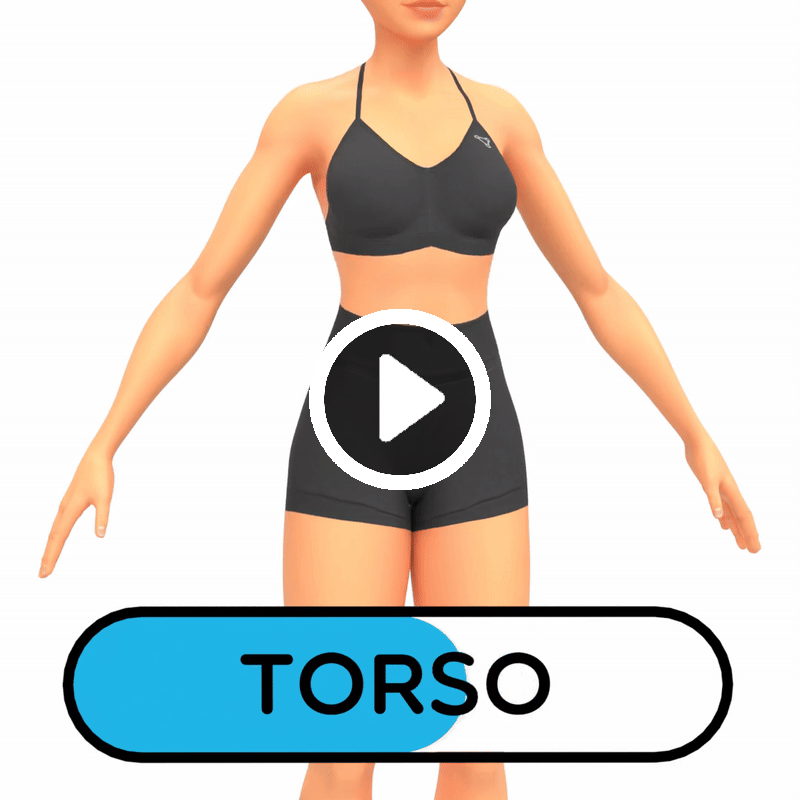
Torso
The Torso slider will change the size of the torso.
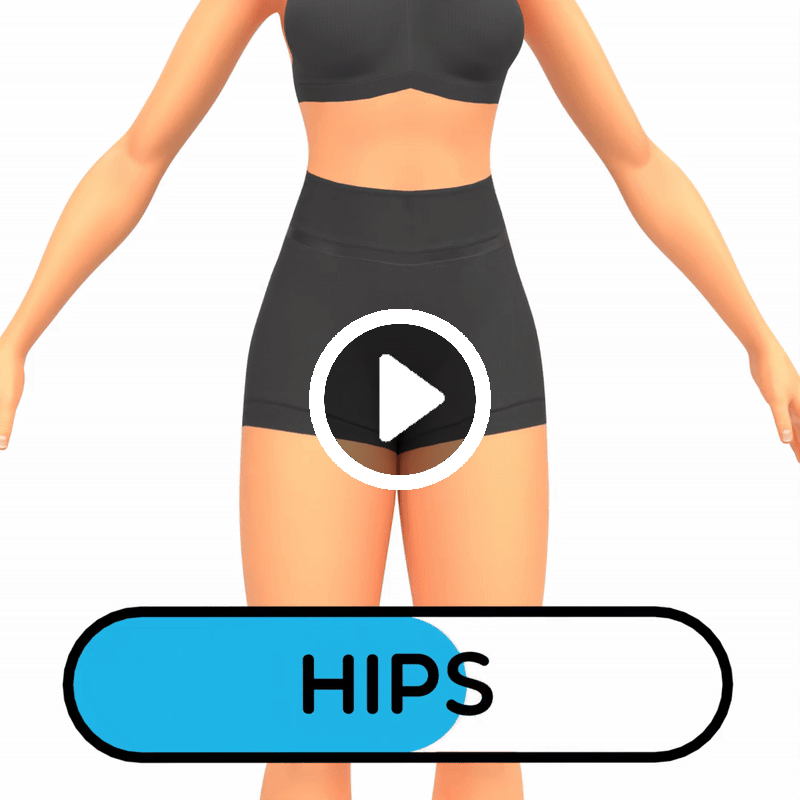
Hips
The Hips slider changes the size of the hips. Use this in combination with the legs slider to create characters with strong legs
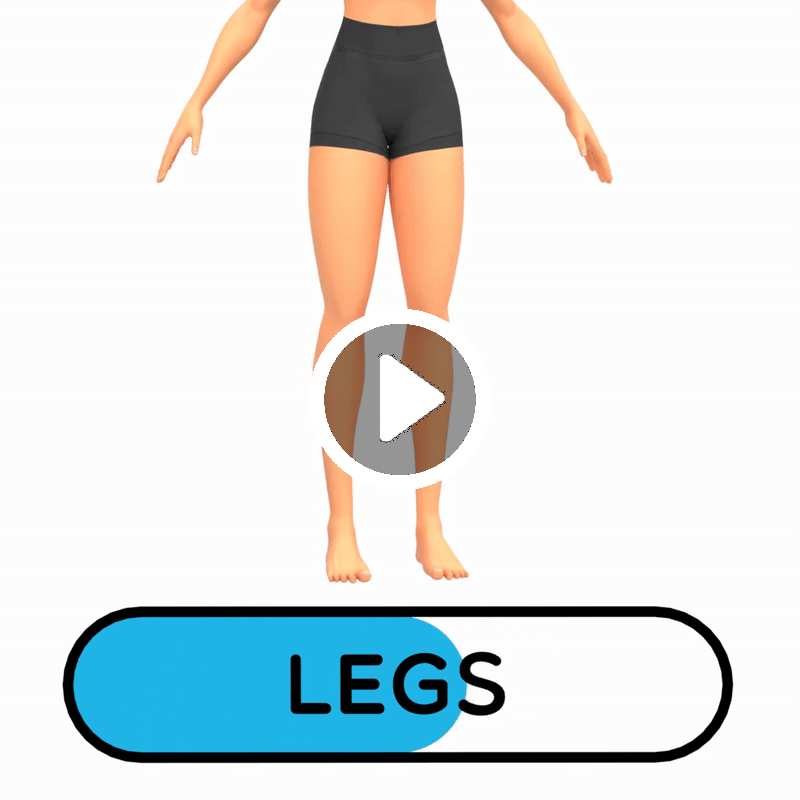
Legs
The Legs slider changes the size of the legs
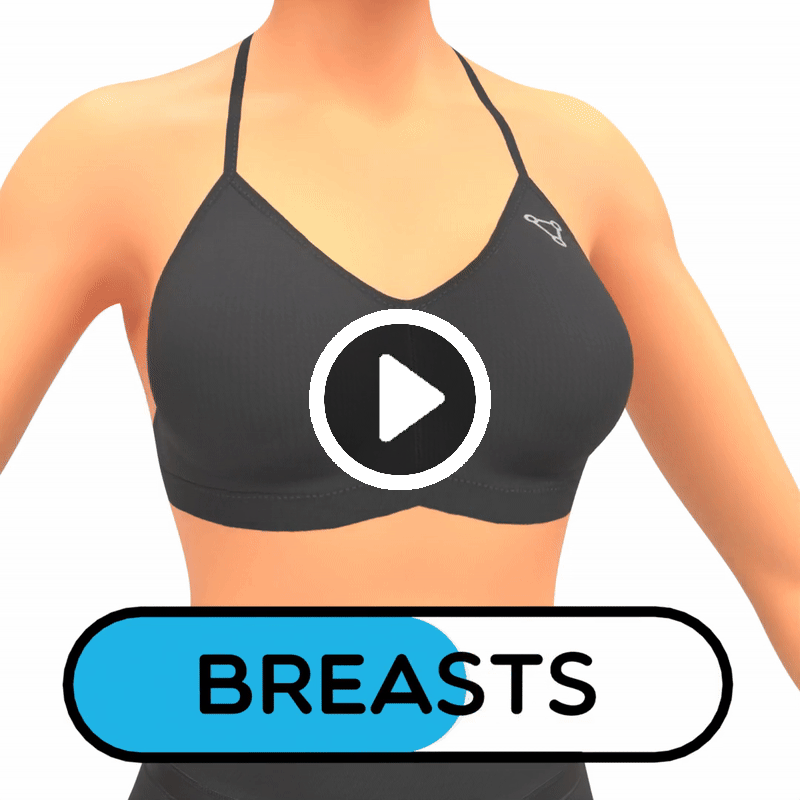
Breasts
The Breasts slider changes the size of the breasts.
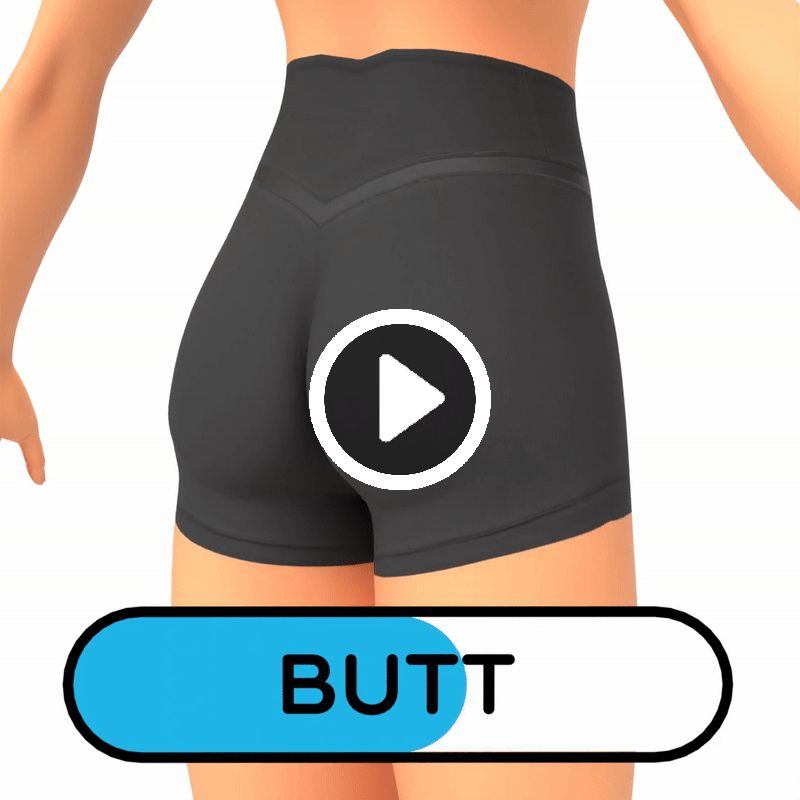
Butt
The Butt slider changes the size of the butt.
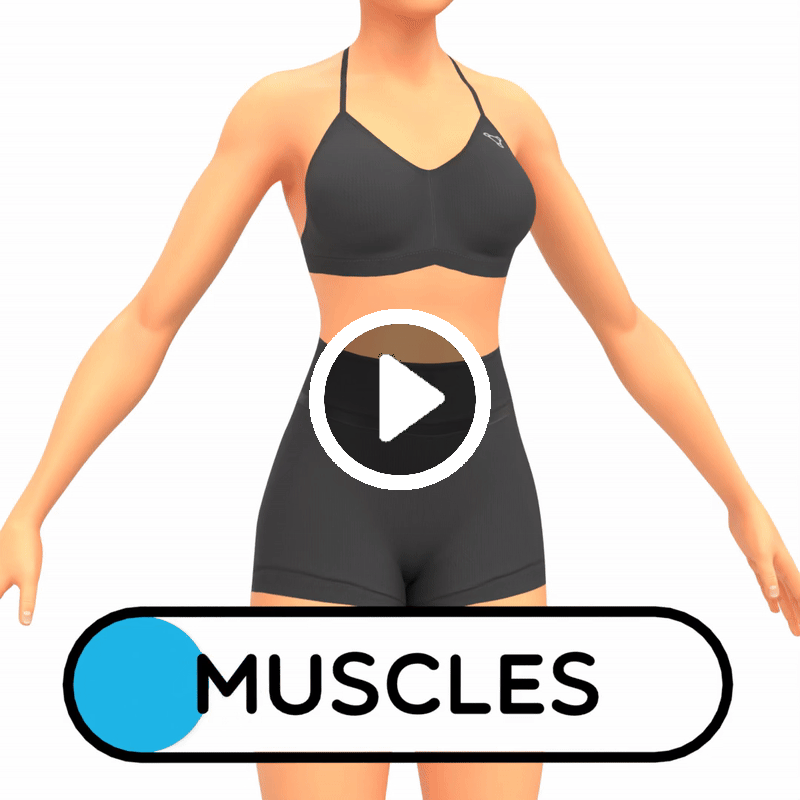
Muscles
The Muscles slider increases the muscle definition of the model, this can be used for large or small characters to give added definition.
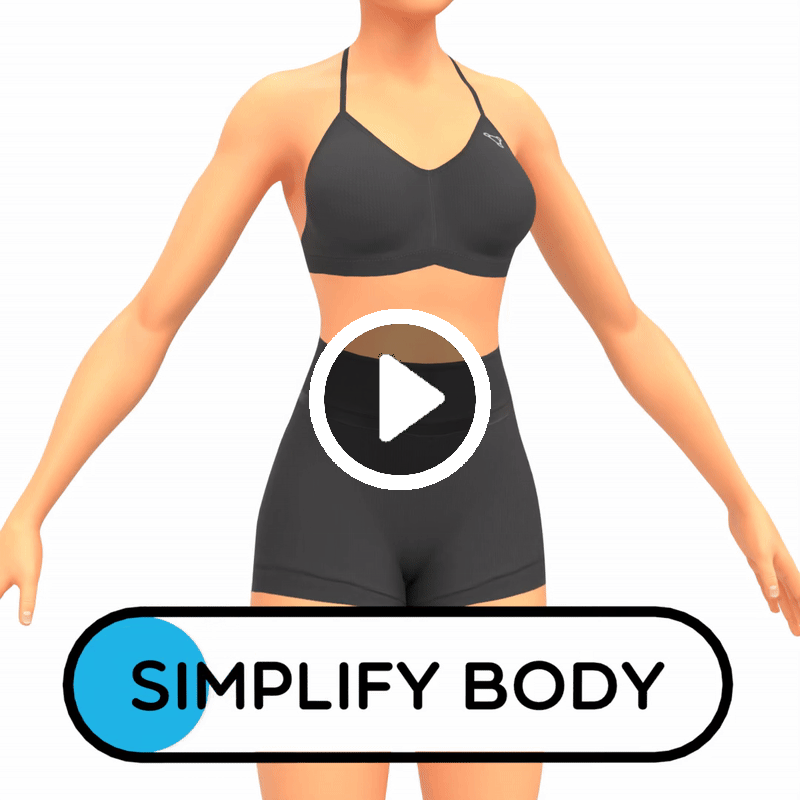
Simplify Body
The Simplify Body slider allows you to remove some of the definition from the model, this can be useful for more cartoony characters.
Face Settings
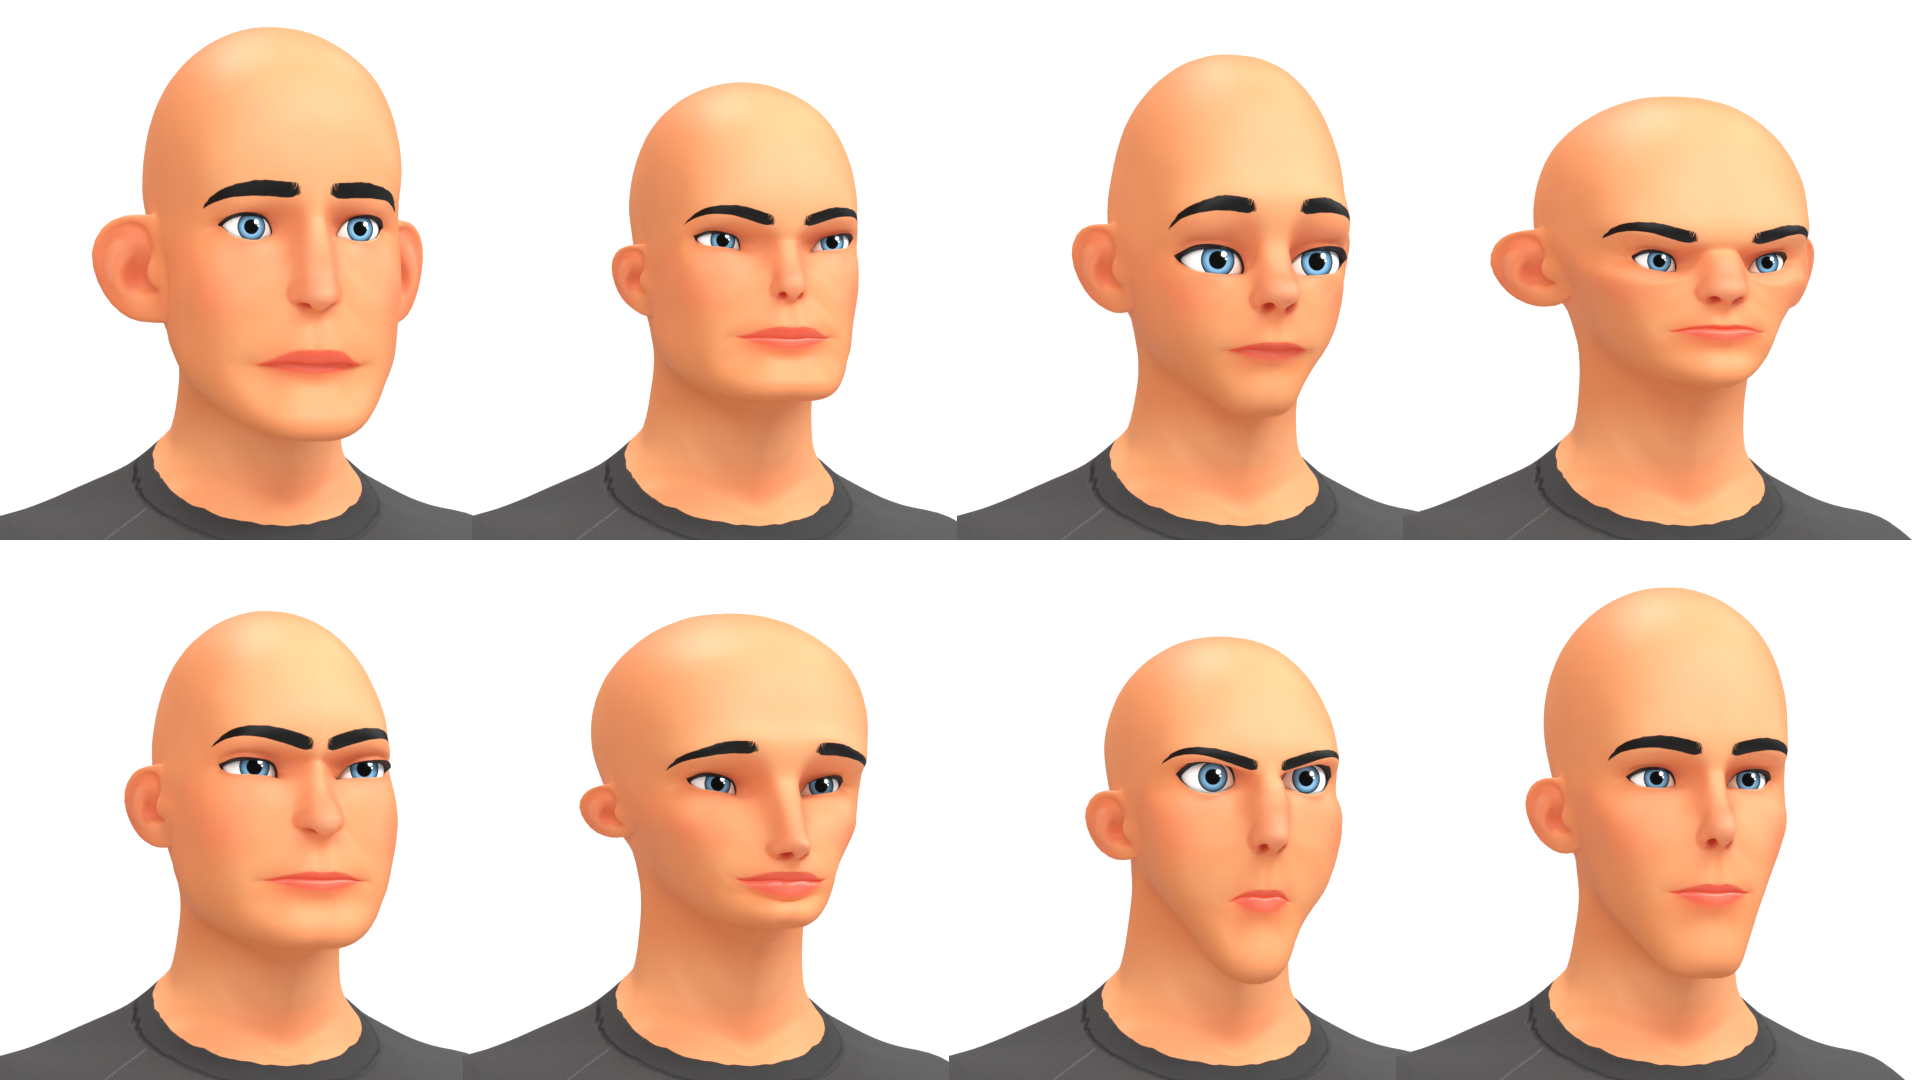
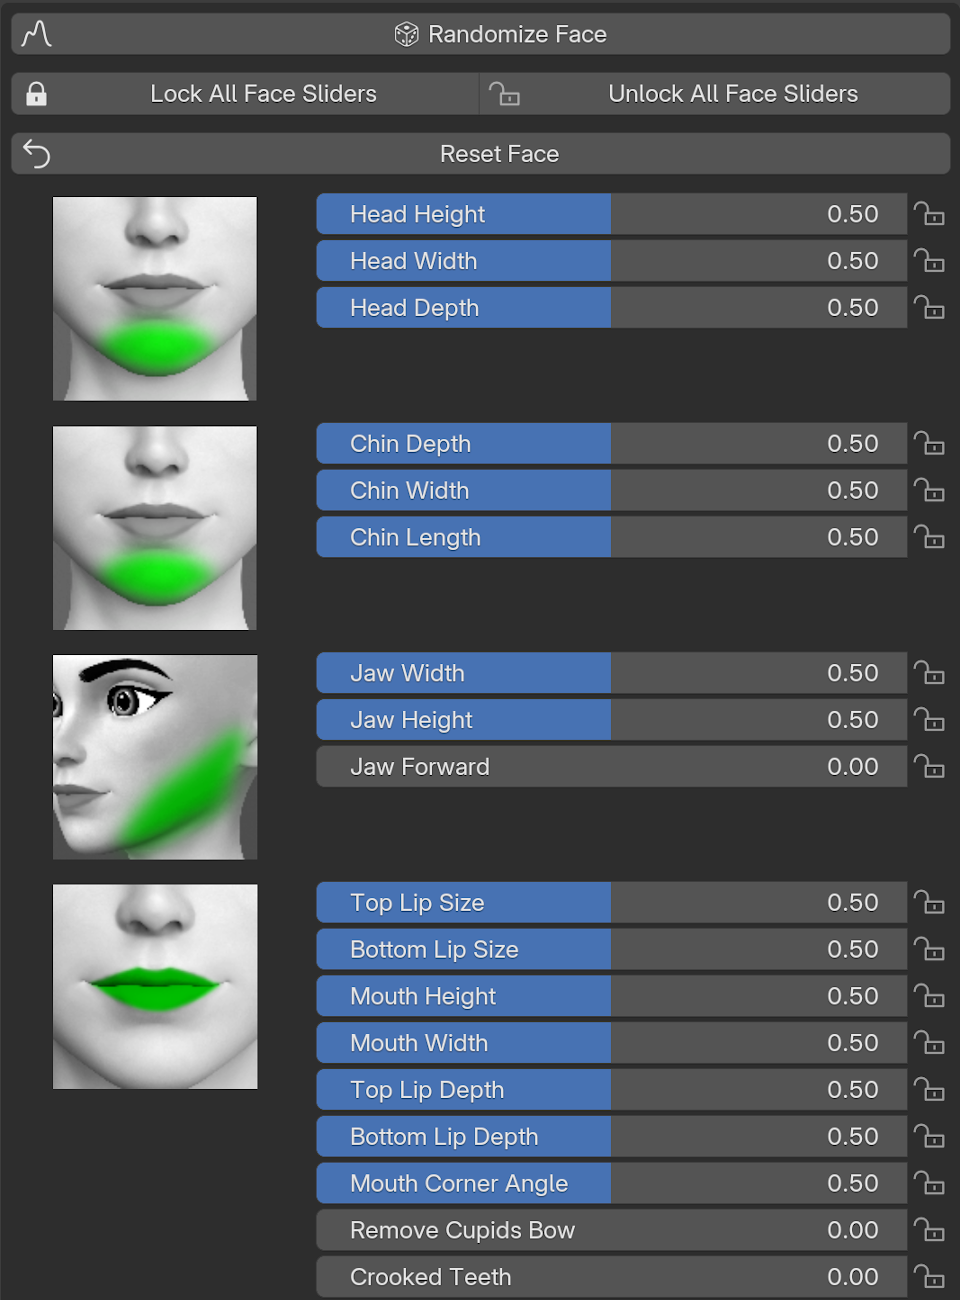
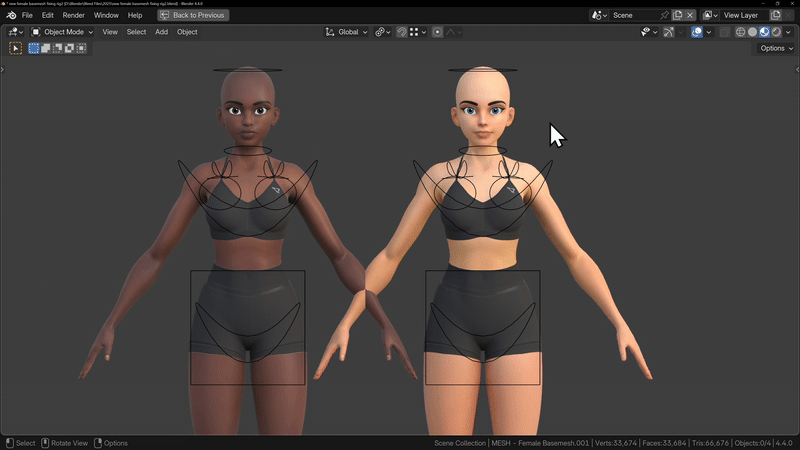
The Face Menu lets you adjust each part of the face individually, with over 60 different controls for creating a wide range of character designs.
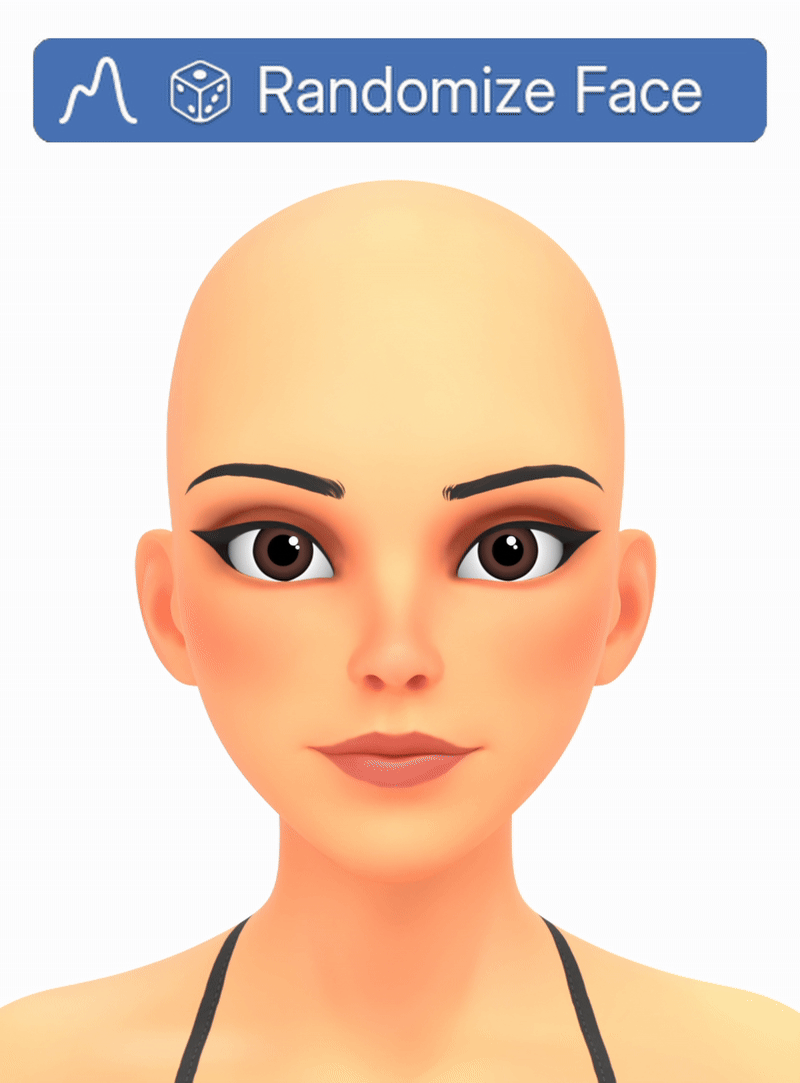
Similar to the Body, you can also have more control over the Randomisation of your character’s Face with the Randomise Range slider. This slider lets you control how Extreme the Randomness is. If you want subtle changes, keep the Range low, but if you want something more extreme, turn it all the way up to 1.
One of the most powerful ways to use the addon are the Lock features. You can lock and unlock any of the Facial features and the randomisation will only affect the Unlocked options.
So one way I like to use this is Randomise a few times or use a Preset, and then go through each section and see what you do and don’t like.
Now if we press Randomise it will only affect the unlocked sections.
When Randomising, sometimes the results can be very extreme, but you can use the new Soften Features button to bring it back to neutral a small bit and this will usually fix any issues.
You can also choose to Exaggerate features if you want to push your character a little bit more.
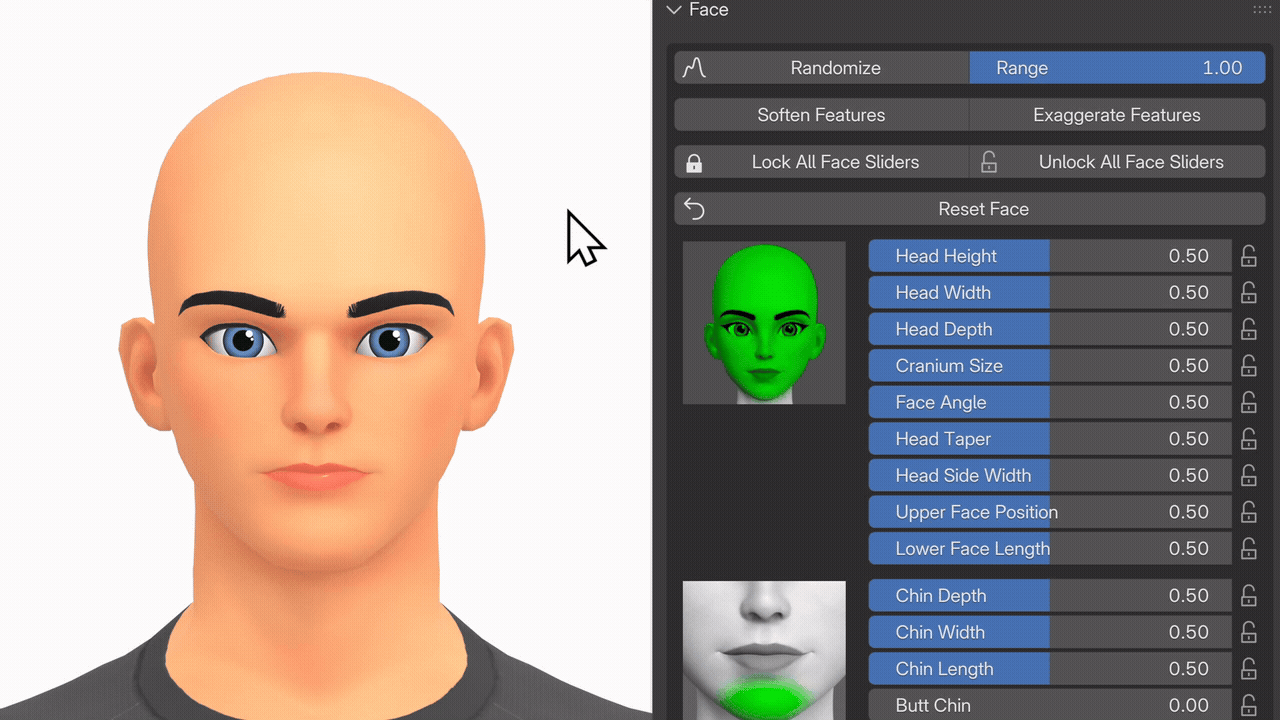
Below is a full list of all face controls, along with examples showing what each setting does:
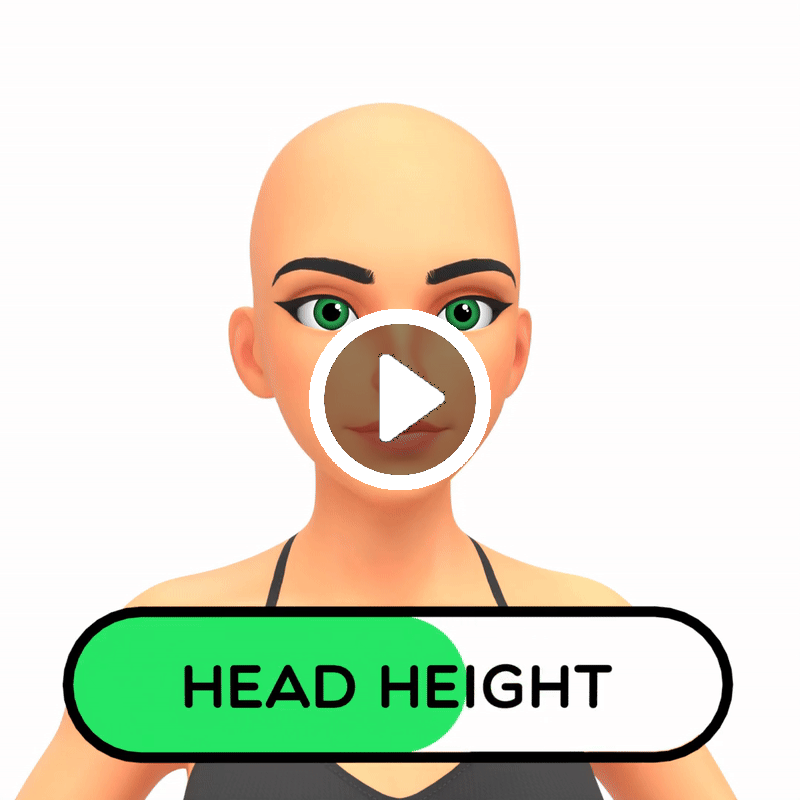
Head Height
Head Height allows you to change the vertical size of the head. This can be useful for creating skinnier faces.
Head Width
Head Width allows you to change the width of the head

Head Depth
Head Depth allows you to change the depth of the head

Cranium Size
Cranium Size allows you to change the size of the cranium to create more Caveman style characters or characters with big foreheads.

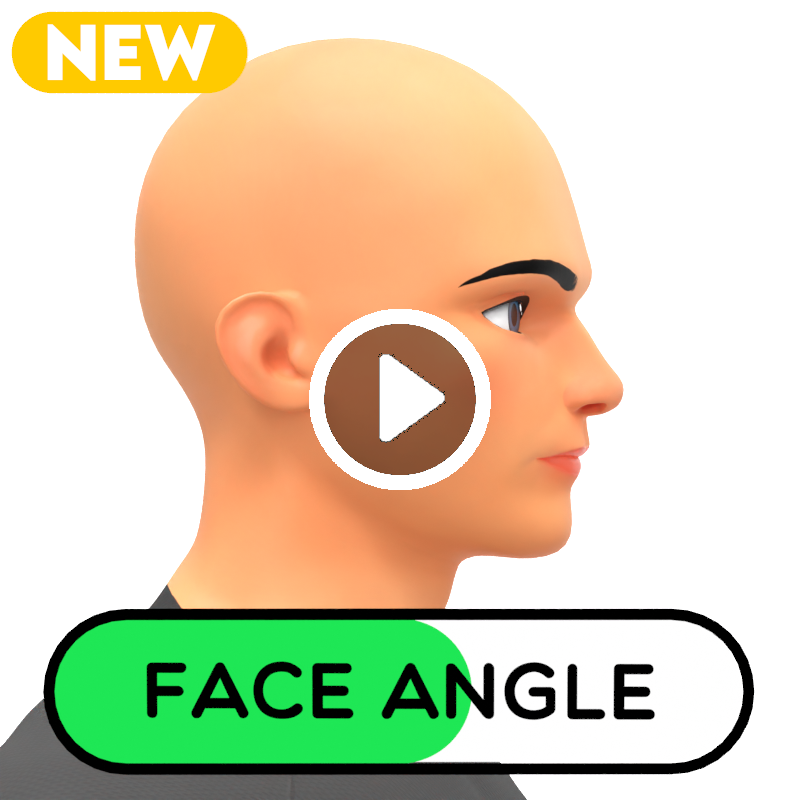
Face Angle
Face Angle lets you tilt the entire face forward or back, creating characters with more pronounced or recessed chins
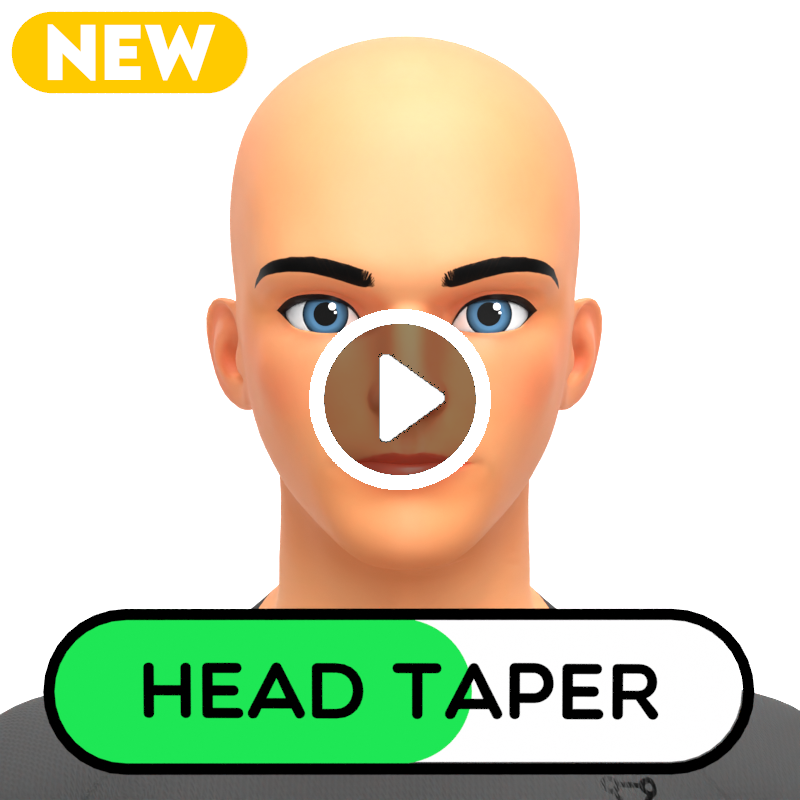
Head Taper
Head Taper allows you to change the taper of the head. You can create characters with more top-heavy or bottom-heavy features
Head Side Width
Head Side Width allows you move the entire side of the head inwards or outwards. This is useful for refining the position of the ear, but you can still control the ear settings separately.

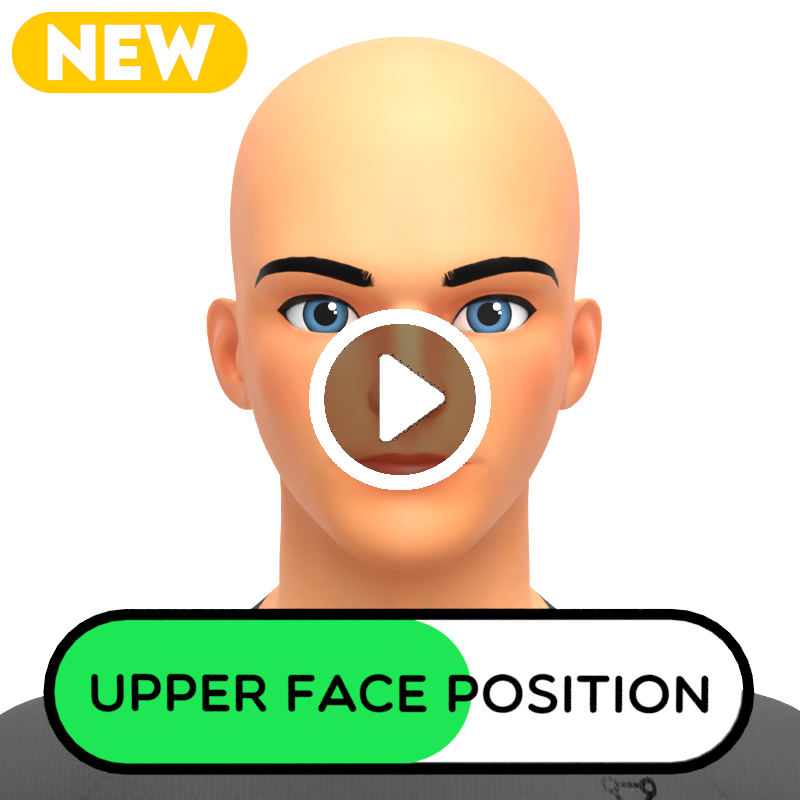
Upper Face Position
Upper Face Position allows you to move the eyes and eyebrows up or down, allowing you to create some more squished or stretched out faces.
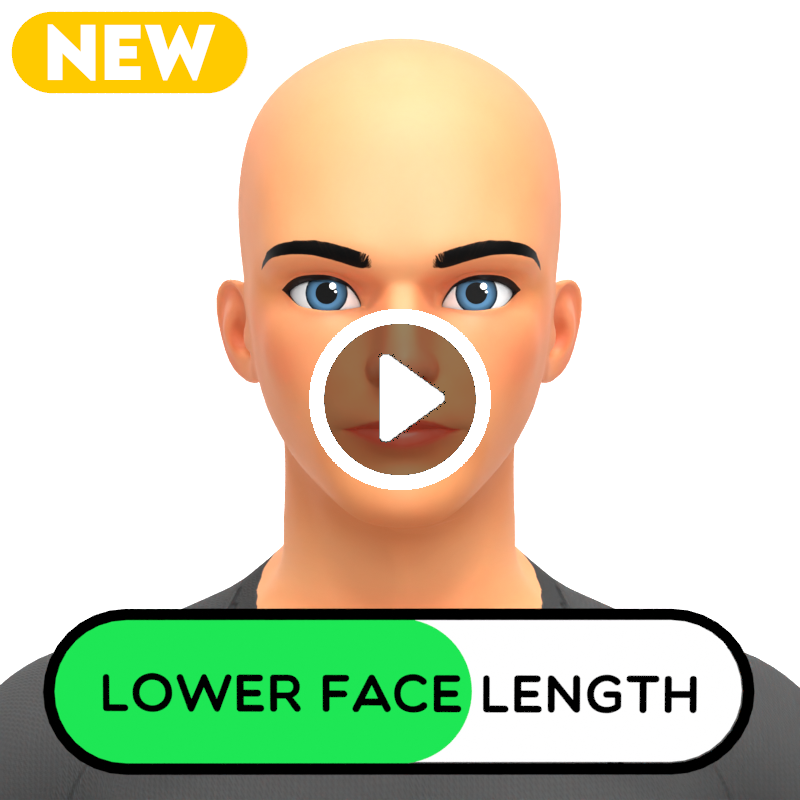
Lower Face Length
Lower Face Length allows you move the bottom of the face up or down to create some more short or long faces.
Chin Depth
Chin Depth allows you to change the depth of the chin

Chin Width
Chin Width allows you to change the width of the chin, making it pointy or square

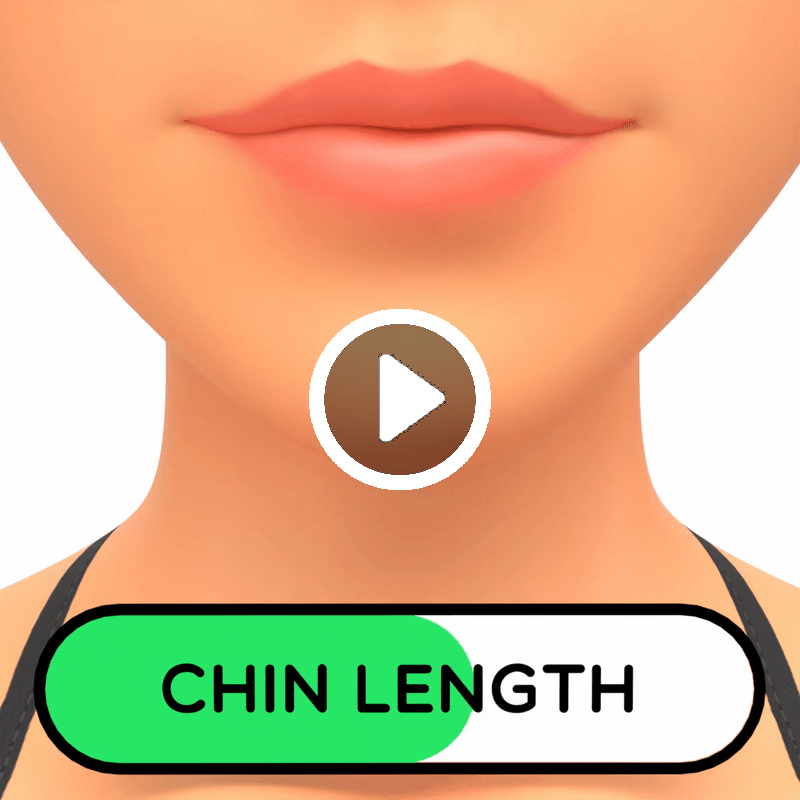
Chin Length
Chin Length allows you to change the length of the chin
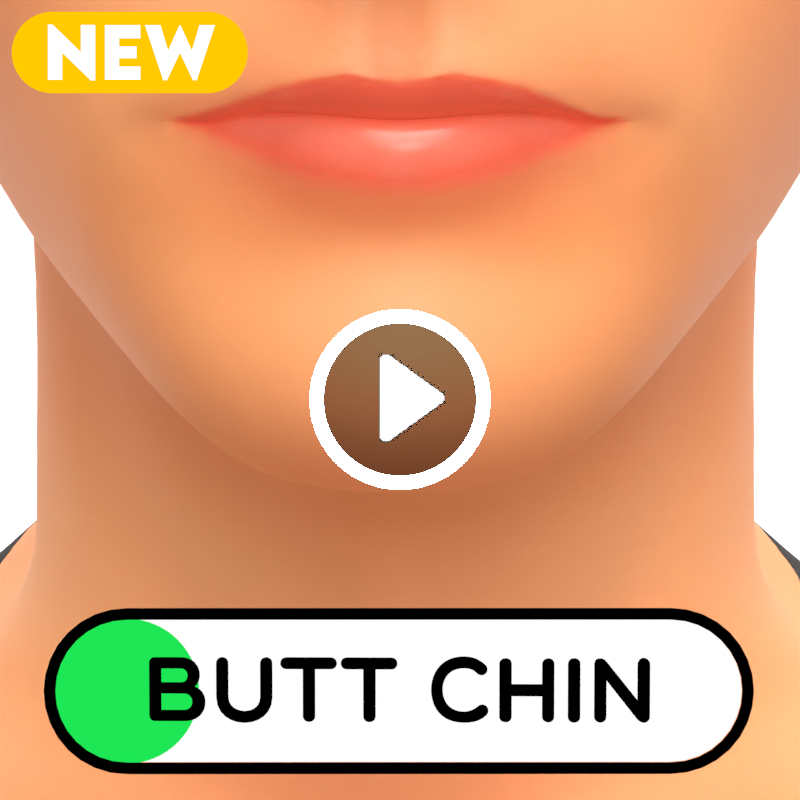
Butt Chin
The Butt Chin slider will give your character a butt chin.
Jaw Width
Jaw Width allows you to change the width of the jaw, making it skinnier or wider

Jaw Height
Jaw Height changes the height of the jaw

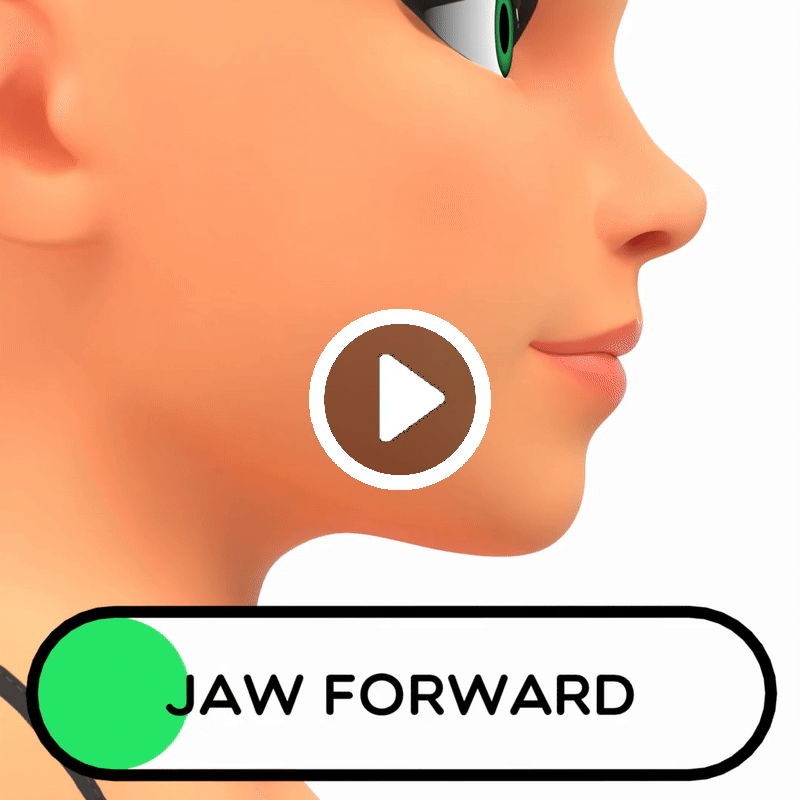
Jaw Forward
Jaw Forward will bring the jaw forward or back, this is useful when changing the depth of the ear
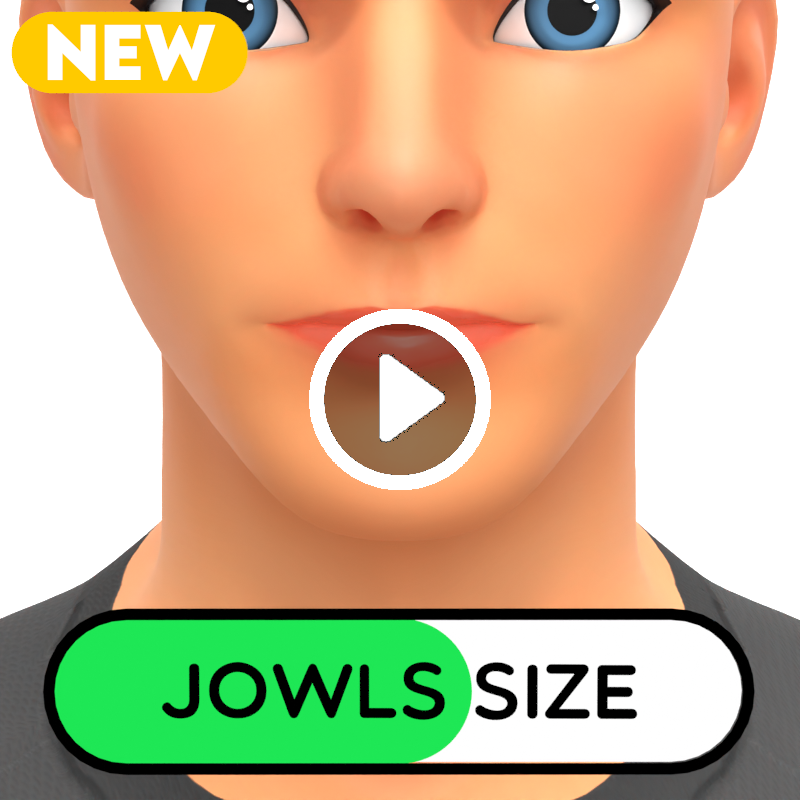
Jowls Size
Jowls Size will allow you to change the size of the jowls. Turning this down will give your character a more Timothee Chalamet style chin and turning it up will make the chin/jaw look heavier
Top Lip Size
Top Lip size changes the size of the top lip

Bottom Lip Size
Bottom Lip Size changes the size of the bottom lip

Mouth Height
Mouth Height changes the height of the mouth

Mouth Width
Mouth Width changes the width of the mouth

Top Lip Depth
Top Lip Depth changes the depth of the top lip

Bottom Lip Depth
Bottom Lip Depth changes the depth of the bottom lip

Mouth Corner Angle
Mouth Corner Angle changes the angle of the corner of the mouth, essentially making the character smile or frown

Remove Cupid’s Bow
This will remove the Cupid’s bow from the top lip

Crooked Teeth
This will make the teeth more crooked. Only visible when the mouth is opened in Pose Mode

Lower Fangs
This will increase the size of the lower incisors. Only visible when the mouth is opened in Pose Mode

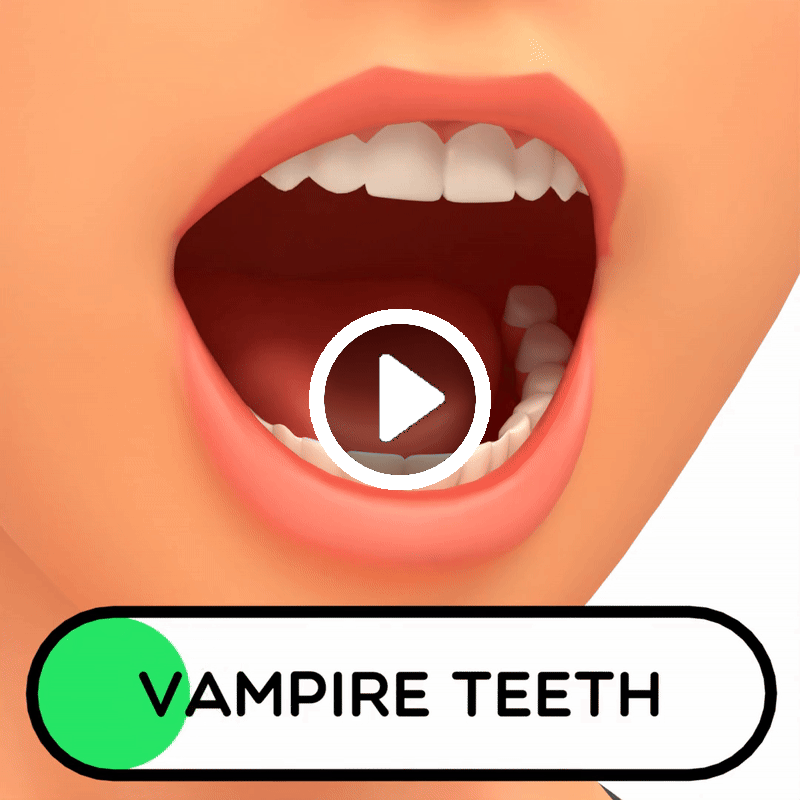
Vampire Teeth
This will increase the size of the upper incisors, creating vampire teeth. Only visible when the mouth is opened in Pose Mode
Forked Tongue
This will change the tongue into a forked tongue. Only visible when the mouth is opened in Pose Mode

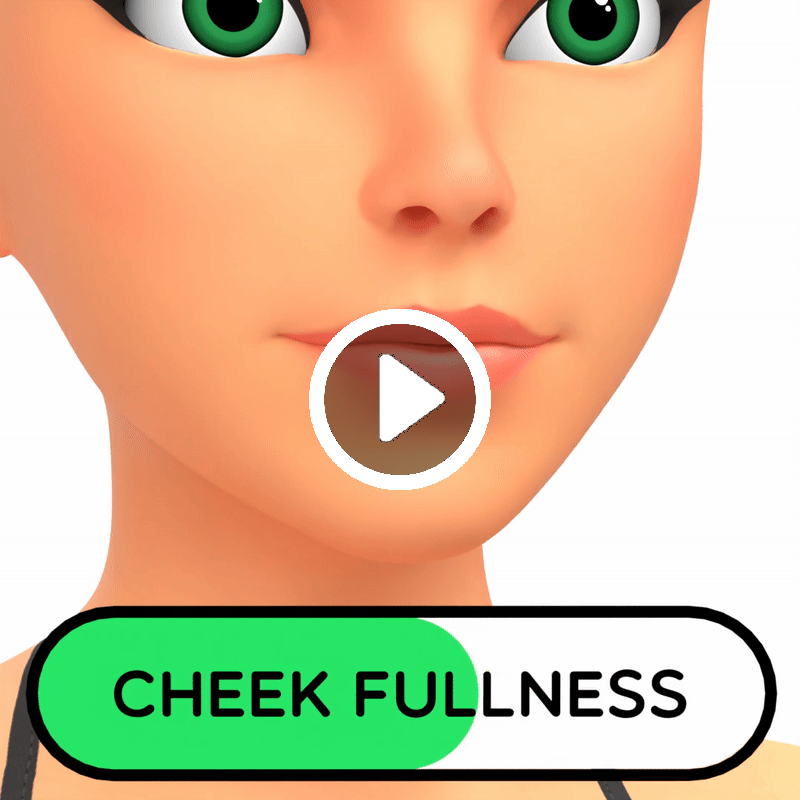
Cheek Fullness
Cheek Fullness changes how gaunt or full the cheeks are
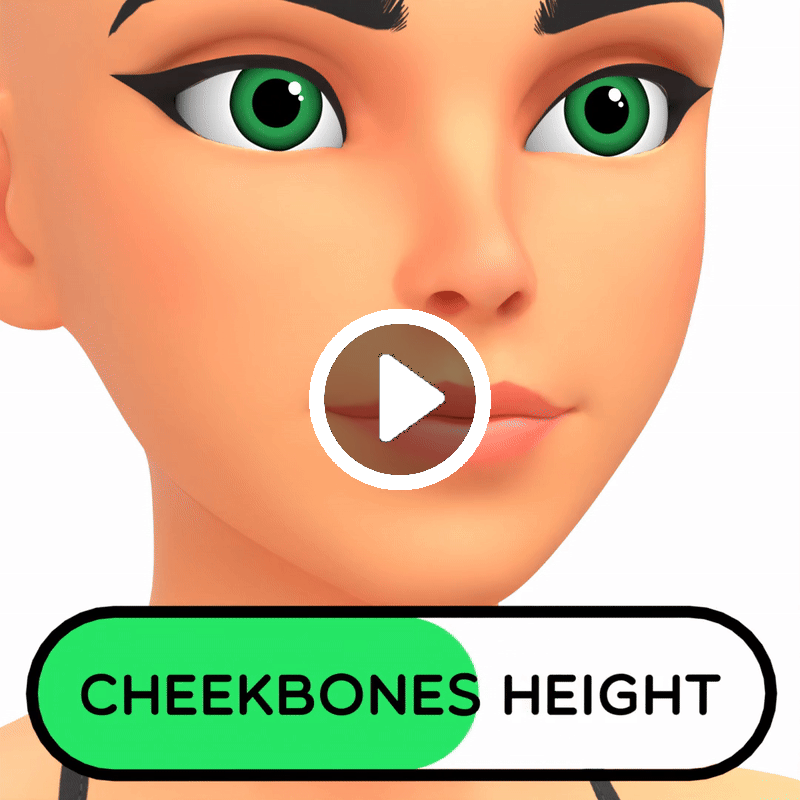
Cheekbones Height
Cheekbones Height changes the vertical position of the cheekbones
Cheekbones Size
Cheekbones Size changes the size of the cheekbones

Nose Size
Nose Size will change the size of the nose making it skinnier or wider

Nose Depth
Nose Depth will move the entire nose forward or back

Nose Height
Nose Height allows to make the nose shorter or longer

Nostril Size
Nostril Size allows you to change the size of the nostrils

Nose Angle
Nose Angle allows you to change the angle of the nose, making it more upturned or downturned

Bridge Size
Bridge Size allows you to change the size of the nose bridge

Tip Roundness
Nose Tip Roundness will make the nose more pointy or more bulbous

Pinocchio
The Pinocchio slider will make the tip of the nose longer

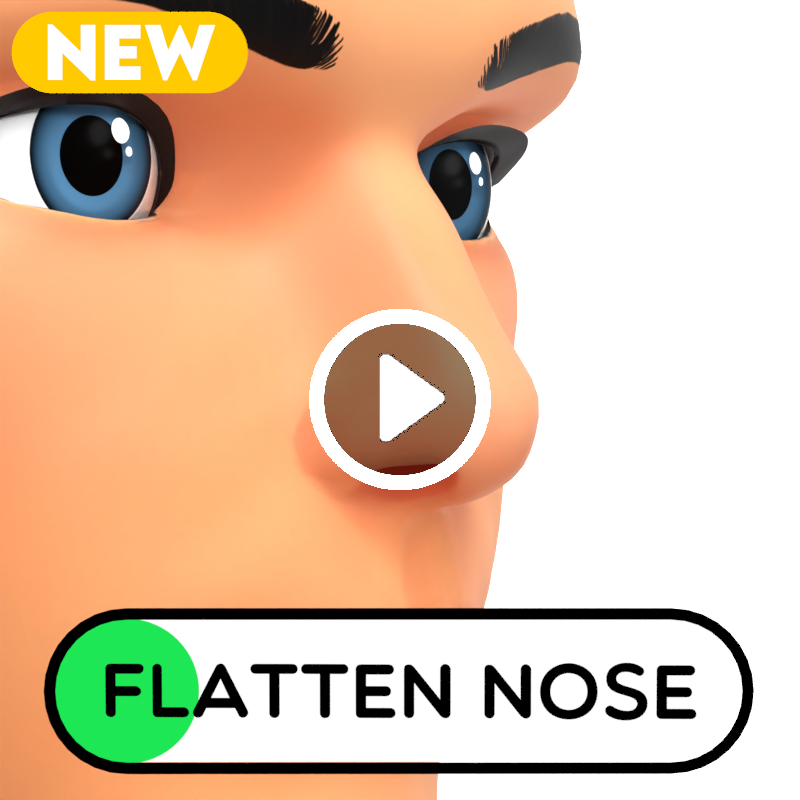
Flatten Nose
This will allow you to flatten the nose for a more Avatar style look, but combine this with the other Nose controls to create some unique variations
Eye Size
Eye Size allows you to change the size of the eyes

Eye Height
Eye Height allows you to change the vertical position of the eyes

Eye Distance
Eye Distance allows you to change the distance between the eyes

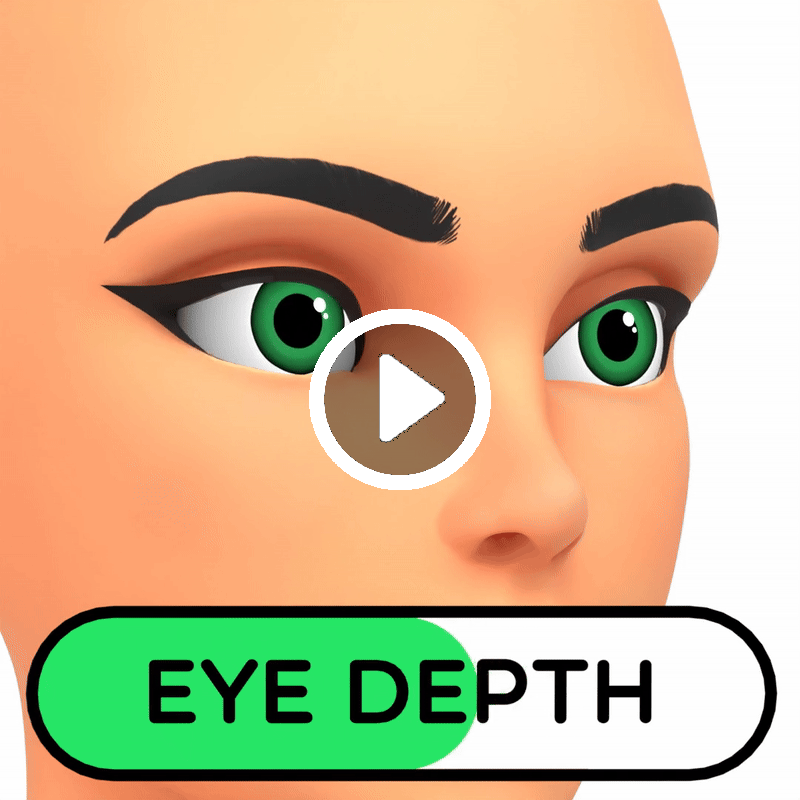
Eye Depth
Eye Depth changes the depth of the eyes
Eye Angle
Eye Angle allows you to rotate the eyes

Monolid
Monolid removes the eyelid crease

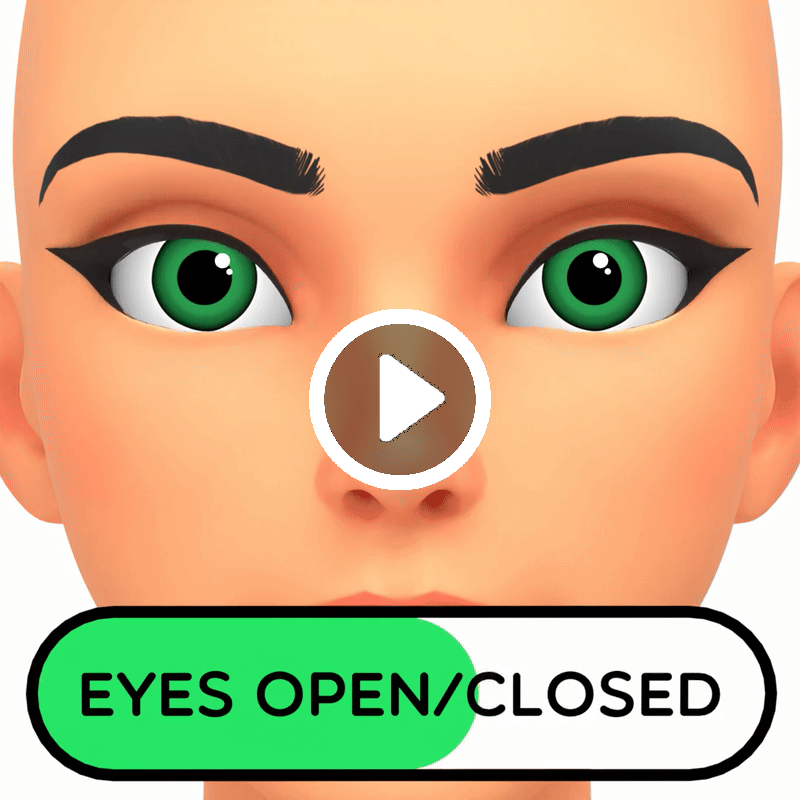
Eyes Open/Closed
Eyes Open/Closed allows you to open/close the eyes. This overrides the Rig controls, so to animate or pose, you need to remove the Constraints on the eyelid bones
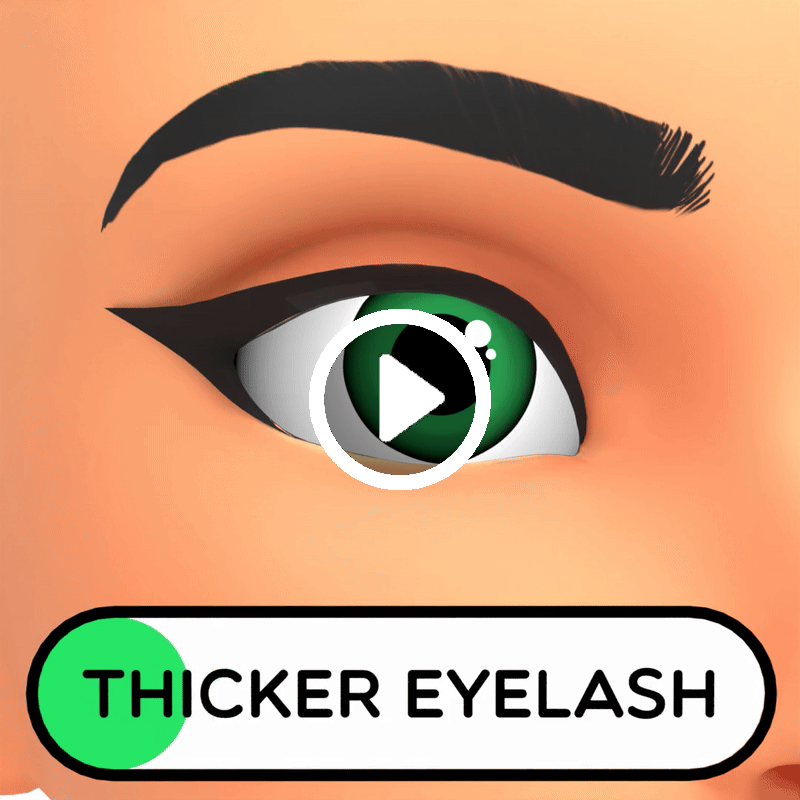
Thicker Eyelash
This will make the eyelash slightly thicker
Remove Eyelash Point
This will remove the Point from the Eyelash

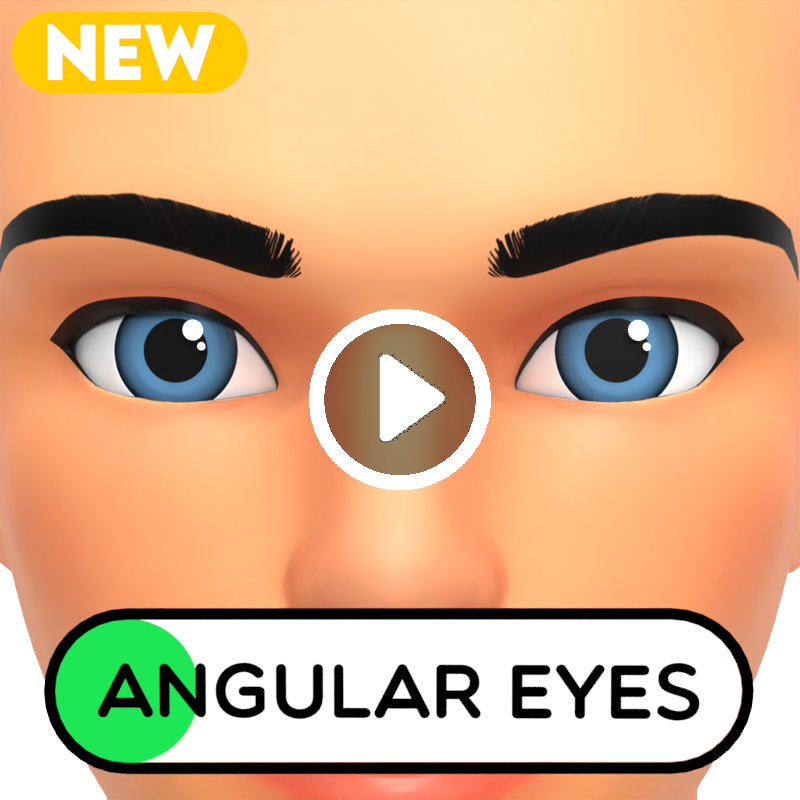
Angular Eyes
The Angular Eyes slider will give your character sharper eyes which is useful for more intimidating characters.
Brow Depth
Brow Depth changes the depth of the brow

Brow Width
Brow Width allows you to change the distance between the eyebrows

Brow Height
Brow Height changes the height of the brow

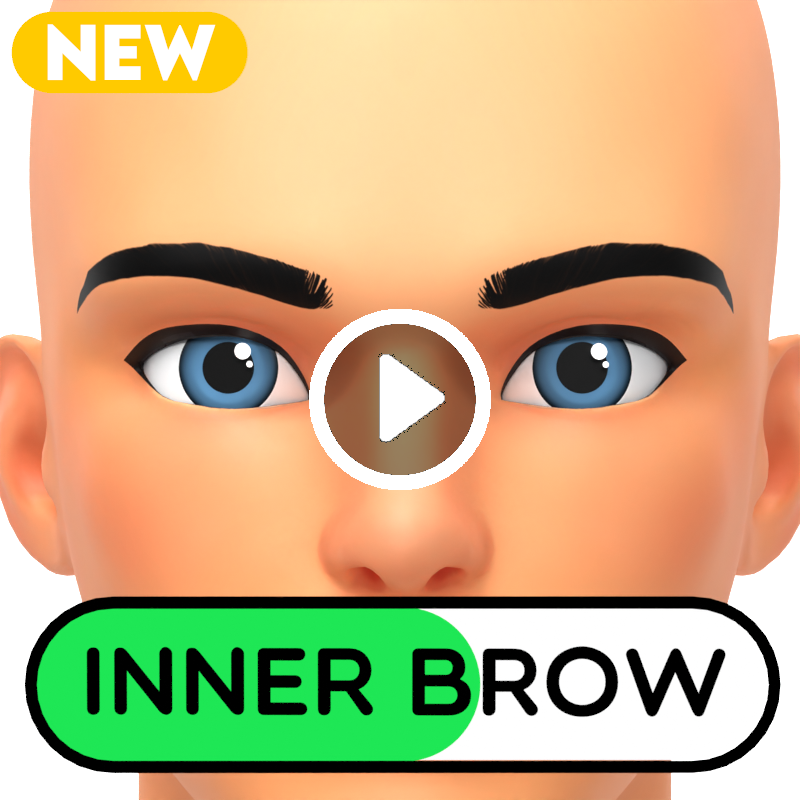
Inner Brow
The Inner Brow controls allow you make more Angry or Sad looking characters, as sometimes people’s eyebrows just naturally sit in different ways.
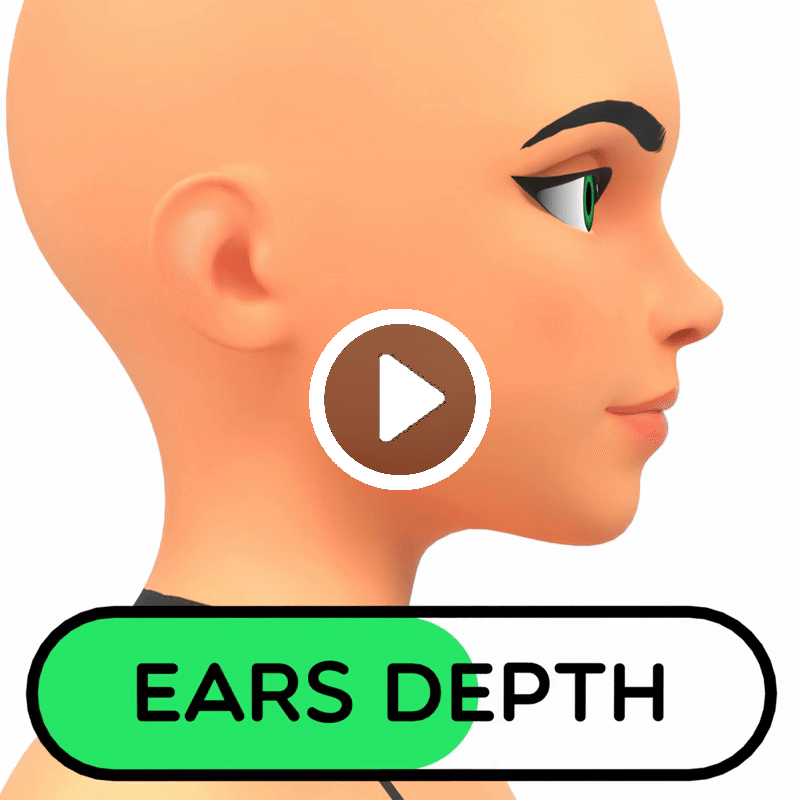
Ears Depth
Ears Depth changes the depth of the ears, bringing them either closer to or further away from the face
Ears Height
Ears Height changes the height of the ears

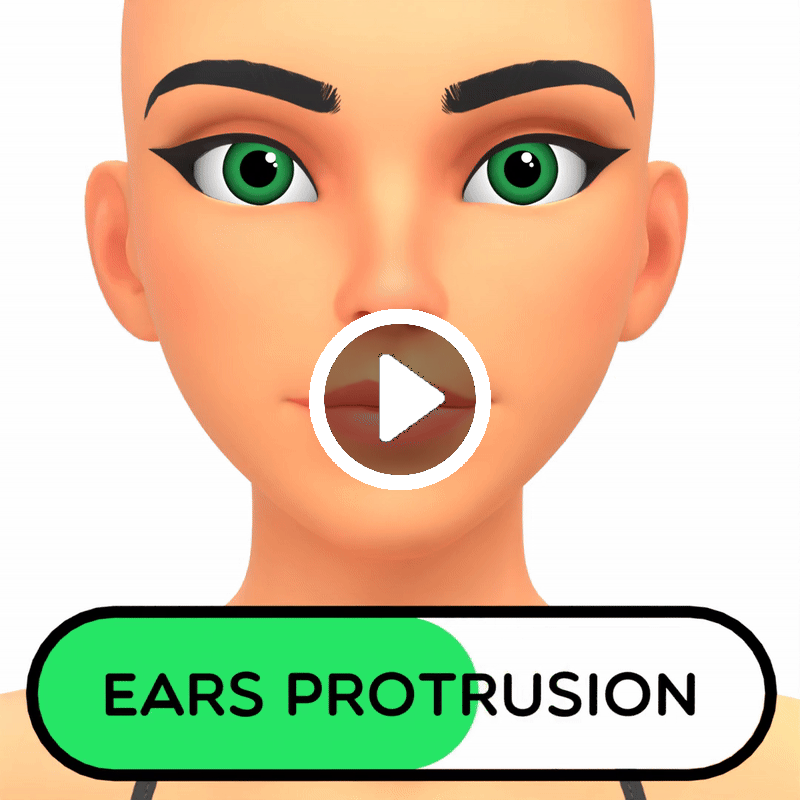
Ears Protrusion
Ears Protrusion will change the protrusion of the ears, either laying them more flat or making them stick out
Ears Size
Ears Size will change the size of the ears

Ears Forward Tilt
Ears Forward Tilt controls the side rotation of the ears

Ears Tilt
Ears Tilt will tilt the ears outwards

Lobe Size
Lobe Size allows you to control the Size of the Ear lobes, useful for creating older characters.

Pointy Ears
Pointy Ears allows you to create some more fantasy style characters

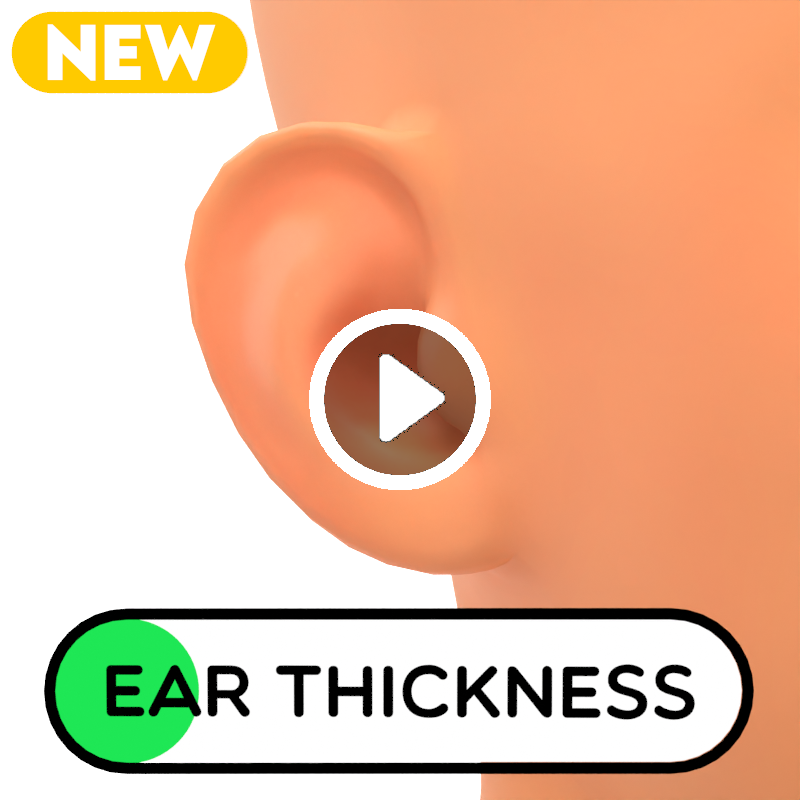
Ear Thickness
Ear Thickness allows you to thicken the edges of the ears to create softer ear shapes.
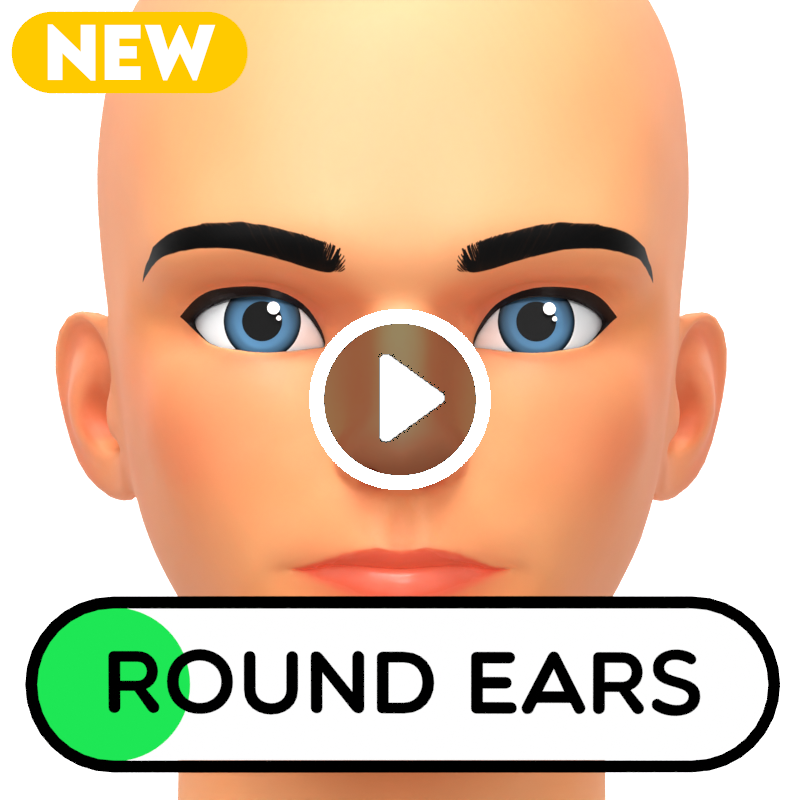
Round Ears
Round Ears will round the ears slightly creating more circular shape
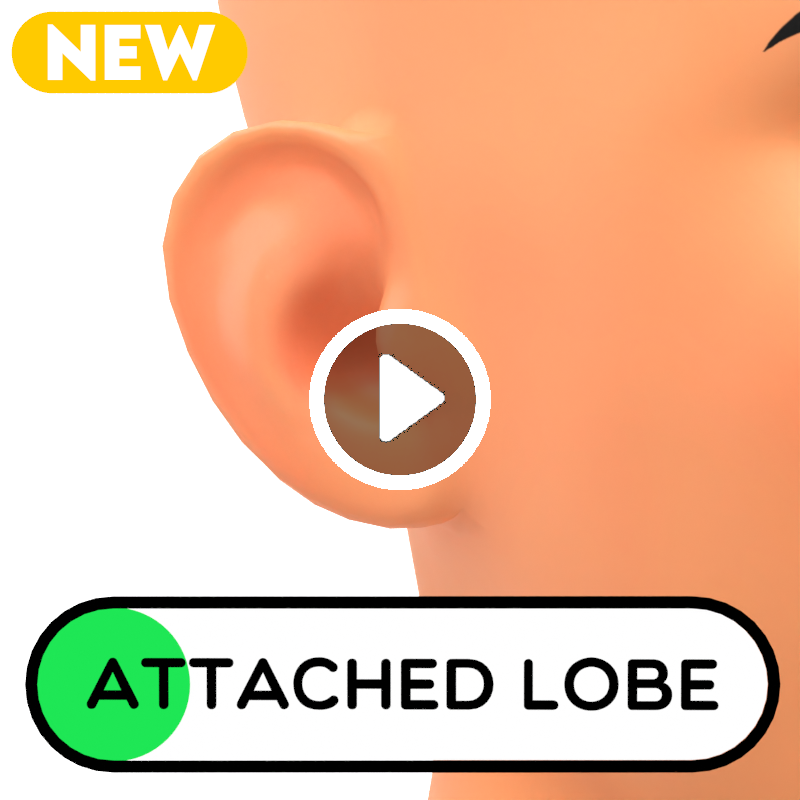
Attached Lobe
Ear Thickness allows you to thicken the edges of the ears to create softer ear shapes.
Skins
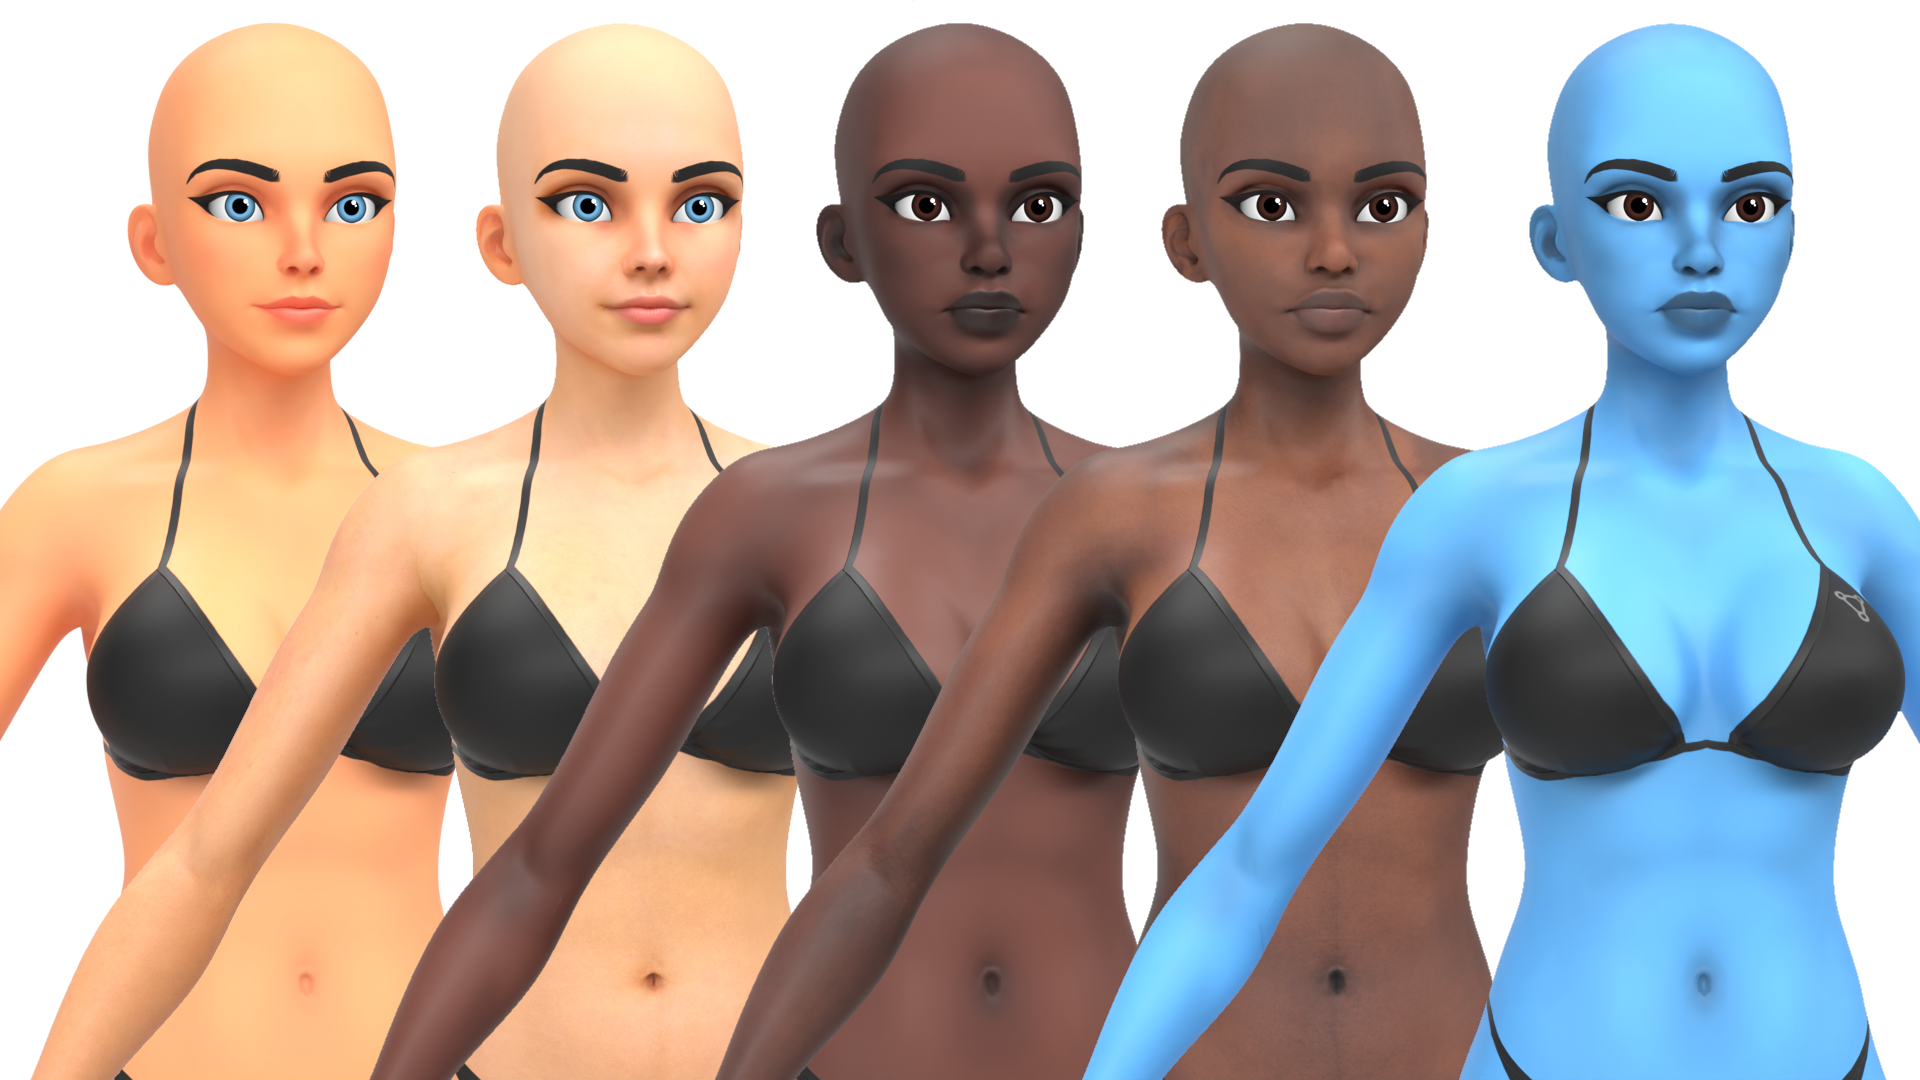
The Skins Menu lets you change the character’s skin texture. There are 4 skin textures to choose from: Caucasian, Black, and realistic versions of each. In addition to these, there is a Coloured Skin option that allows you to choose any skin colour using a colour wheel.
You can also Randomise the Skin. If the Coloured Skin option is selected during randomisation, it also chooses a random colour. At any time, you can Reset the skin to its default state.
If you want to work on multiple characters, you can duplicate both the mesh and rig using Shift + D. By default, duplicated characters share the same materials, meaning changes to one will affect all linked characters. To give each character their own unique skin, use the Make Unique Materials button. This separates the materials so each character can have independent skin textures and colours.
The Make Unique Materials button will also allow you to change the Eyebrows, Makeup and Clothes separately as these are all part of the Skin material.
Eyes
The Eyes section lets you customise your character’s eye texture. You can adjust the colour of each part of the eye individually, Sclera, Iris, and Pupil, allowing for a wide range of eye designs.
You can Randomise the eyes to quickly generate new variations. This will randomly choose between Toon, Realistic or Snake eye textures, enable or disable the Iris or Pupil, and generate random colours for each part of the eye.
The Iris and Pupil can be enabled or disabled using their respective buttons. You can also use the colour wheels to choose the colour of each part of the eye separately.
Like the Skin materials, eye materials are shared when duplicating the mesh and rig. If you want characters to have independent eyes, use the Make Unique Eye Materials button to separate them so each character’s eyes can be edited individually.
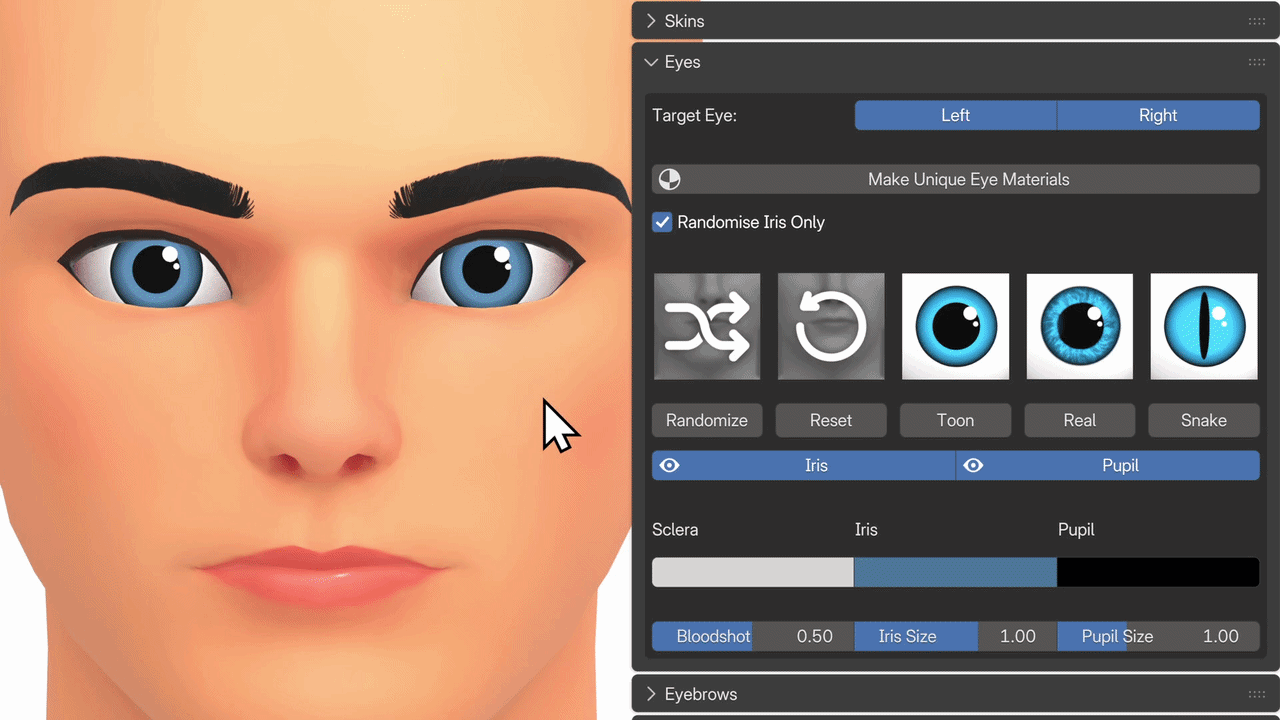
New in v2.1 is the ability to add bloodshot eyes, and change the size of the Iris and Pupil for an even greater range of styles.
You can also now have two completely different eyes. At the top of the menu, you can select which eye you want to change. If both eyes are selected, the eyes will be synced, but if you only select one of the eyes, now any changes you make will only apply to that eye.
Eyebrows
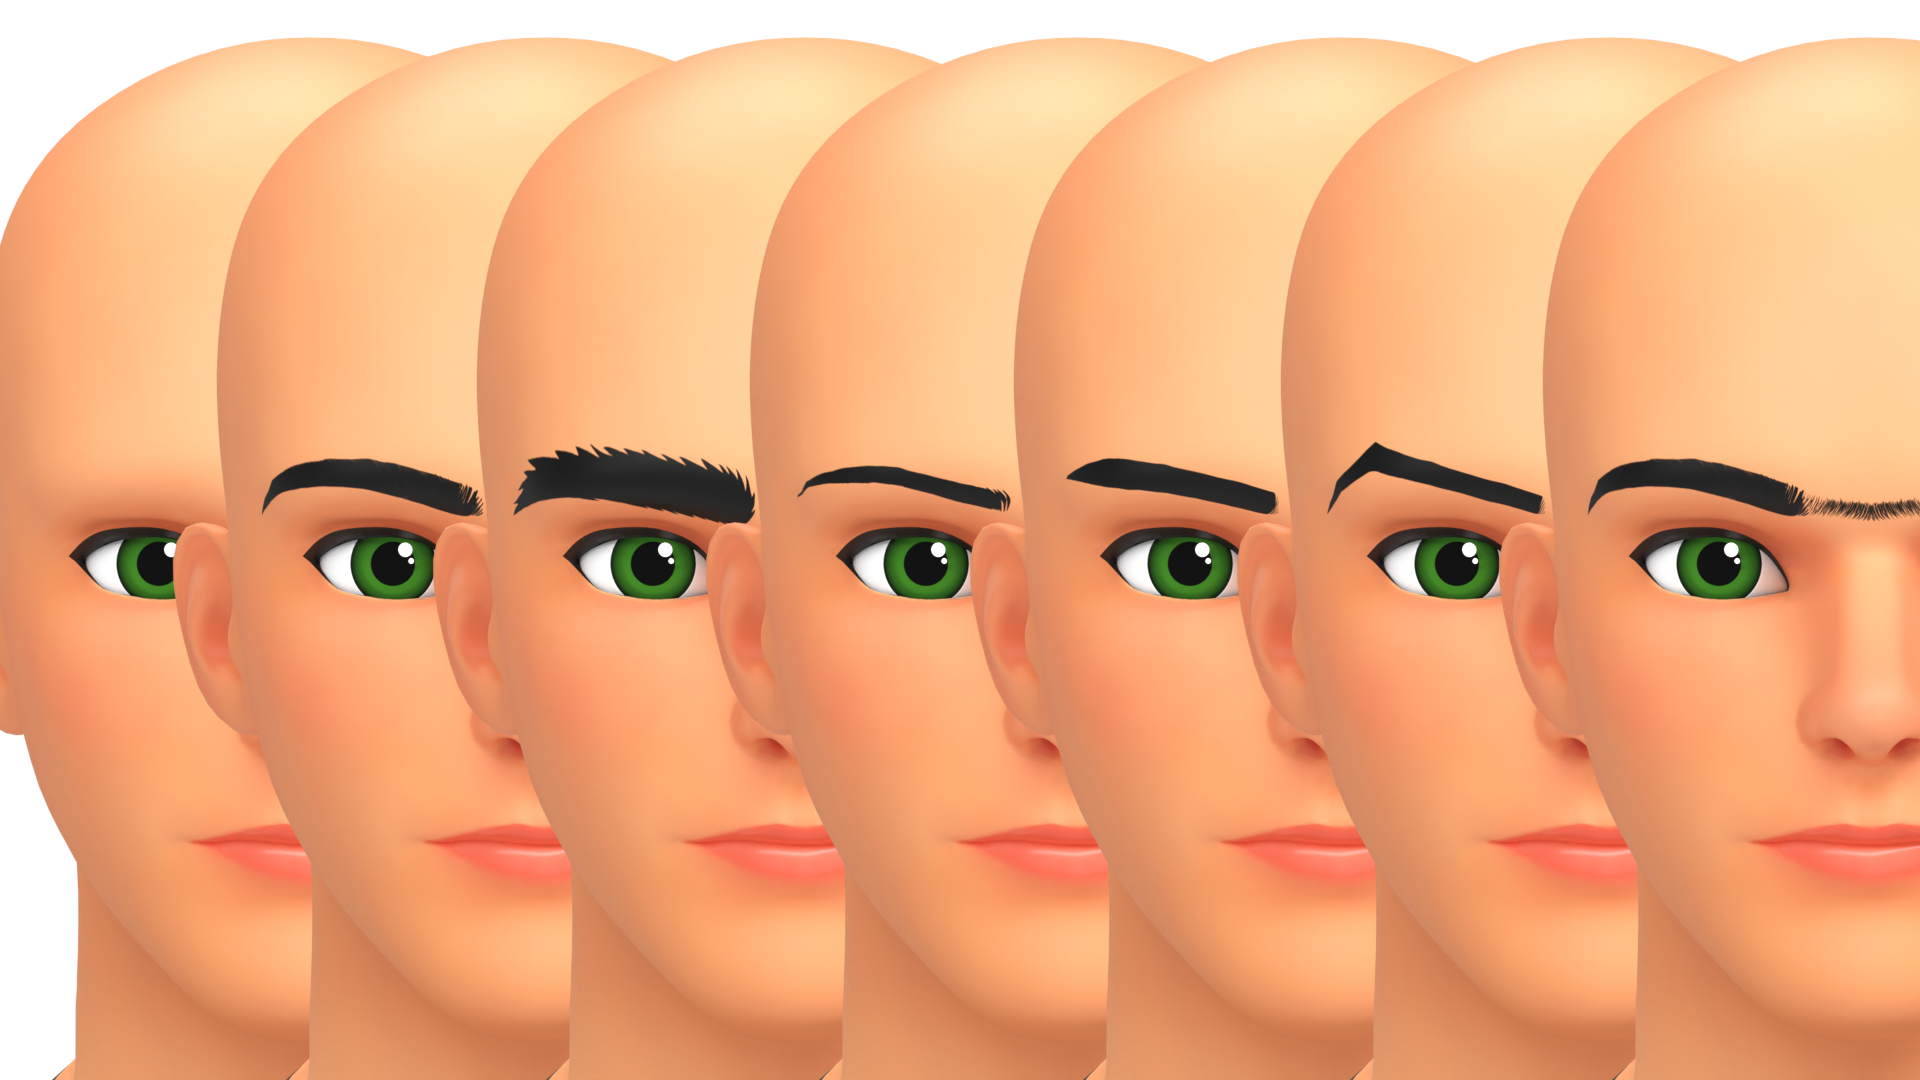
The Eyebrows section allows you to change the character’s eyebrow style. There are 7 different eyebrow textures, as well as an option for no eyebrows. Eyebrows play a huge role in character design, so trying out different eyebrow styles can be helpful when designing characters.
You can now also change the colour of the eyebrows.
You can Randomise the eyebrows and this will choose one of the 8 eyebrow options.
Eyebrows are part of the Skin material. If you duplicate the character or rig and have already made the Skin material unique, you do not need to make it unique again to edit the eyebrows. A unique Skin material allows you to independently modify the skin, eyebrows, makeup, and clothing for each character.
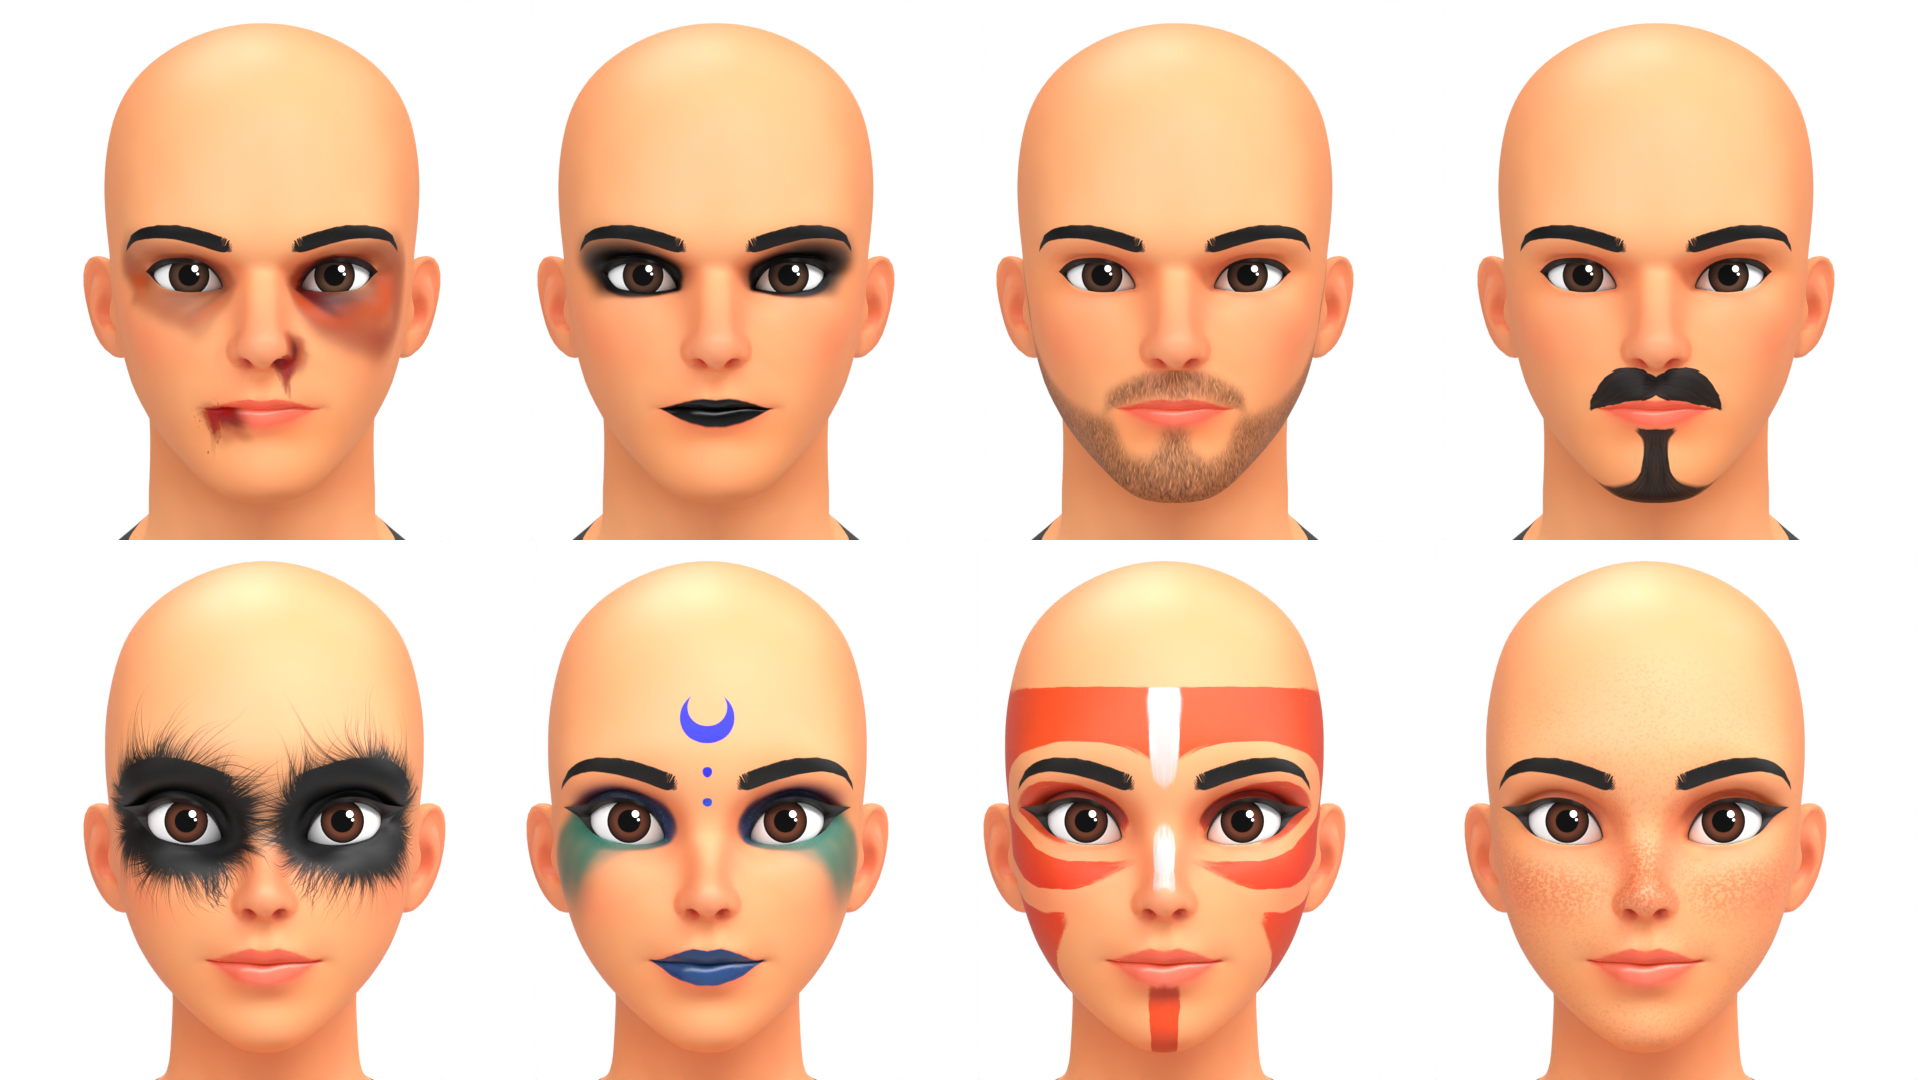
Overlays
The Overlays section (previously Makeup) allows you to change the character’s body or face overlay. There are 25+ different overlays. The Body Overlays range from simple Freckles, to Scars, to some Tattoos. The Face overlays range from different Makeup styles to different Facial Hair styles.
You can Randomise the Overlays to select one of the options at random.
Makeup is part of the Skin material. If you duplicate the character or rig and have already made the Skin material unique, you do not need to make it unique again to change the makeup. A unique Skin material allows you to independently modify the skin, eyebrows, makeup, and clothing for each character
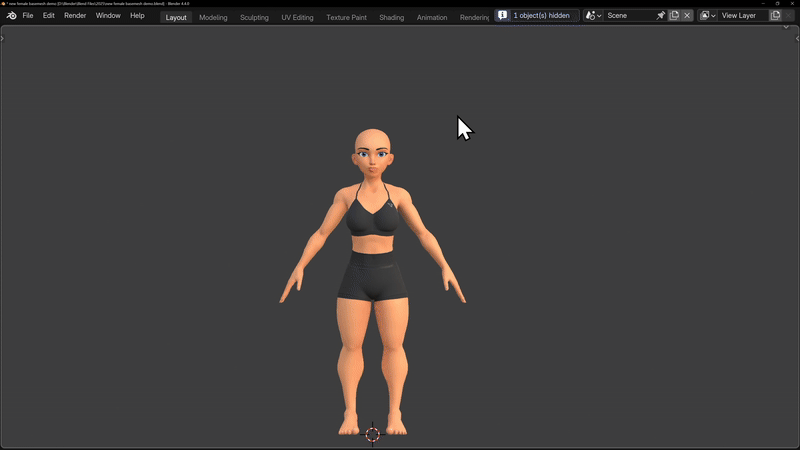
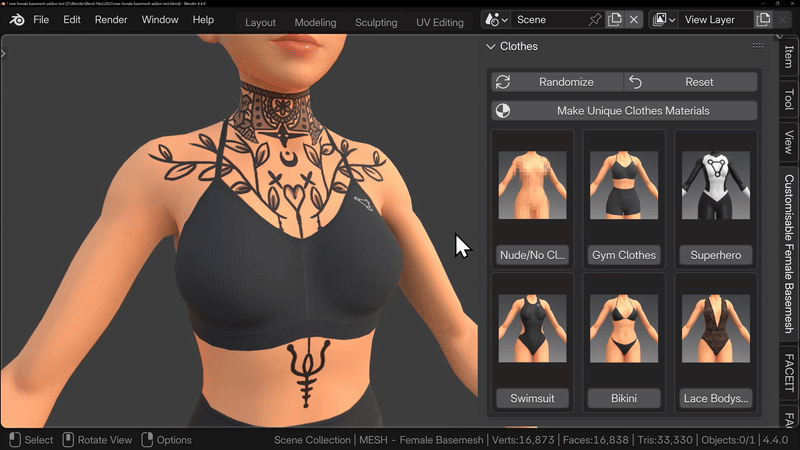
Clothes
The Clothes section allows you to change the character’s clothing. There are 7 clothing options, as well as a nude option. The clothing options are designed to provide a simple, neutral outfit, which can be helpful when working on things like hair, outfits, or weapons, because sometimes a fully nude model can be distracting.
You can Randomise the clothing, which will choose one of the clothing options. The Nude option is intentionally excluded from randomisation, so when randomising the entire character you won’t unexpectedly end up with a nude model.
When Resetting, the Female character will default to the Gym Clothes, and the Male character will default to the Gym Clothes W/ Shirt.
Clothing is part of the Skin material. If you duplicate the character or rig and have already made the Skin material unique, you do not need to make it unique again to change the clothes. A unique Skin material allows you to independently modify the skin, eyebrows, makeup, and clothing for each character.
Importing into Other Scenes
If you want to use the Customisable Female Basemesh in a new or existing Blender file, you can do this by appending it.
In your new file, go to File > Append and locate the Customisable Female Basemesh BLEND file.
Double-click it to view the contents, then open the Collections folder and append the Customisable Female Basemesh collection.
The first thing we need to do is hide all of the Widgets.
Rigify generates all of these Widgets and unfortunately it needs to import them, but in the outliner we can click the checkbox beside the Widgets collection and this will hide them.
Now, assuming you’ve installed the addon, you can customise the character as normal, you can adjust proportions, change materials, and use the rig for posing and animation.
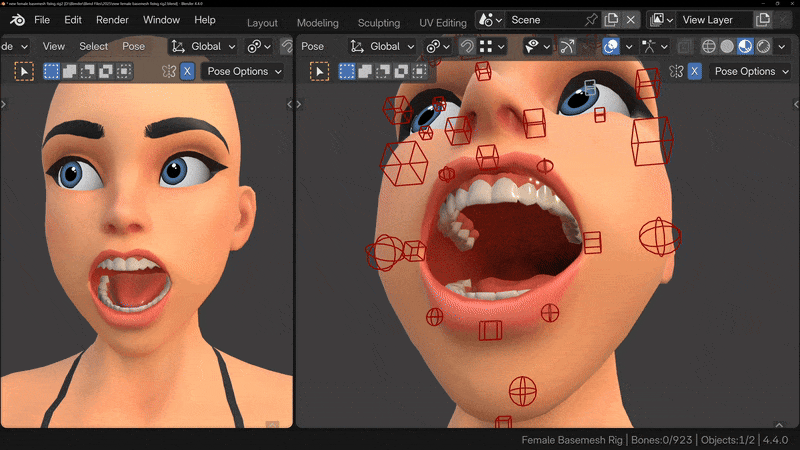
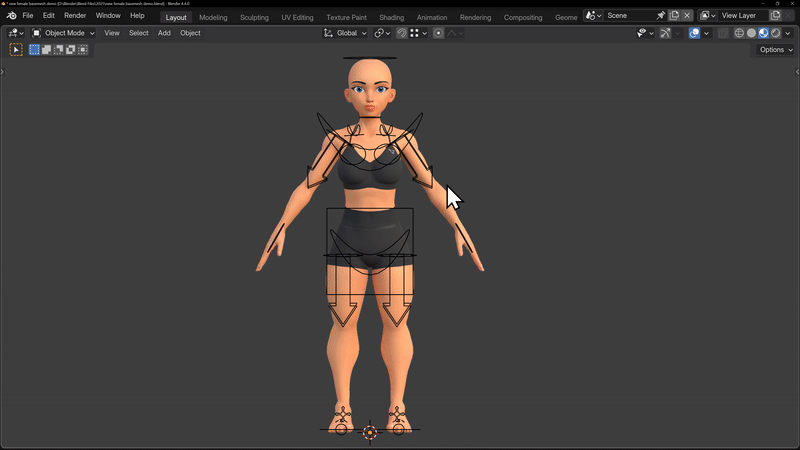
Using the Rig
The rig you see here is Blender’s built in Rigify rig. This gives us access to a wide range of controls that allow us to pose and animate the character efficiently.
With the rig selected, enter Pose Mode using the dropdown in the top left corner of the viewport. To access the Rig Layers, open the Item tab on the right hand side of the viewport. This menu allows you to toggle the visibility of different parts of the rig, making it much easier to focus on specific areas.
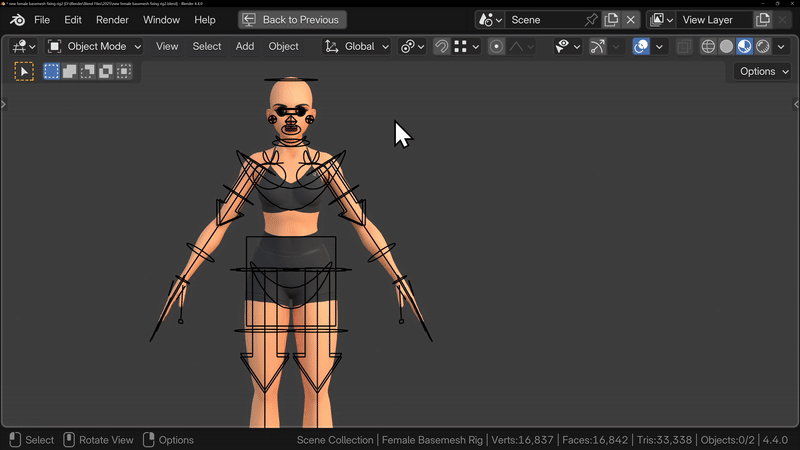
To start off, I’d recommend enabling only the Torso, Arms, and Legs layers. This lets you block in your main pose without getting distracted by smaller details. Later on, you can focus on things like fingers or the face, and Rigify makes switching between these very straightforward.
To pose your character, simple select any of the controls and move, rotate or scale them to see what they do. The best way to learn how to use a Rig is to play around with it.
To pose the arms, select the hand bone and move or rotate it. You should automatically see the arm bend. If the arm isn’t bending in the right direction, you can rotate the arrow on the arm. This same logic applies to the legs.

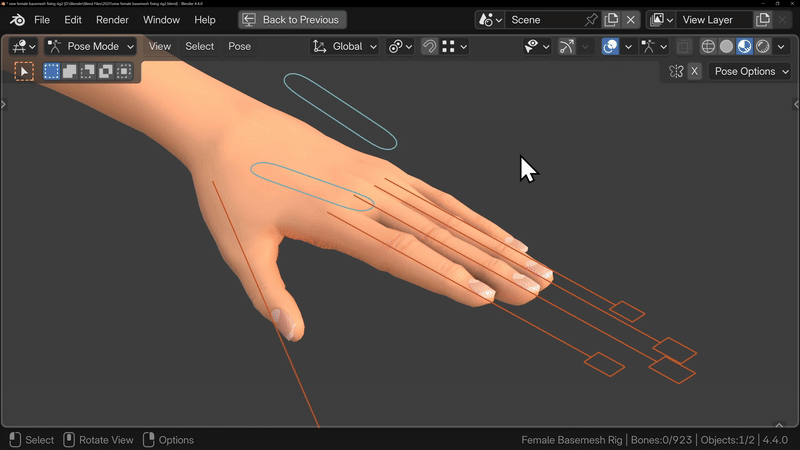
To pose the fingers, use Rigify’s finger controls. With the finger controls selected, you can press R X X to rotate the bones along the axis of the finger. To curl the fingers, you can then scale the controls. Make sure your Pivot Point is set to Individual Origins, as this allows each finger to scale along its own axis.
To pose the thumb, follow the same process, rotate and scale the thumb control, and now your character’s hand is in a fist.
To pose the face, start by enabling the Face bone layer. This gives you access to the basic face controls. To change where the eyes are looking, simply move the eye look-at bone. If you want to open the mouth, rotate the Jaw bone on the X axis. You can then use the circular control around the mouth to adjust the shape of the mouth. Scaling along the X axis will make the mouth narrower or wider, but you can also move, rotate, and scale this control to create different expression.
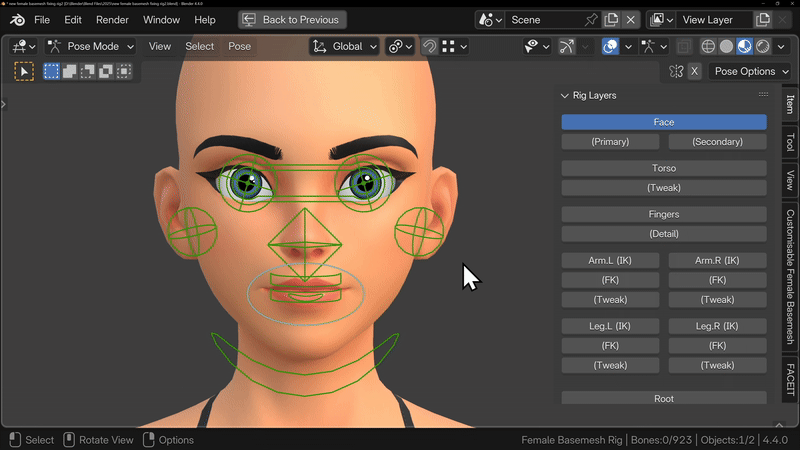
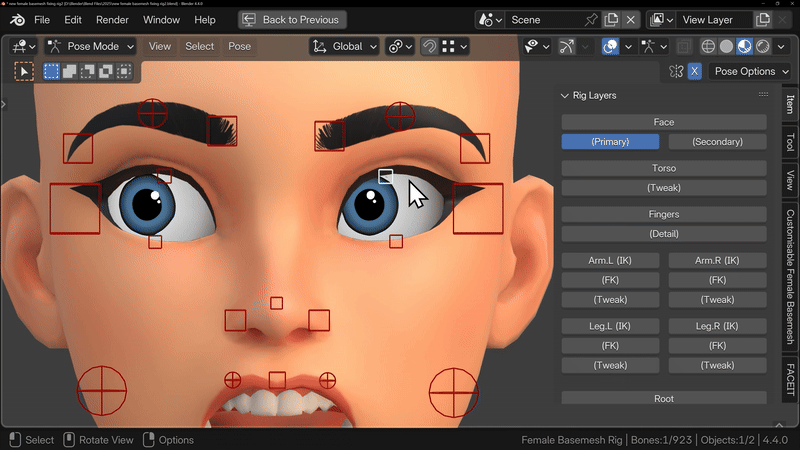
Once you have a basic expression in place, you can add more detail by enabling the Primary bone layer. This unlocks additional facial controls such as eyelids, eyebrows, nose, and lip controls. Most of these can be moved, rotated, or scaled, so take some time to experiment and see how each control affects the face.
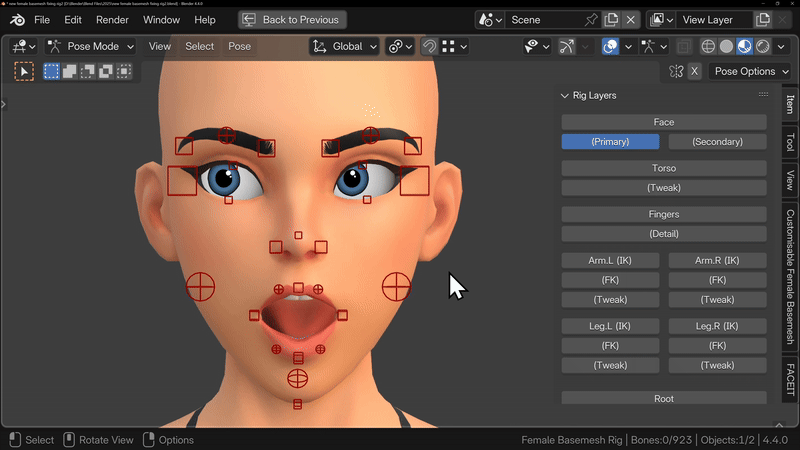
To make the character blink, move the eyelid bones downward on the Z axis. If the eyelids don’t respond correctly, return to the Female Basemesh addon menu and make sure the eyelids are set to Manual mode, which allows them to be posed directly.
When posing the lips, just make sure that the lips follow the shape of the teeth. Sometimes when posing, the expression might look off because the lips are too far away from the teeth.
If you’d like to explore everything Rigify is capable of, I’d recommend looking up some dedicated Rigify tutorials, because it can do a lot more than what I’ve shown here.
Editing The Model
If you’re happy with the changes you’ve made using the sliders, you may want to take the character further and make more specific edits. There are a few different ways to do this, depending on how you plan to use the model.
Adding a New Shape Key
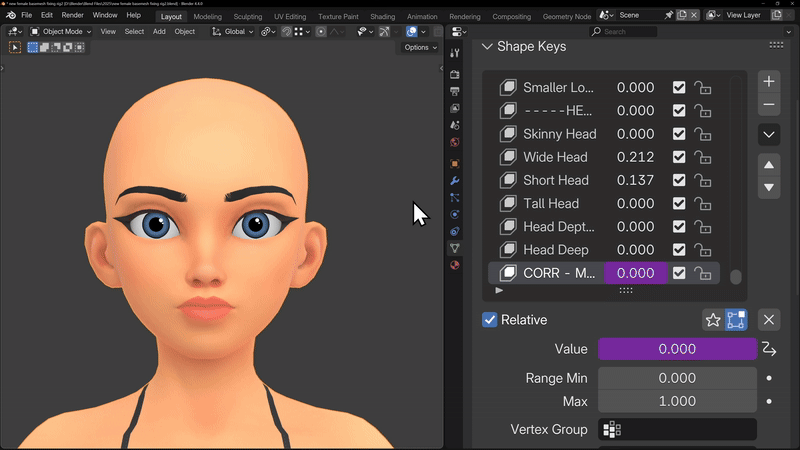
If you want to keep the sliders and retain the ability to adjust proportions, the best approach is to add your own shape key on top of the existing system.
With the mesh selected, go to the Object Data tab (the green triangle). Here you’ll see all of the shape keys that control the character’s proportions. To add a new one, click the + button. This will create a new shape key, in this case Key 122.
Set the value of this new shape key to 1, and you can now freely edit the model in Edit Mode or Sculpt Mode. Any changes you make will be stored in this shape key, and you can control the strength of those changes at any time using the shape key slider.
This approach allows you to continue using the addon as normal. However, depending on how extreme your edits are, some sliders may behave differently or produce unexpected results.
Static Sculpt (Applying Everything)
If you plan to use the character as a base for sculpting, detailing, or 3D printing, you may prefer to simplify the setup by removing the rig and all shape keys.
To do this, right click the mesh and choose Convert > Convert to Mesh. This applies all of the current shape key and proportion changes directly to the geometry.
NOTE: Once this is done, the addon will no longer function, as it uses the shape keys to adjust the proportions.
Next, with the mesh selected, press Alt + P and choose Clear Parent and Keep Transformation. This detaches the mesh from the rig while keeping it in the same position. You can now safely delete the rig if you want.
At this point, the character is a clean, static mesh. You can switch to Sculpt Mode and add extra detail such as skin folds, wrinkles, or any other refinements without worrying about rigs or sliders.
Posing your new character
If you want to start posing your new character, the best approach is to regenerate the Rigify rig using the metarig. This will bake the new proportions of your character as the default pose for the new rig, allowing you to pose correctly.
Start by leaving your character in an A Pose. Right-click the mesh and choose Convert > Convert to Mesh. This applies all current shape key changes directly to the geometry and removes the shape keys.
Adjusting the Metarig
Next, open the Outliner and make sure the metarig is visible. The metarig is Blender’s base rig that Rigify uses to generate the final control rig.
Depending on how extreme your proportion changes were, the metarig may roughly match the character, or it may be too large or too small. Your goal is to align the metarig to the character’s new proportions.
Select the metarig and enter Edit Mode. Move and scale the bones so they line up correctly with the character.
For areas like the hands, you can select all of the hand bones together and move or scale them as a group until they fit.
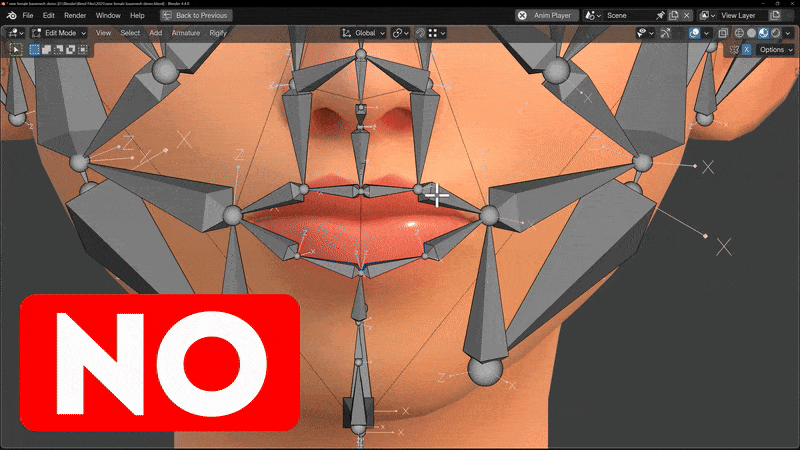
The Tricky Part: The Face
The face is the most sensitive area. Rigify is very strict about bone connectivity, especially where multiple bones meet.
In Rigify face rigs, several bones share the exact same head or tail position. These are bones that branch from a single joint. It’s very easy to accidentally move a bone which move the head or tail and it breaks that connection.
When adjusting the face:
Make sure bones that are meant to meet at a single point still share the exact same head or tail position
For example, cheek bones should connect cleanly to the mouth bones, and upper lip bones should connect to the nose
Always move bones by selecting their head or tail, not the bone body
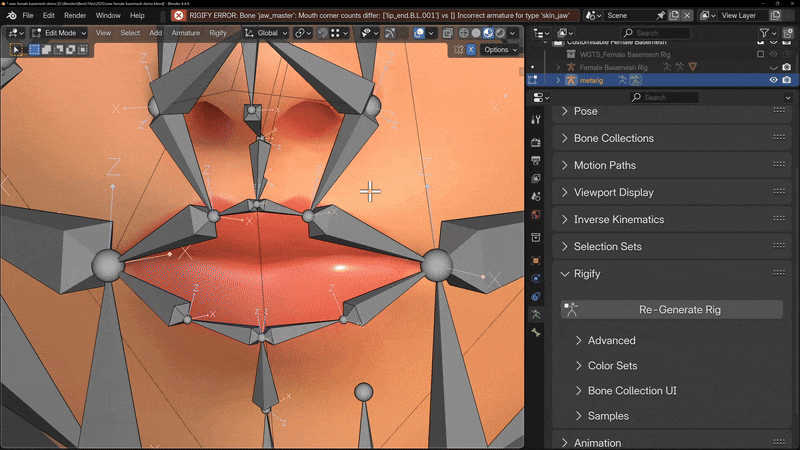
Regenerating the Rig
Once the metarig is aligned, go to the Rigify properties and click Generate Rig.
If you encounter an error, it is often caused by face bones, especially the upper lip bones no longer sharing the same position.
To fix this:
Select the metarig and enter Edit Mode
Select the heads (or tails) of the upper lip bones that should meet
Press S > 0 to scale them to the exact same point
If the error persists, repeat this process for any other clusters of face bones that should converge at a single point.
Reparenting the Mesh
Once the rig is generated successfully, you can reattach the mesh:
Select the mesh
Shift-select the rig
Press Ctrl + P
Choose Parent With Empty Groups (the model already has vertex groups)
Your character is now fully rigged again, but without shape keys. You can now pose and animate the character as normal using the regenerated Rigify rig.
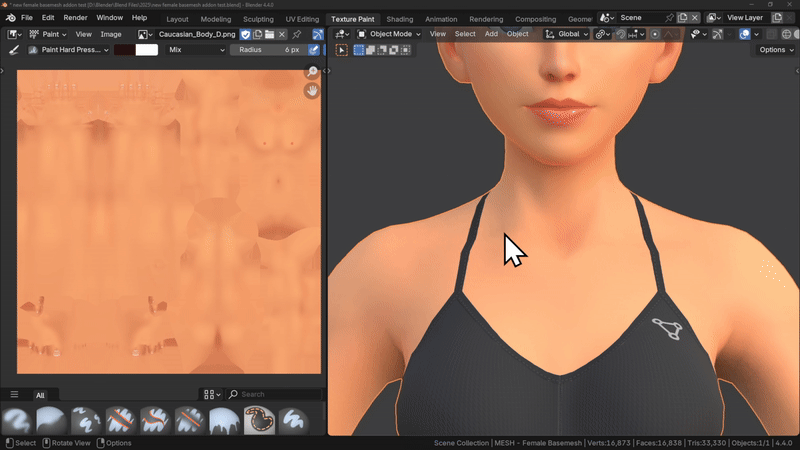
Editing The Textures
You can easily edit the model’s textures to add tattoos, scars, or any other custom details you’d like.
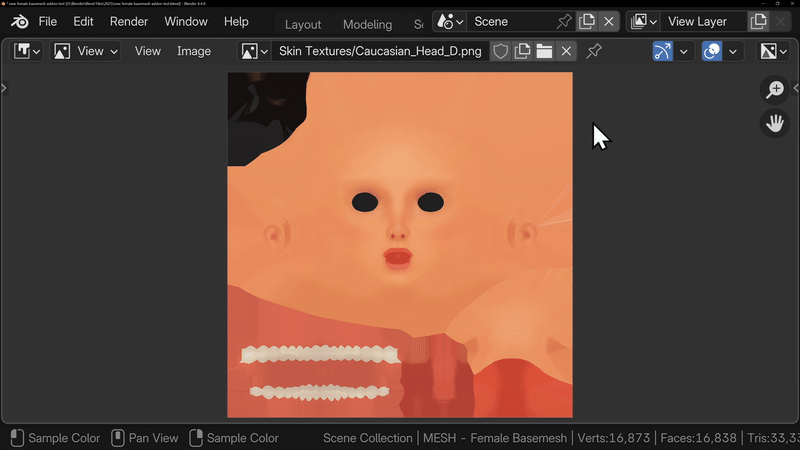
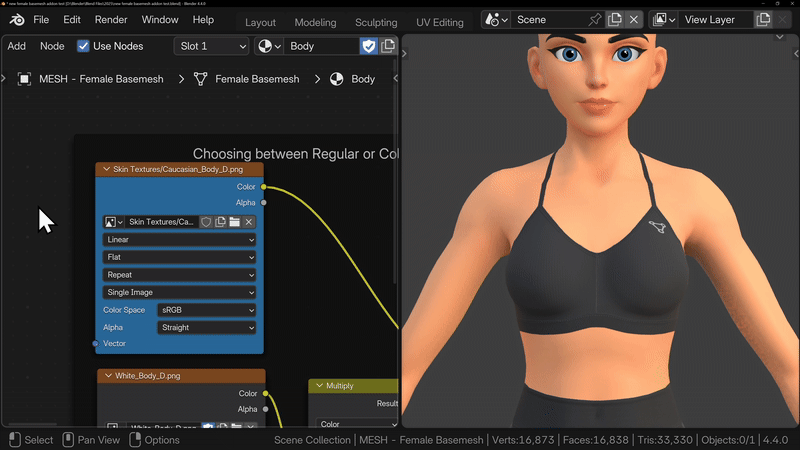
To do this, start by opening the Image Editor and locating the currently active Skin Textures. These will be labelled something like Skin Textures/Caucasian, Black, etc. From here, find the texture you want to modify, in this example, we’ll use the Caucasian Body texture.
With the Skin Textures/Caucasian_Body texture selected, all we need to do is rename the image. This creates a separate version of the texture that we can safely edit. I’ll rename it Example Body, and then make sure to save the image. Be sure to click Save As, otherwise you’ll overwrite the original texture.
When you click Save As, Blender will automatically place you in the textures directory inside the addon folder. I’d recommend saving your custom textures in a separate folder just to keep things organised. Also, make sure the file name is not left as “Caucasian_Body” or “Head”, as this can cause confusion later when editing or swapping textures.
Now we can start Texture Painting.
First, switch to Edit Mode, and with nothing selected, hover over the skin and press L. This selects only the skin, and it will act as a mask for texture painting so that the eyes and teeth aren’t affecting things.
Next, switch into Texture Paint Mode. You’ll notice that the eyes are now greyed out, and this confirms that you’re only painting on the skin.
At the top of the screen, make sure you’ve selected the correct texture to paint on. Click the image icon and choose your custom image texture. This tells Blender exactly which texture you want to paint onto.
At this point, you’re free to paint on the skin however you like. For this example, I’ll just add some simple tattoos, but you can take your time and add as much detail as you want.
You can do all of this directly in Blender’s Texture Paint mode, or you can bring the saved textures into external software like Substance Painter if you want more advanced tools and control.
If you’re painting inside Blender, make sure to save your image regularly, as crashes can happen and it’s easy to lose progress if the image hasn’t been saved.
You can still use the addon menu to adjust the character as normal. The Eyebrows, Makeup, and Clothes are all layered on top of the skin texture, so they’ll work correctly.
Just be aware: if you click any of the Skin buttons, the original textures will be reloaded. If that happens, you’ll need to go into the Shader Editor and reassign your custom texture. In the Shader Editor, locate the blue Image Texture node and swap it back to your custom image.
Multiple Characters
If you’d like to have multiple characters in your scene interacting with one another, this is very easy to do.
First, select both the female basemesh and its rig, then press Shift + D to duplicate them. You can move the duplicated character off to the side to keep things organised.
To modify a character, simply select the mesh or rig you want to work on. The addon will only adjust the proportions of the currently selected character. If you want to make changes to a different character, just select that character instead.
Materials and Making Them Unique
By default, duplicated characters share materials. This means changes to skin, eyes, makeup, or clothes will affect all characters using that material.
If you want characters to have independent materials, click the Make Unique Materials button in any of the material sections (Skin, Eyebrows, Makeup, Clothes)
This will make the Skin material unique, allowing you to change colours and textures independently. You can also click Make Unique Eye Materials to change eye colours separately for each character.

Posing Multiple Characters
To pose your characters at the same time, Shift-click to select all of your rigs, then enter Pose Mode. You can now pose each character independently.
So, all you need to do to edit any of the characters is select the one you want to work on, then use the addon as normal and the correct mesh and materials will be updated automatically.
Troubleshooting/FAQ
I can’t open the file, Blender keeps crashing
The Customisable Female Basemesh is only compatible with the newest version of Blender (or some older versions, check the compatibility section). If you open it in an older version of Blender, Blender will crash.
So if you double click the Female Basemesh file and Blender immediately crashes, it’s because you are using an incompatible version of Blender.
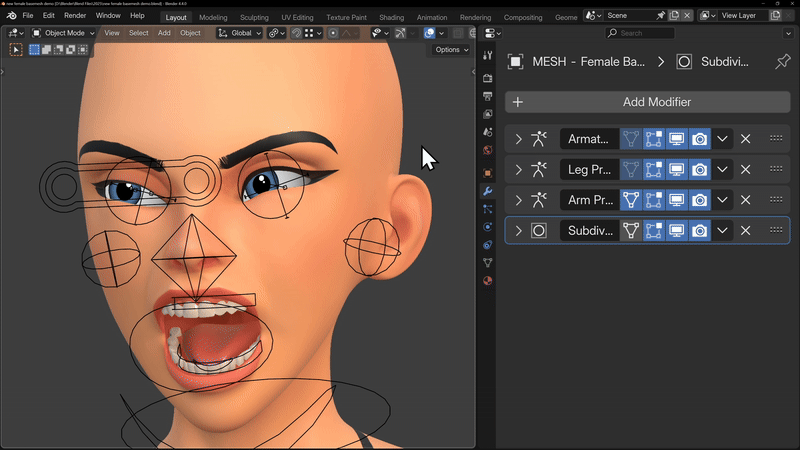
Why are there 3 Armature modifiers?
If you’ve ever rigged a mesh in Blender, you’ll know that Blender uses an Armature modifier to bind the mesh to the bones.
In this setup, multiple Armature modifiers are used intentionally.
Additional Armature modifiers, combined with Vertex Groups and Preserve Volume enabled, allow specific areas of the body, such as the shoulders, hips, and butt to maintain their volume during deformation.
This prevents those areas from collapsing or flattening when the character is posed or animated, resulting in more stable and natural looking deformations.
Why does the rig look broken after customising?
If you pose the character and then change the proportions, especially height or facial features, the model may not look right.
Small adjustments are usually fine, but bigger changes can cause the bones to no longer line up with the mesh, making the character appear broken when posing or animating.
To fix this, you’ll need to reparent the mesh to the armature so the rig realigns with the updated proportions, you can follow the reparenting guide here.
Can I use this character for a game/animation/VTuber/commercial use?
Yes, you can use the Customisable Female Basemesh in your projects as long as you’ve made enough changes to it.
Don’t use the basemesh without making changes to it. However, if you use it as a starting point and add your own hair, clothes, armour, or other custom details, that’s completely fine.
As long as the final character isn’t obviously recognisable as the Female Basemesh, you’re free to use it in games, animations or any other projects.
Changing settings in the addon doesn’t change the model?
If you change settings in the addon menu and nothing happens, it usually means the model isn’t selected.
The addon only works on the currently selected mesh, which allows you to work on multiple characters independently. Just make sure your mesh is selected before adjusting any settings.
I can’t move the mannequin or the sliders
The Customisable Female Basemesh uses a rig to pose the character and control the sliders. A rig is a special type of object in Blender that allows you to move and animate bones.
To pose the character correctly, make sure the rig is selected and that you’re in Pose Mode. You can switch to Pose Mode from the mode dropdown in the top-left corner of the screen, as explained here.